
Archive XL: Item structure explained
More detailed explanations for the guide "Adding new items"
Structural files: telling the game about your mod
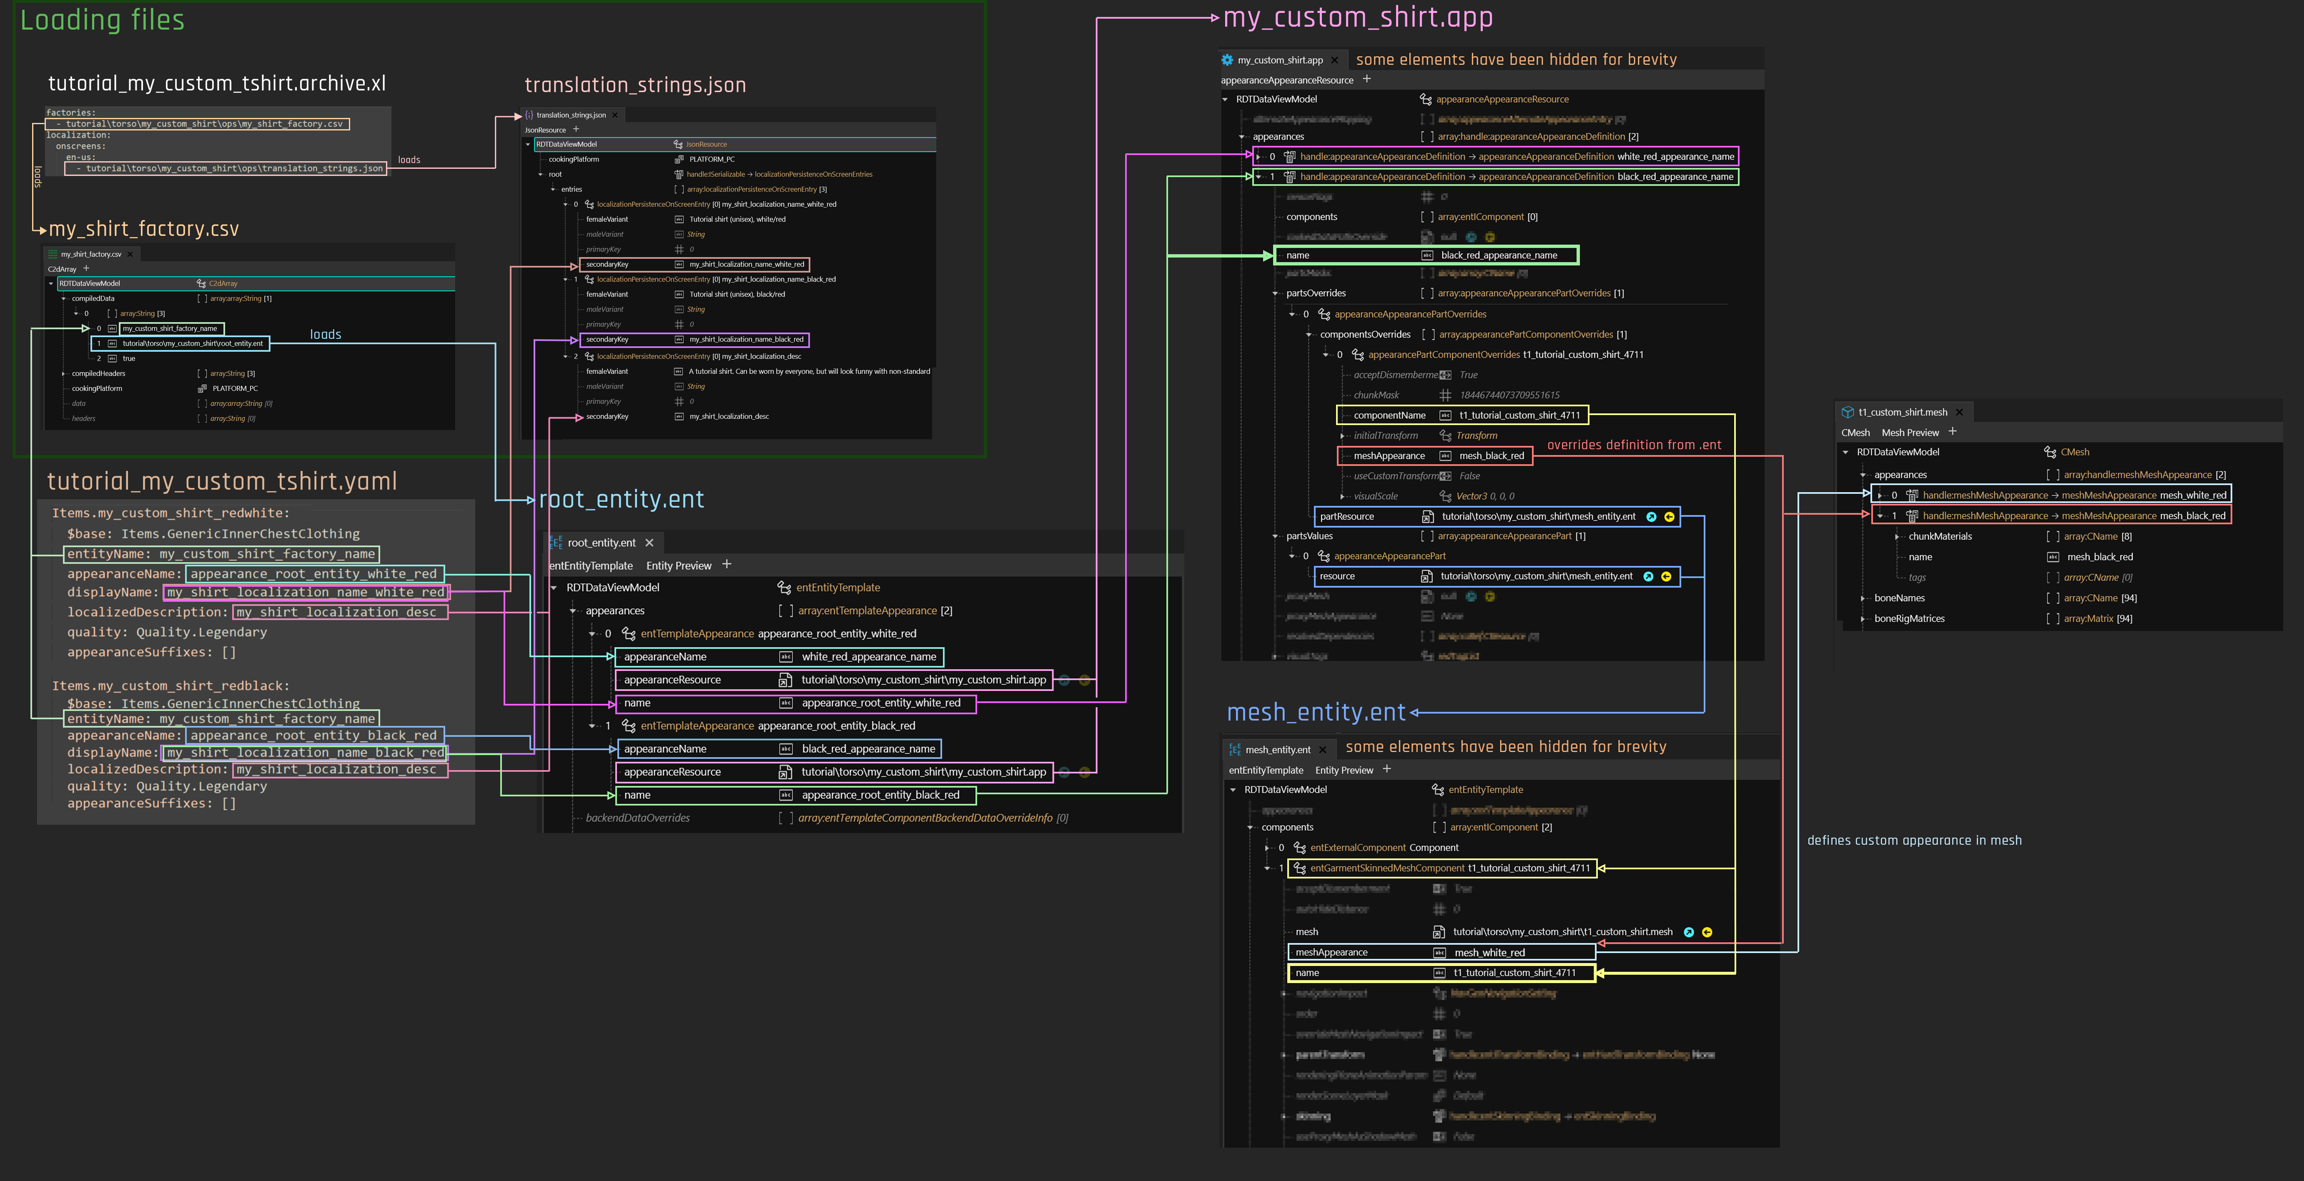
We need four files to tell the game about our new items:
the .xl file, which tells ArchiveXL which files to register
the .json file with the translations
the factory.csv, telling the game about your custom files
the yaml, which tells TweakXL about your item's properties

The .xl file
This file will be in the same directory as your mod's .archive file. It lets ArchiveXL register the factory (my_shirt_factory.csv) and the localization file (translation_strings.json).
You usually touch this only once, unless you want to add more factories or translation files.

The .json file (custom texts, i18n)
This is the localization file for language-specific entries (green boxes on the xl file's screenshot). If no entry for a language is defined, then the English one will be used.
An entry will look like this:
The value under secondaryKey must match the entry in your .yml file, or you will just see an empty string.
If you don't need a male-specific translation, you can leave it blank — by default, femaleVariant will be used.
The .csv file (the factory)
The factory connects your .yaml to the corresponding rootEntity.ent via entity_name.
When reading your .yaml file (e.g.tutorial_my_custom_tshirt.yaml, next section), the game will find entries like this:
When spawning an item, TweakXL knows which entity file to use by filtering entityName for a match in the first field:
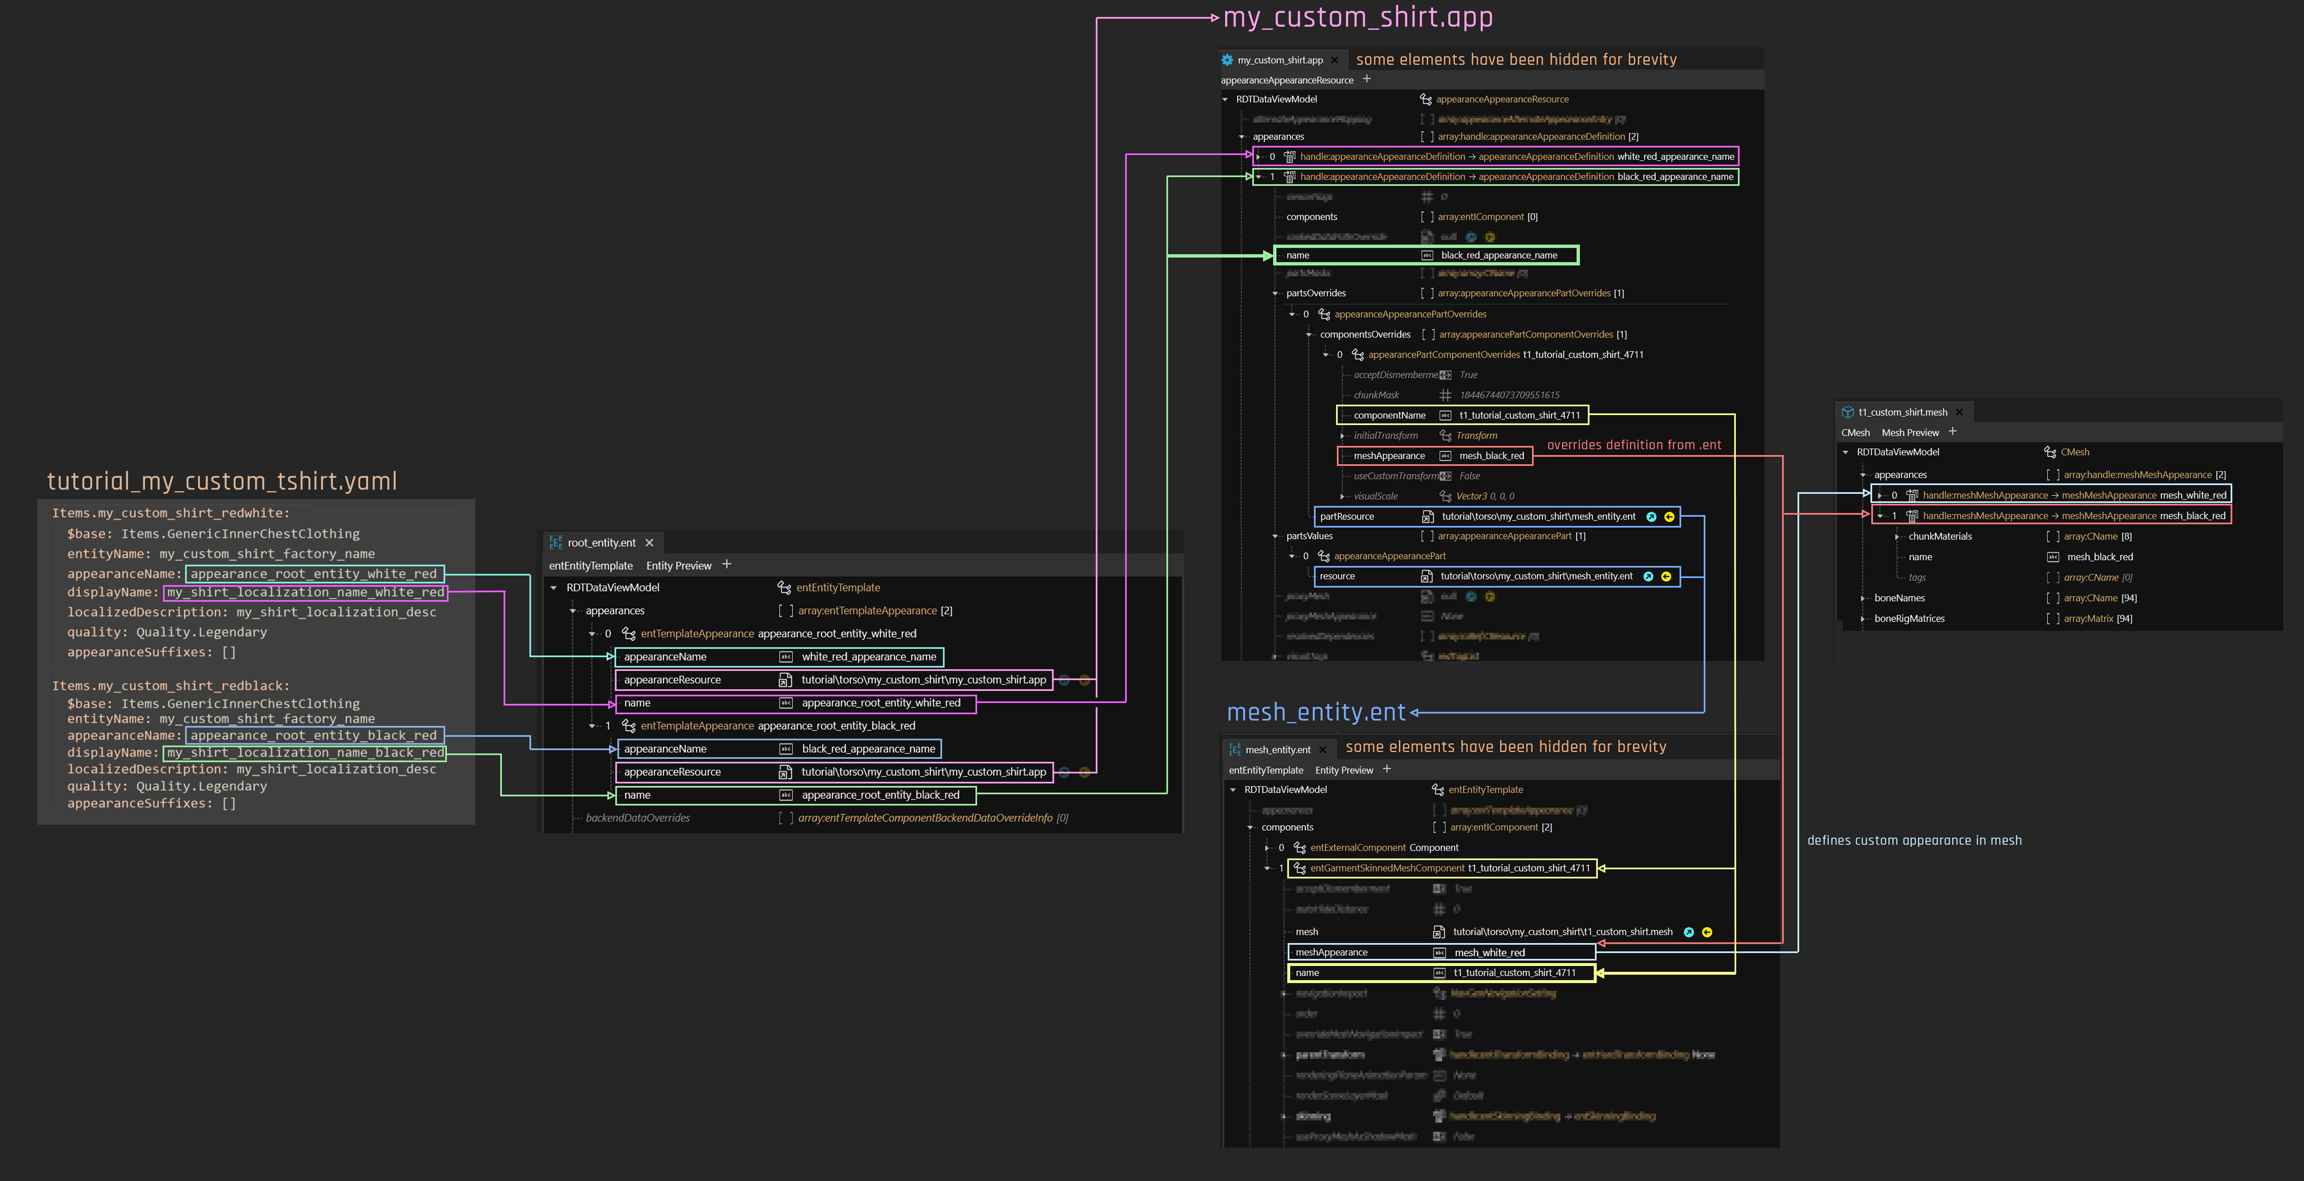
… and use root_entity.ent to look up an appearance by the name of appearance_root_entity_white_red.
The control file: yourModName.yaml
This file controls the adding of items to the game. An entry looks like this:

The entry above will let you add the item via Game.AddToInventory('Items.my_custom_shirt_redwhite')
Four mappings take place here:
entityName: Points to the factory.csv (see documentation there as for what it works)appearanceName: In the root entity specified in the factory, it will look for an appearance by this name.
The appearance name will only be considered up to the first suffix. If you want to know what those pesky & things are doing in the file path,
displayName/localizedDescription: In thetranslation_strings.json, find an array where the value for [3] (the last entry) is identical to this key. Then, check which gender V has, and display eitherfemaleVariantormaleVariant.icon:This hooks up your custom preview.
What is it, precious? The $base parameter
$base defines which type we have here. All those types have different properties (e.g. on which slot they are), and they inherit properties from their parent template.
The following types of clothing exist:
Items.GenericHeadClothing
Items.GenericFaceClothing
Items.GenericOuterChestClothing
Items.GenericInnerChestClothing
Items.GenericLegClothing
Items.GenericFootClothing
The inherited properties can cause problems (see "Suffixes, and whether you need them" below for more detail). We're getting around these by manually overwriting them with appearanceSuffixes: [].
You can absolutely set up a shirt and then put $base: Items.GenericHeadClothing - V is the only person I know of who can wear their undies on their head without impairing their functionality.
However, before you start abusing the system that way, you might want to look into EquipmentEx instead.
When editing this file, please keep in mind that indent is important!
The first line of each block must not have spaces, the blocks below must have the same amount of spaces. More spaces means more child, this can break your entire structure.
The game files
Now that we're done with the base structure, we can take a look at the game files. Like for any of the vanilla game items, we have four of them. This guide will only hold information that's directly relevant to adding item, but in the individual sections below, you will find links to more documentation about the files.
appearance.app
mesh_entity.ent
the mesh file
Overview
This is how the files connect to each other. If your head explodes now, don't worry: it's not as complicated as it looks, and the item addition guide will walk you through step by step.
root_entity.ent
Would you like to know more? Full documentation of the root_entity is on its own page.
The entry point from your yaml, this file is a glorified lookup dictionary: for any appearanceName, it will specify an .app file and the name of an appearance in the .app file.
An entry looks like this:
If you don't know what suffixes are, you should not use them because they can prevent your item from spawning.
To make sure of that, each entry in your .yaml should contain the following line:
appearanceSuffixes: []
mesh_entity.ent
Would you like to know more? Full documentation of the mesh_entity is on its own page.
For our purposes, this is a collection of components that we're pulling in from the .app file rather than re-defining it once per appearance.
An entry looks like this:
The name will be used in appearance.app's materialOverride array (see below)
appearance.app
Contains a list of appearances as mapped by rootentity.ent. Each of the appearances will load mesh_entity.ent via partsValues and specify
For experienced modders
The .app file's component array should be empty: this is not an NPC appearance! :)
An entry will look as follows:

partsValues will define what mesh_entity file(s) to load (as a list of components), while partsOverrides tells the mesh which appearance to use.
For ArchivXL >= 1.4.0, appearance overrides can understand the following variables for meshAppearance:
{gender}
m or w depending on V's body gender
{skin_color}
{hair_color}
Mesh
Would you like to know more? The documentation for .mesh files lives on their own page!
The mesh file maps materials to appearances. To find out how exactly it does that, find the material section on the mesh wiki page.
For our purposes it's enough to say that you can define your individual appearances here. For a guide on how to do that, check here or the mesh knowledge page.

The final result
This is how everything plays together:
Last updated