Replace your clothes with an NPC's that requires blender editing.
This tutorial will teach you how to swap player's clothing items with NPC's that requires blender editing.
Without mesh editing, some NPC meshes will clip quite badly, because they don't have as many poses and animations as V. Some are even worse, since they'll be flying around rather than following V's movements.
In this guide, we'll fix up a coat by transferring weights from a different item. Prerequisites: - Blender 3.1 *Required* 3.6 *recommended* - Cyberpunk Blender Addon - Wolvenkit
Prerequisite: you have the mesh that you want to fix already in your project. For this tutorial, we'll want Maman Brigitte's jacket: t2_001_wa_jacket__maman_brigitte.mesh
Use the to find a player mesh of roughly the same size/length/cut. For this tutorial, we'll use River's coat:
t2_087_pwa_jacket__river_short
For female body gender, search for _pwa_
For male body gender, search for _pma_
Add it to
Export both meshes
Open Blender
delete the standard objects from the scene (Shortcut: A -> X)
Import the player mesh (File -> Import -> Cyberpunk GLTF)
Import the NPC mesh
Delete or hide the NPC item's armature
Delete the NPC item's armature modifier (or make sure that it points at the player item's armature)
Repeat the process for each submesh.
If you don't have the same number of submeshes, you can simply use the "biggest" mesh you have (e.g. the coat's base mesh rather than the seams)
Select the player item's mesh
Select the NPC item's mesh
Switch to Weight Paint mode in the dropdown on the top left of your viewport
Select "Transfer Weights". Use the settings from the second screenshot.
Make sure that the NPC mesh's armature modifier is targeting the player armature:
Make sure that you select Object Mode while adding modifiers.
Select all submeshes under the NPC's armature
Use the Wolvenkit Blender plugin to export them over the player item's mesh (overwrite it)
Switch to Wolvenkit
Import the player item's mesh via Import Tool
Optional: copy the NPC's appearances, materials and material definitions to the player mesh
Optional: rename the appearances to match those in the original player item
Sometimes you will need to do a bit more of editing but that is not a topic for this tutorial.
Now you have functional clothing attached to the player and not flying arround.
If you have any questions about modding join discord server and we will help you out.
and test it!
Put your item in place of a default game item. Supports variants.
Created & Published: November 05 2022 by @manavortex Last documented edit: Feb 28 2024 by @manavortex
This tutorial will teach you how to switch a player mesh for an NPC garment and map its variants to the existing colours.
Other relevant know-how for this process (you don't need to read them if you already know which item you want to replace):
For a guide how to import meshes into Cyberpunk, check here.
Make sure that you replace an item that you can actually spawn — not all items in V's folder are actually spawn-able =>Spawn Codes (BaseIDs/Hashes)
Perquisite: You need a Wolvenkit project.
Find the mesh that you want to use ("the old mesh") and replace it with the one that you want to switch in ("the new mesh").
Example: Replacing the short-sleeved poser jacket with the monk shirt with the tied-back sleeves. For the male variant, replace _pwa_ with _pma_ and _wa_ with _ma_.
the old mesh
base\characters\garment\player_equipment\torso\t2_084_jacket__short_sleeves\t2_084_pwa__short_sleeves.mesh
the new mesh
base\characters\garment\gang_monk\torso\t2_135_jacket__monk_shirt\t2_135_wa_jacket__monk_shirt.mesh
Find both files in the Asset Browser and add them to your project.
Move the replacement mesh to the original mesh's folder.
Rename the old mesh (e.g. "t2_084_pwa__short_sleeves.mesh" -> "original.mesh").
Rename the new mesh to replace the old mesh (e.g. "t2_135_wa_jacket__monk_shirt.mesh" -> "t2_084_pwa__short_sleeves.mesh")
Open both meshes in WolvenKit by double-clicking them in the Project Explorer — we will now transfer the appearance names to enable variants.
The game looks up appearances in a mesh file by name. If none can be found, then game meshes will fall back to the default appearance, which is how the early replacers worked — every variant (base_01, old_01, rich_01) would simply spawn the default appearance.
We can simply transfer the names from the old mesh to the new mesh by renaming the entries in the appearances array.
If there are more entries than variants available, or if you're just curious which spawn code corresponds to which appearance, go here for a guide how to find out.
Now that we have done that, we can start recolouring.
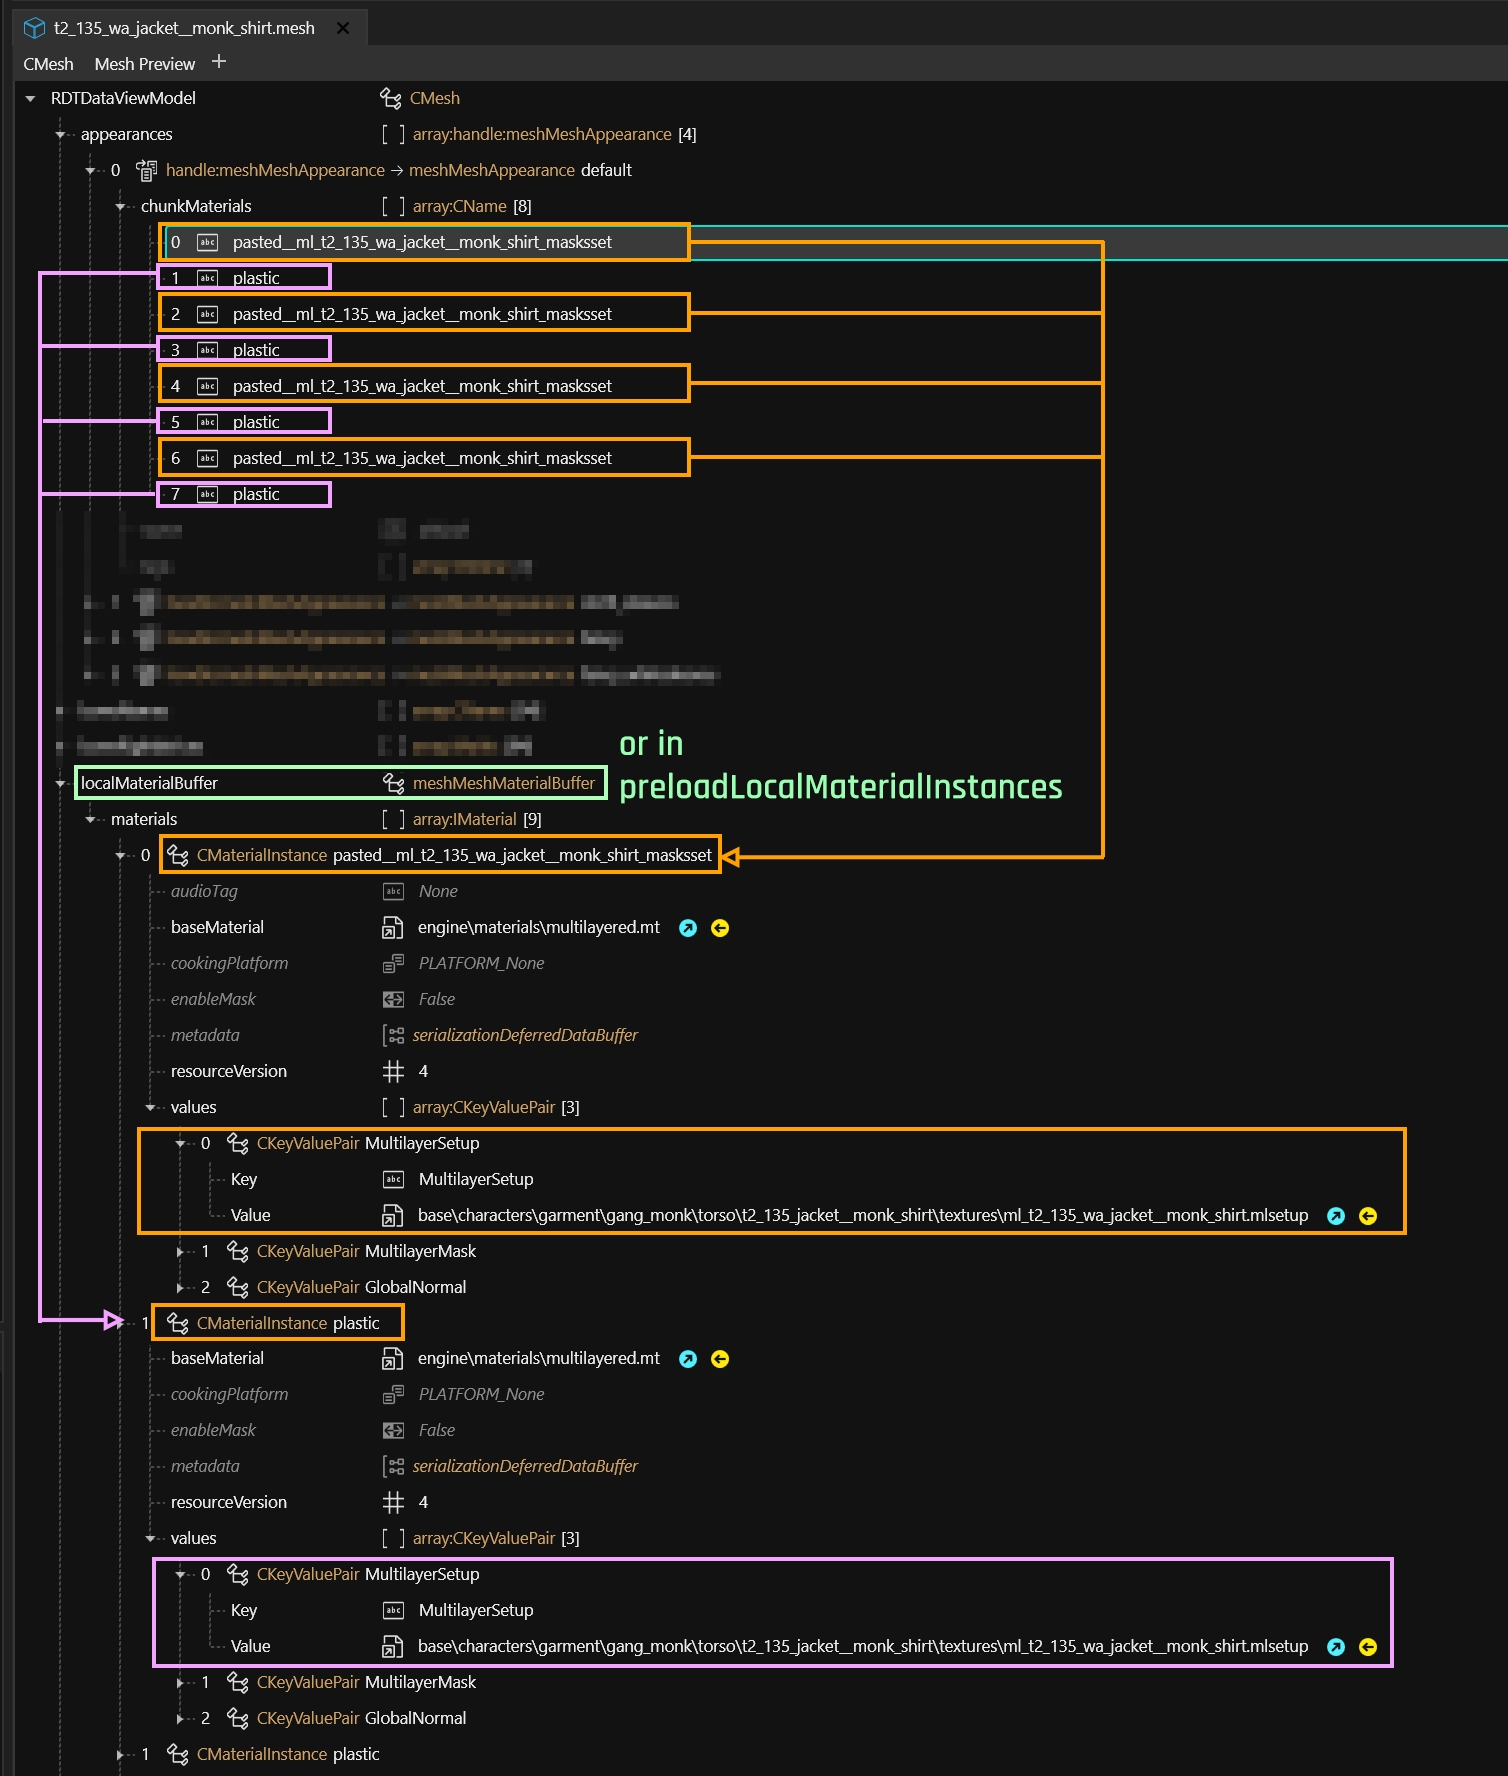
Each appearance in the appearances array has a list of chunkMask entries (one per submesh), which are assigned a material by name.
For a full guide on Editing mesh appearances, follow the link (you don't have to).
For a more detailed explanation, you can check this page, but all we care about right now is this lookup chain:
You can now save your mesh, then install your mod by clicking on the green arrow in Wolvenkit's toolbar. Once you have started up the game, the old item will now look like your new mesh — including its variants.
For a guide on how to edit an .mlsetup file (or to change an item's appearance in general), see here.
Enjoy!


