Archived: Exporting and importing meshes
How to export and import meshes (WolvenKit <=> Blender)
Summary
Created by @manavortex Published November 05 2022
This guide will show you how to - export meshes from the game for use in other projects - import those meshes back into WolvenKit

As of November 2023, the recommended workflow is using the Wolvenkit Blender IO Suite. Check its import/export documentation under WKit Blender Plugin: Import/Export.
It will not show you anything else. For other use cases like exporting characters, please check Wait, this isn't what I want!
Assumed skill level: You are able to read ;)
>= 8.8.0 (8.7.0 works, but has a slightly different UI)
>= 3.1 stable
>= 1.1.0
Wait, this isn't what I want!
Would you rather…
Import/Export to fbx with Noesis?
Use the Wolvenkit Blender Plugin?
Read more about Wolvenkit's Import/Export tool?
Replace meshes without editing them?
Export a whole character or an animated character?
Legacy: Noesis
In the dawn of modding, Wolvenkit just plain couldn't import or export .mesh files and you had to use Noesis. In 2023, you won't need that anymore. We're keeping the documentation for the sake of completeness and downward compatibility, but in general, you don't need it anymore.
Exporting the mesh
This page is archived. Please scroll to the top for links to more recent information.
Before you start editing, a warning:
It is easy to break a mesh beyond the point of repair. Make frequent back-ups, and continuously test if your altered mesh still imports and displays in WolvenKit, especially when editing vertices!
glTF Binary (*.glb)
Select your mesh in Wolvenkit: Tools: Import/Export UI and click Export/Process Selected, or simply use Export/Process All.
If the export fails, try unchecking the following properties in the export settings (you have to do this for each individual mesh)
Export Materials
Export Garment Support

You have to do this for each mesh individually, or you can copy and paste the settings with the buttons
You should now havemeshName.glb in your WKit project's raw directory.

Wolvenkit > 8.8 will by default export with materials for the Wolvenkit Blender IO Suite.
Path example
Assuming you are exporting t2_002_pwa_vest__puffy.mesh, WolvenKit will do the following:
Path of mesh: <yourModDir>\source\archive\base\characters\garment\player_equipment\torso\t2_002_vest__puffy\t2_002_pwa_vest__puffy.mesh
Path of glb: <yourModDir>\source\raw\base\characters\garment\player_equipment\torso\t2_002_vest__puffy\t2_002_pwa_vest__puffy.glb
Blender: Saving the mesh
Some meshes (such as eyelashes and hair) are two-sided. See here for details on how Wolvenkit handles that.
glTF Binary (*.glb)
Please follow the Wolvenkit Blender IO Suite's instructions forExporting from Blender.
For historical reasons, the box below holds the minimum steps to export via the vanilla Blender plugin. You shouldn't want to do that.
Exporting via vanilla Blender Plugin
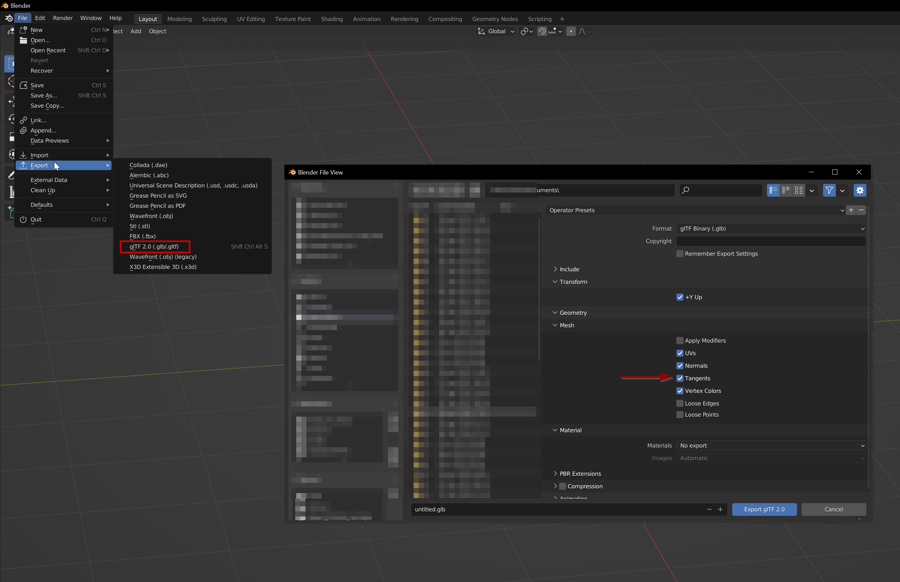
If you have touched the topology, make sure to triangulate your mesh before exporting (Select all in Edit Mode, Ctrl+T)
Make sure to check the box under Data > Mesh > Tangents, as Wolvenkit will not export without it.

Importing to *.mesh
This page is archived. Please scroll to the top for links to more recent information.
If you are following a guide with pre-made resources and it tells you to import via Noesis, you'll want to follow the advice, as the elements in the exported structure will have different names.
Alternatively, you can run this script on your blend file, which will automatically fix that for you.
glTF Binary (*.glb)
In Blender, you should have overwritten your previously exported glb. With WKit's Import/Export tool, you can now simply Import it back in.
WolvenKit will map any *.glb file under raw to the mesh with the same name under source.
Example:
<yourModDir>\archive\raw\base\characters\garment\player_equipment\torso\t2_002_vest__puffy\t2_002_pwa_vest__puffy.glb
will be imported over
<yourModDir>\archive\source\base\characters\garment\player_equipment\torso\t2_002_vest__puffy\t2_002_pwa_vest__puffy.mesh
WolvenKit refuses to import if the target mesh doesn't support all bones in the glb or if your mesh's topology became corrupted. If that's the case, check the troubleshooting page.
Import/Export: _doubled
Normally, a mesh's backfaces are invisible/transparent - you aren't supposed to see a mesh from below, so it doesn't matter. But some, like hair and eyelashes, are different, and need to be doubled.
When importing via Noesis, you need to do this by hand: duplicate all the vertices in the mesh, and flip the normals. When importing via WolvenKit, it will automagically do that for you if a mesh name ends with _doubled.
The suffix also indicates that Wolvenkit de-duplicated a mesh on export!

Troubleshooting
If your mesh won't export from Wolvenkit, try exporting it without materials by unchecking the box.
For a list of troubleshooting steps, check the corresponding wiki page.
Last updated