NPV: Preparing the head in Blender
Step 1: How to generate your V's custom head mesh
Summary
Published: May 13 2023 by @manavortex Last documented update: Jan 04 2024
This page is a part of the NPV guide. It will show you how to create your V's head in Blender. If you want to load your head back into Cyberpunk, note that you aren't changing anything in the files itself — that will come in NPV: Creating a custom NPC.
We will not be dealing with the body, this is part of the next section as well.
If you want a 3d model, you probably know what you're doing; in that case, make sure to run the script and get the shape right, then go wild.
Prerequisites
In this section, we will be moving/deleting files. You can complete these steps in Wolvenkit or in the Windows File Explorer.
It's important that you leave the file structure as it is. Moving or renaming files will confuse Wolvenkit and break the example project.
The final section of NPV: Creating a custom NPC tells you how to safely move files.
Step 1: Getting head
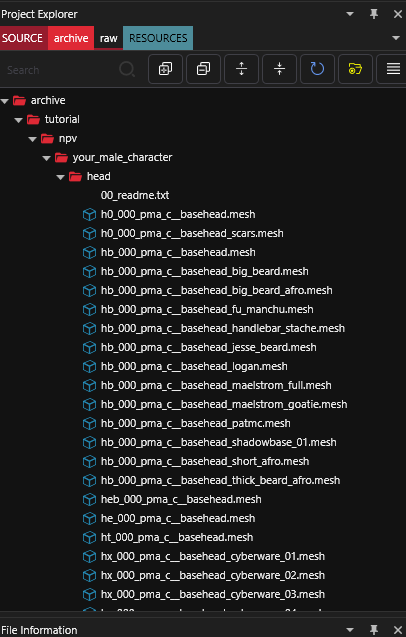
Open the
head
folder in your project'sarchive
section.Optional: Be confused and/or panic about why there are files.list
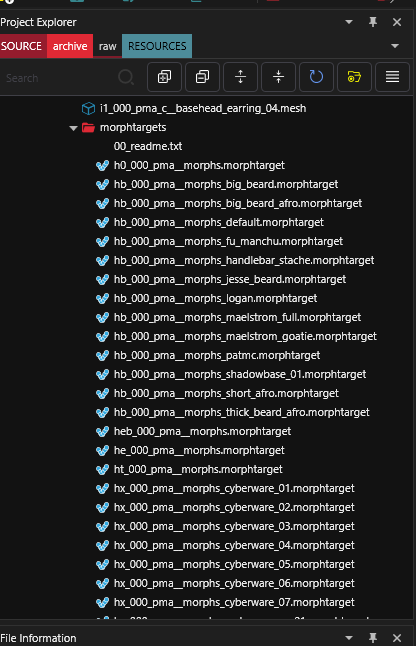
Look into the
head/morphtargets
folderOptional: Be confused and/or panic about why there are files again.
Delete all those files that you aren't using (read on as for how)
It's too many of them!
True! That's because I included all options for any given V. But don't worry: after you have deleted the ones that you won't be using, you should be left with a maximum of 13 .morphtarget
files for female V and 14 files for male V.
I have included all meshes and morphtargets from the game files. We'll now thin out the options, deleting those parts that your NPV won't be using.
Deleting unused files: the convenient option
The best and most convenient tool for the job is NoraLee's NPV picker. It will give you a list of files that you need to keep.
The list will give you a number of Source Mesh entries like h0_000_pwa_c__basehead.mesh
.
You need to keep these files inside the head
folder and the .morphtarget
file in the subfolder morphtargets
. If you want to understand why, keep reading; otherwise, you can proceed to Deleting Files.
Finding the right piercing
If your V isn't using any piercings, you can skip this step and go directly to Deleting Files.
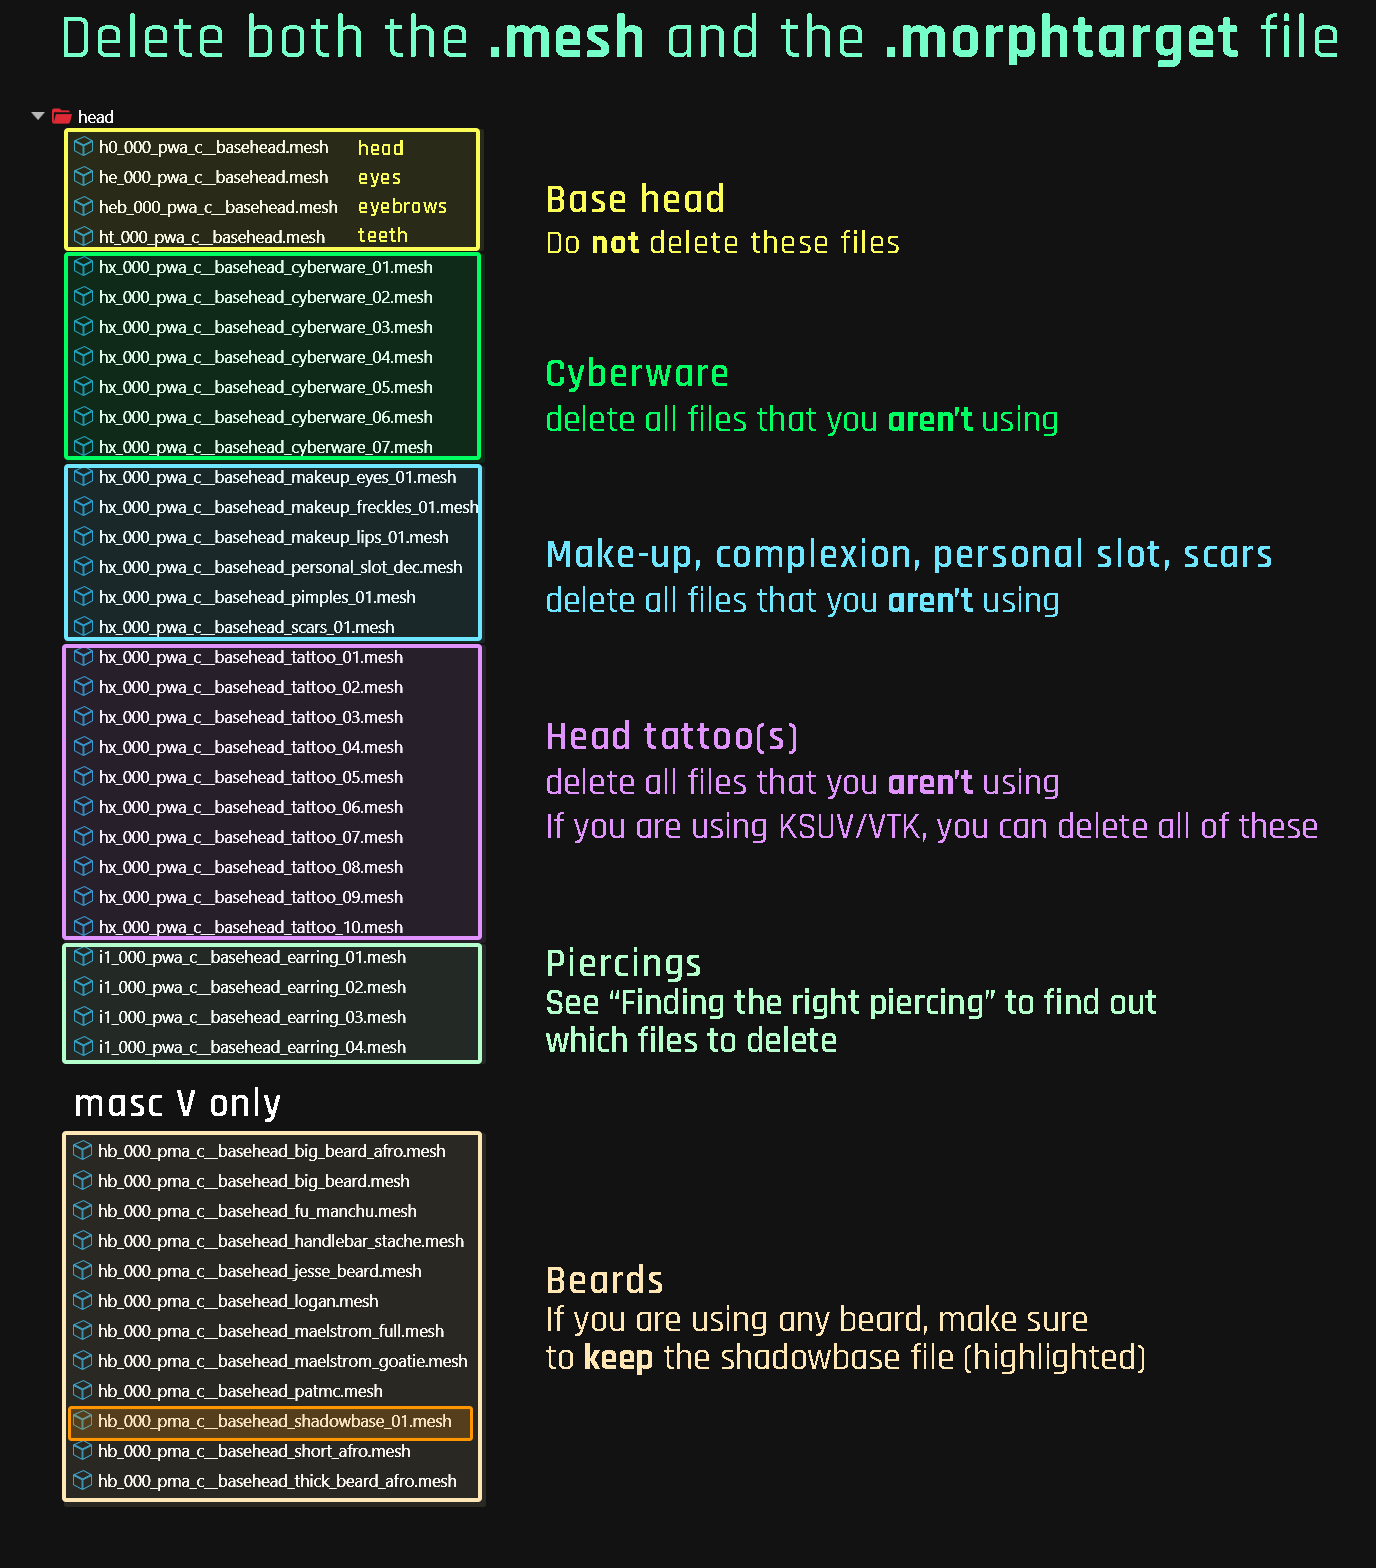
In the files, you will see four files for jewelry:
… none of which is your V's exact piercings. Instead, there are full sets of jewelry, most of which will be hidden.
You have to look at the meshes and find the file that includes your set of piercings. We will delete the ones you don't need later.
Deleting files
Number in file name <=> Number in character creator
Do not delete any files if you're editing the player head (Ignore this hint if you aren't).
Many of the files are variants and your V will be using one or none of them. That means you have a bunch of files to delete.
If you have chosen the convenient option, you should already have a list of files that you need to keep.
The following table will show you examples on what to keep (as in, you delete everything else):
Body gender/variant | Files not to delete from variants |
---|---|
female V, cyberware 03 | |
male V, scars 01 | |
male V, big beard | |
female V, tattoo 09 | |
male V, no earring | Files to delete (0* means "01 - 04"): |
Expected result
After deletions, both head
and head/morphtargets
should hold only the files that your V is actually using.
For a list, see the table above.
Once you're done, you should have between 4 and 13/14 files:
minimum number of files | 4 |
maximum number of files | 13 (female body gender) 14 (male body gender) |
Step 2: Exporting head
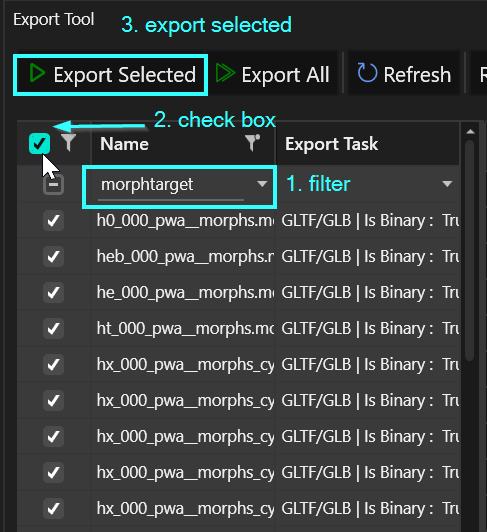
Now, we will export all .morphtarget
files from Wolvenkit so that we can edit them in Blender.
You will complete most of these steps in Blender, only the import/export happen in Wolvenkit.
If you run into any errors, check Step 5 (optional): Troubleshooting
Find the Export Tool (Tools -> Export)
To filter, click into the empty row under "name" and write "
morphtarget
"Check the box in the header to select everything
Click "Export Selected"
Switch to your project's
raw
folder or Wolvenkit'sraw
perspective. You will find the entire file structure mirrored there.In
head
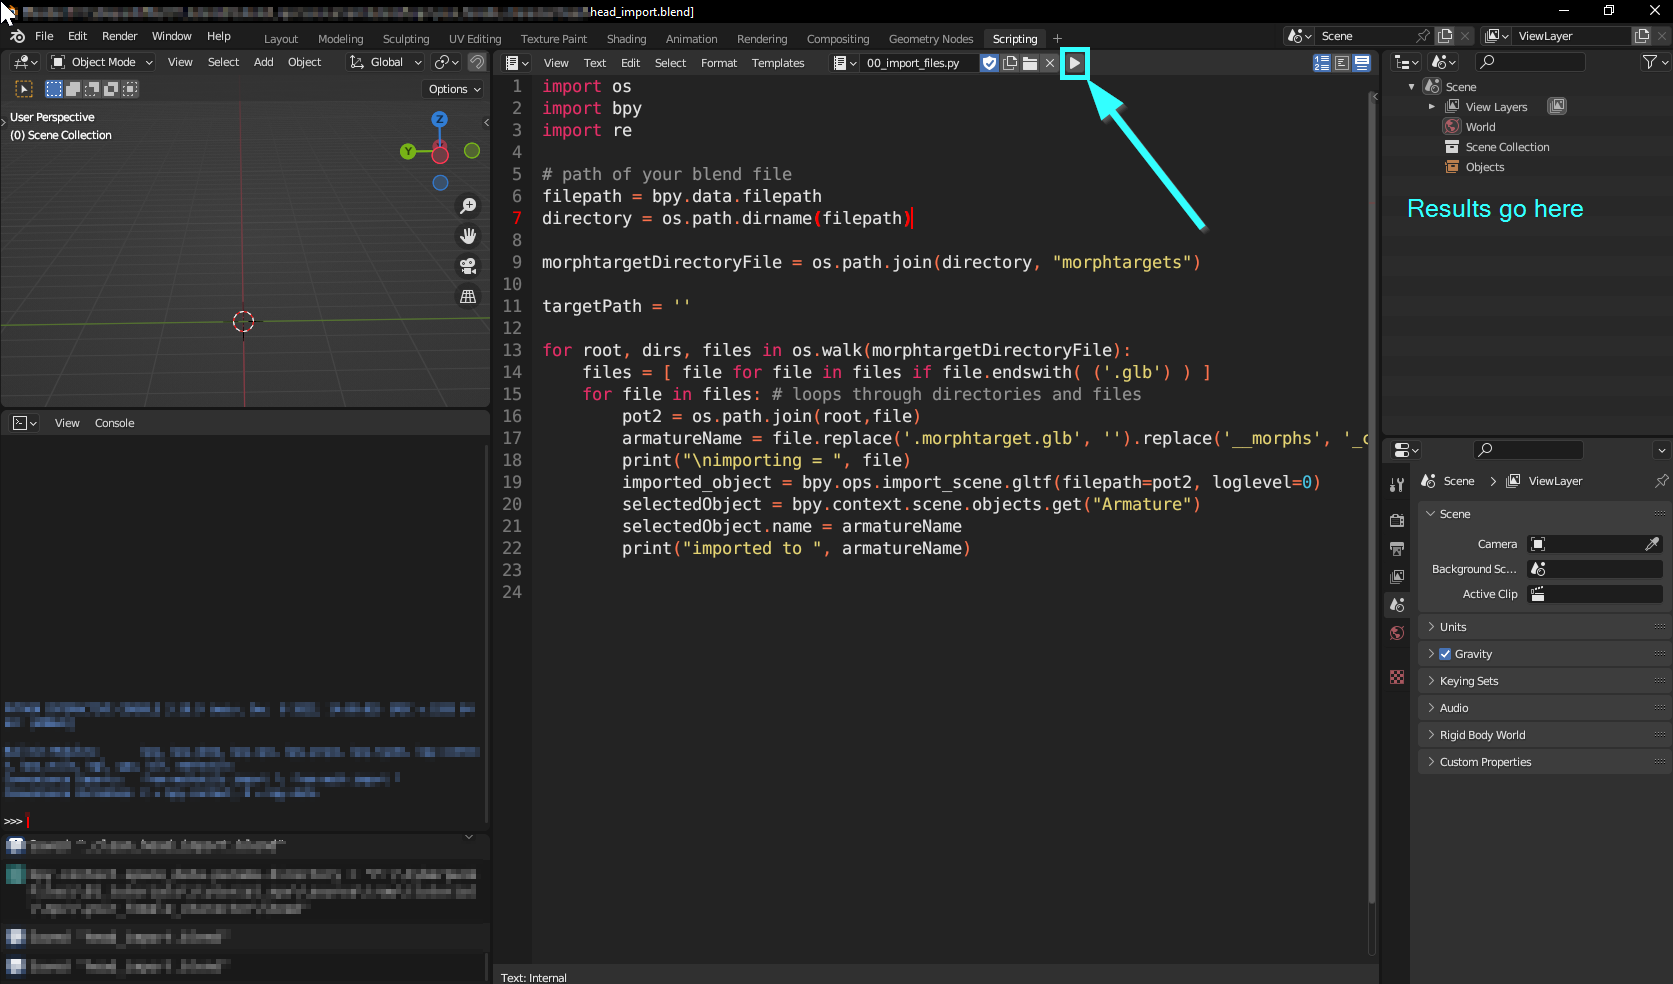
folder, find the filehead_import.blend
. This file is a utility file which will automatically import and export the files for you. For that reason, it needs to be in a certain relative path.
If you have already changed your structure (by re-naming your folders), you need to make sure that head_import.blend
is in the folder head
right next to the folder morphtargets.
Open it in Blender. It will take you to the scripting perspective, where you'll see something like this:
Press the play ▶️▶button.
The script will now import a bunch of armatures from the
morphtargets
folder. You will see them showing up in the topright corner (see the next screenshot under 7. for how it should look)Switch to the next script in the file, but don't run it yet:
If you've been previously afraid of scripting: This is a good place to stop! :))
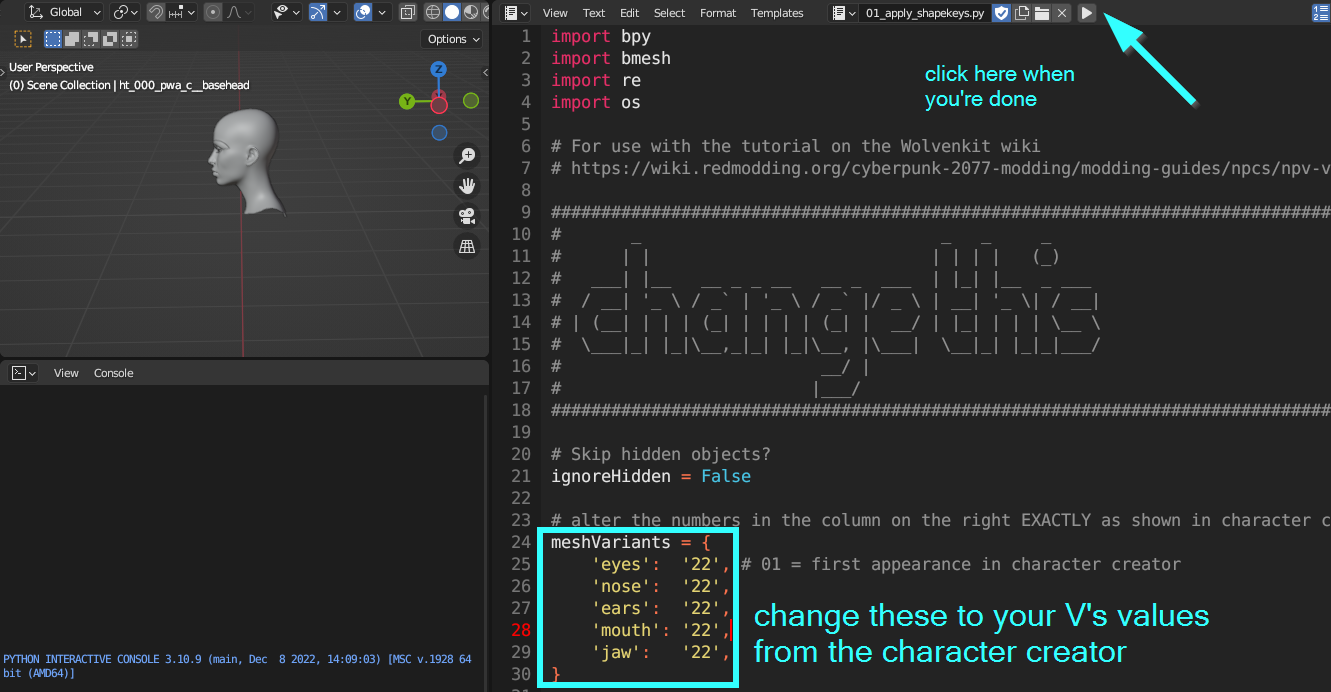
Find line 26 and following in the script, and alter the values to those of your V (which you get from the character preset, see here for further explanation).
You don't need to select the eyebrows here, as those are "painted on" later via mesh appearance. The mesh only needs to have the right shape, which is what we're doing here.
After you've changed the values to those of your V, click the "play" button again. This will apply the morphs to your V's face:
Some shapekeys don't correspond 1:1 with their numbers in the character creator. If a part of your shape is shaped subtly wrong or looks weird in the game, undo your changes (Ctrl+Z), add or subtract 1 from the corresponding shape key, and run the script again.
Can I have that with textures?
Yes, you absolutely can! Once you have imported everything back into Wolvenkit, you can re-export the .mesh
files and use the Wolvenkit Blender IO suite to import them with materials.
Step 3: Importing head
Unless you are editing original V, start by deleting the morphtargets from the template file — we don't need them anymore.
Remove the entire folder, both from raw
and archive
. From now on, it's meshes only!
Exporting from Blender
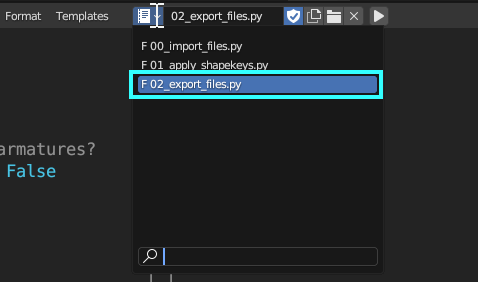
Now that your head looks the way you want, it's time to run the final script, which will export your changed head to .glb for you:
This will overwrite already existing files, leaving you with a set of import-ready mesh files.
Now it's time to get them back into Wolvenkit.
Find the Import Tool (Tools -> Import Tool)
Click "Import All". You shouldn't see any errors.
You're done!
At this point of the guide, you should see your NPV's head in Wolvenkit (re-select the mesh to refresh the preview).
If everything works, you're done with Blender (unless you want to get fancy).
If the head mesh has not changed, you ran into a problem — check the Log View and/or make sure that you completed all steps in the right order. Especially changing any paths will break things.
Step 4: Make sure that it works
Spawn your NPV and check that they look like they should.
If they do, proceed with NPV: Creating a custom NPC
If they don't, check Step 5 (optional): Troubleshooting
Step 5 (optional): Troubleshooting
Optimally, this process just runs with no hitches. However, during beta testing and troubleshooting, people ran into a few issues, so I'm listing them here.
Blender won't export
You need to use the Wolvenkit Blender IO Suite for export. Make sure that it is installed and up-to-date.
Blender script errors
You can check if Blender has run into errors by opening the Blender console window - from the menu, select Window -> Toggle System Console.
As of December 2023, any script errors have been because the person encountering them has been using the wrong Blender version. You can see which version is currently running either via UI or by checking the path in the system console window's title:
As of plugin version 1.5.5.1, you should have at least 4.0 installed.
The piercings are in the wrong position!
The problem went away after the person having it upgraded Blender.
V was imported, but they're unsettlingly, subtly wrong
If you had the example project lying around for a very long time, please try and redownload it (Nexus link), as the first version had been using an NPC animationgraph for facial expressions.
If that's not it, then you ran into the shapekey offset issue: some shapekeys don't correspond 1:1 with their numbers in the character creator. If a part of your shape is shaped wrong or looks weird in the game, add or subtract 1 from the corresponding shape key, and run the script again.
Last updated