> For the complete documentation index, see [llms.txt](https://wiki.redmodding.org/wolvenkit/llms.txt). Markdown versions of documentation pages are available by appending `.md` to page URLs; this page is available as [Markdown](https://wiki.redmodding.org/wolvenkit/modding-community/exporting-to-blender.md).
# Exporting Characters to Blender
## Summary
**Created by** [Simarilius](mailto:undefined) **&** [dragonzkiller](mailto:undefined)\
**Published: September 03 2022**\
**Last documented update: November 2024**
This guide aims to walk you through finding and exporting a character to blender so that its usable for cosplay or 3d printing or whatever. Guide is using nightly WolvenKit, Cyberpunk add-on for Blender, and Blender 3.6.
#### This guide uses the following versions:
* Cyberpunk 2077 game version 2.1
* Blender >= [3.6 (stable)](https://www.blender.org/download/lts/3-6/) or [4.0](https://www.blender.org/download/releases/4-0/)
* Wolvenkit >= 8.11.1 ([stable](https://github.com/WolvenKit/Wolvenkit/releases) | [Nightly](https://github.com/WolvenKit/WolvenKit-nightly-releases))
* [Wolvenkit IO suite for Blender >= 1.5.1](https://github.com/WolvenKit/Cyberpunk-Blender-add-on)
## Prerequisites
* [ ] You have [created a new Wolvenkit project](/wolvenkit/wolvenkit-app/usage/wolvenkit-projects.md#create-a-new-wolvenkit-mod-project)
{% hint style="warning" %}
This guide works just the same for guns — add the .ent to your project, run the script, import, profit. Vehicles are more complex and have their own guide: please see [Exporting Vehicles](/wolvenkit/modding-community/exporting-vehicles.md) for these.
If you want to add a character's animations, you can check the follow-up guide [Exporting Rigs & Anims](/wolvenkit/modding-community/exporting-to-blender/exporting-rigs-and-anims.md).
{% endhint %}
## The character's .ent file
This section will tell you how to find and add an NPC's file to your project. If you already have one (because you're exporting an NPV), you can skip it and go straight to [#exporting-to-blender](#exporting-to-blender "mention").
### Finding the file
Before we can export anything, we need to find the `.ent` file for the character we want to export. This tutorial will use Jackie, but it works just the same for everyone else.
{% hint style="info" %}
You can find a list of the entity files for a lot of the main characters over on the Cyberpunk 2077 Modding wiki [Here](https://wiki.redmodding.org/cyberpunk-2077-modding/for-mod-creators/references-lists-and-overviews/people)
{% endhint %}
The easiest way to find a characters ent if their not already in the list on the wiki is to use Red Hot Tools. Once its installed you can simply walk up to an NPC in game and the inspect tab will show you the ent and appearance info you need. With that info you need to find them in wolvenkit.
With our project open in Wolvenkit, we switch to the [Asset Browser](/wolvenkit/wolvenkit-app/editor/asset-browser.md) and search for the right file
```
jackie
```
{% hint style="info" %}
You can refine your search, checking only .ent files, by using the following search query:
```
jackie > .ent
```
{% endhint %}
This will give us plenty of files — we'll sort them by file extension and scroll to the `ent` section of the list. `jackie_welles.ent` looks promising, so we'll double-check if it's the right file:
* Right-click it and select `Open without adding to project`
* Use the `entity preview` tab to confirm that it's him
Now, [add the file to your project](/wolvenkit/wolvenkit-app/editor/asset-browser.md#adding-files-to-projects).
## Exporting to Blender
With the `.ent` file in your project, you can run the script that will handle the actual export, adding all the necessary files to your project and exporting them in a way that Blender can process.
Open the [Script Manager](/wolvenkit/wolvenkit-app/tools/script-manager.md) (Tools -> Script Manager as of Wolvenkit 8.15), find `Export_Ent.wscript` and run it.
{% hint style="info" %}
Wscript cant export files from other mods currently, if your exporting an NPV which uses other mods you will need to add any used files/materials to the project manually if you want them in Blender.
{% endhint %}
What does the script do/how to do it by hand? (You don't need to know this)
If you open the Entity file then expand the appearances bit of the entity template, he has 15 appearances which all appear to be defined in jackie\_welles.app. For this next step you need to have the Wolvenkit resources plugin installed (View Options > plugins to install). The app should also be in the search results for jackie, simply right click it, then do find used files. Sort by type again and find the cookedapp files. Theres several which cover the different appearances, for each one you want to include in your export do the following:
* Right click, do Find used files
* Sort by type, find the mesh files
* Select all and right click, add selected to project
You may need to go through the app file afterwards to check all the meshes got found, it sometimes seems to miss some.
The mesh files should now be visible in the project explorer, occasionally I find they arent showing up but closing and reopening the project makes them appear.
Open the Export Tool, and verify your meshes are listed. Double click one then the export options opens, and verify WithMaterials as the export type and LOD Filter is on. Set the texture type to png if it is not. Select Apply to all files of the same extension then confirm.
Now select Export All (or Export Selected) on the menu bar and a bunch of glb and json files should be exported. After its done a files have been exported notification should pop up to notify you of the success.
{% hint style="success" %}
After the script has successfully run, you will find an `.ent.json` file in your project's [raw folder.](/wolvenkit/wolvenkit-app/editor/project-explorer.md#raw)
{% endhint %}
## Importing into Blender
{% hint style="info" %}
If you right-click the `.ent` file in the project browser and press `Shift` and `Ctrl`, the context menu will let you copy the path to the file!
{% endhint %}
Switch to Blender and use the [Wolvenkit Blender IO Suite](https://wiki.redmodding.org/cyberpunk-2077-modding/for-mod-creators-theory/modding-tools/wolvenkit-blender-io-suite)'s [Entity Import](https://wiki.redmodding.org/cyberpunk-2077-modding/for-mod-creators-theory/modding-tools/wolvenkit-blender-io-suite/wkit-blender-plugin-import-export#importing-into-blender-2) from the File -> Import menu.
{% hint style="warning" %}
Before clicking the import button, please read the next section about [#importing-a-specific-appearance](#importing-a-specific-appearance "mention").
{% endhint %}
{% hint style="info" %}
Find the full documentation on the yellow wiki under [Wolvenkit Blender IO Suite](https://wiki.redmodding.org/cyberpunk-2077-modding/for-mod-creators-theory/modding-tools/wolvenkit-blender-io-suite) -> [WKit Blender Plugin: Import/Export](https://wiki.redmodding.org/cyberpunk-2077-modding/for-mod-creators-theory/modding-tools/wolvenkit-blender-io-suite/wkit-blender-plugin-import-export) -> [WKit Blender Plugin: Import/Export](https://wiki.redmodding.org/cyberpunk-2077-modding/for-mod-creators-theory/modding-tools/wolvenkit-blender-io-suite/wkit-blender-plugin-import-export#entities)
{% endhint %}
Point it to the exported `.ent.json` in your project's files. For Jackie, the relative path is `source\raw\base\characters\entities\main_npc\jackie_welles.ent.json`.
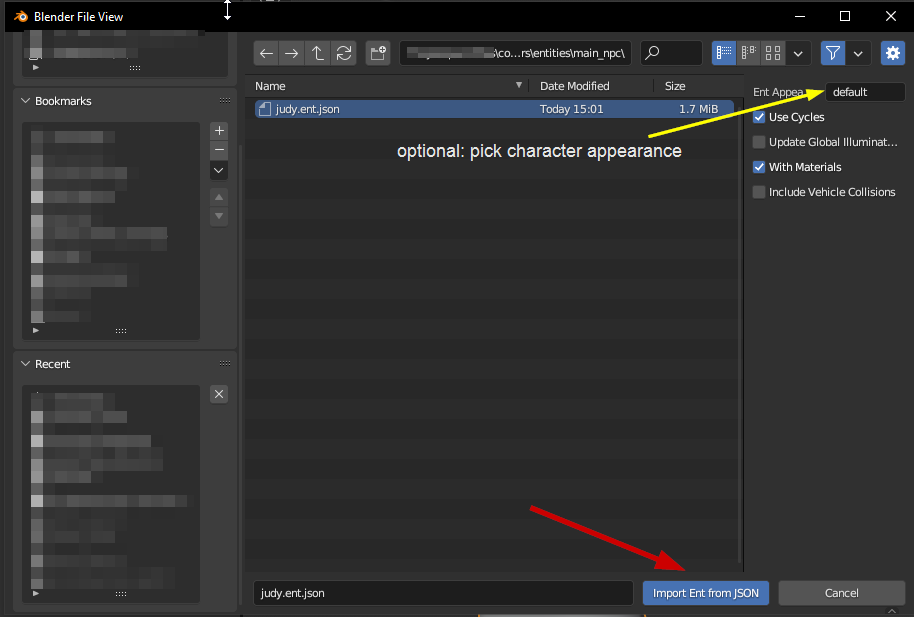
### Importing a specific appearance
Unless you specify otherwise, the `default` appearance will be chosen. If you want another, open the `.ent` file in your project and enter the exact **appearanceName** into the Blender open dialog.
You can find the appearance name in your `.ent` file inside the `appearances` list:
The same file that you picked in Step 1
Now, click the `Import Ent from JSON` button and wait while the Blender plugin does its thing.
{% hint style="info" %}
Blender might need a few minutes to load the materials and bake the shaders. If you aren't getting any errors, just assume that it's still at it.
To double-check, you can select Window -> Toggle System Console to watch Blender work.
{% endhint %}