# Easy IK based Posing
## Summary
This guide will show you how to make use the IK template for making poses.
It has been originally [published by xbaebsae](https://xbaebsae.jimdofree.com/cyberpunk-2077-guides/cp2077-easy-ik-based-posing/) and ported to the wiki with permission.
### Wait, this is not what I want!
* If you want to learn how to make poses, check [Poses/Animations: make your own](/cyberpunk-2077-modding/modding-guides/animations/animations/poses-animations-make-your-own.md)
* If you want to familiarize yourself with Blender, check [Blender: Getting Started](/cyberpunk-2077-modding/for-mod-creators-theory/3d-modelling/blender-getting-started.md)
* To learn about Inverse Kinematics, check [Animations: IK and FK](/cyberpunk-2077-modding/for-mod-creators-theory/files-and-what-they-do/file-formats/animations-.anims/animations-ik-and-fk.md)
### Requirements
[xbaebsae's new simple IK Template](https://drive.google.com/file/d/1ZJMHfTNNdMMGK7AE-Vese9vrlYWJYc4F/view?usp=sharing) (includes FemaleAverage/V, MaleAverage/V, MaleBig skeletons)
## Differences to regular posing templates
Select the yellow boxes (they're IK related bones) to move around bone chains. Use the grab in blender (shortcut g) to grab a bone and move it where you want it. This works on hands and feet which will move the respective arm and leg accordingly.
There are boxes in front of knees and behind elbows that are called **TARGET\_xyz**. Grab and move these to adjust the angle of the joints.
The rig overall has constraints set as usual so elbows and knees will **not bend unnaturally**, saving you from **broken LookAt features** and generally just not realistic movement. No you cannot bend your elbow sidewards, sorry.
You can also use snapping to place for example hands, quickly. Place the 2Dcursor (the lil target thingy) by clicking for example on the hip of your character. Then select IK\_HandRight and press **shift+s>Selected to Cursor**. The IK bone will snap to the cursor you placed!
**!You cannot do this with regular bones!**
Use **IK\_Hips** to move the upper area of your character around as a whole, **IK\_ROOT** to move the entire character and **IK\_SPINE** to pose the first, lowest spine bone. The regular bone counterparts of these are not working correctly while IK is active. All other bones function as usual.
There's the bone IK\_Pelvis which allows for easy hip shifting! No more fiddling around with the Hips bone for this! :)
Last but not least, the fingers also have IK chains for easy bending. You can still pose them normally as well and/or paste poses.
{% hint style="warning" %}
Pasting poses from non-IK rig will NOT work for the rest of the bones!
{% endhint %}
## Differences in the pose creation process
1\. Instead of making a new action per pose immediately, create all your poses within a single Action. This simply means you do a pose, Insert the keyframe for it at frame 0, then move the timeline to frame 1 and do your next pose there, insert it, move to frame 2, pose, insert, repeat.
2\. **Instead** of hitting the arrow to save the Action strip, Head to **Pose>Animation>Bake Action**.
In the window that pops up, use these settings. The green ones being particularly important!
This **removes** the IK from the rig, so do this only when you are done with all your poses! It converts the IK posed ...poses into regular keyframes ready for use ingame.
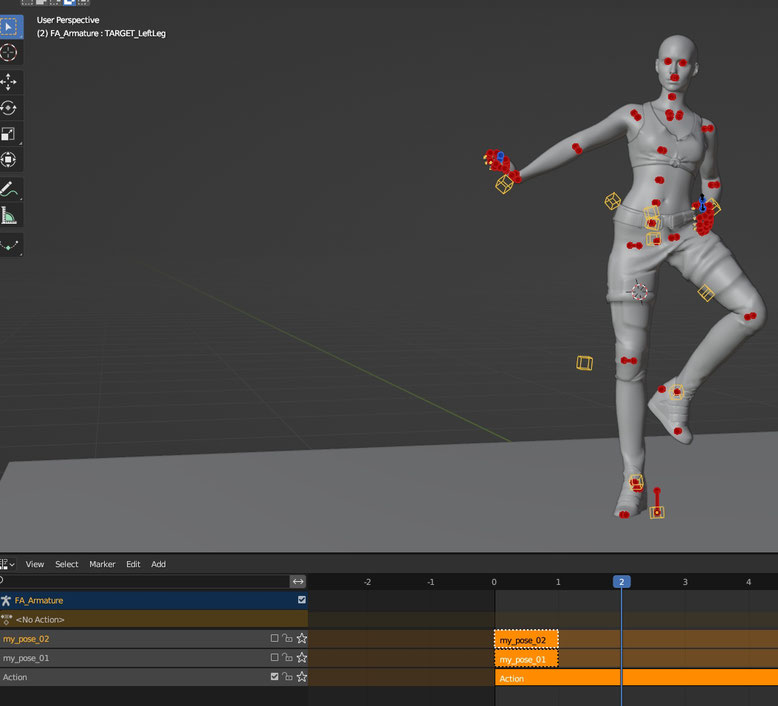
3\. Now we just need to make seperate tracks for each of our poses. To do this, move the timeline cursor to Frame 0 where your first pose is and simply insert a new keyframe for the whole character again. Do a second one with the same pose (it shouldnt change anymore after you set the first one) to make sure everything will be okay ingame.
Green: The long Action we baked, has all poses on different frames.\
Blue: The new action for pose 1 only.
Click the little arrow as usual to make the current pose its own Action. Disable it and move to the next frame of your long Action. Repeat the same process for the second pose. Insert a keyframe where the pose is, then also insert one at frame 0.
Example:
Pose 2 starts at frame 1, inserted a second frame for frame 0 and moved it down as usual.
Pose 3 starts at frame 2 and i inserted a second frame at 0, then moved the action down.
4\. Before exporting, clean up the rig by deleting all IK related bones (they are now useless anyway). Head over to pose mode, select only the yellow bones by simply clicking this here:
Switch to edit mode and delete the selected bones.
Now you are done, your skeleton is cleaned to the old familiar one you used before.
## Getting the poses back into Cyberpunk
The import process is the same as in [Poses/Animations: make your own](/cyberpunk-2077-modding/modding-guides/animations/animations/poses-animations-make-your-own.md) -> [Poses/Animations: make your own](/cyberpunk-2077-modding/modding-guides/animations/animations/poses-animations-make-your-own.md#exporting)
> Hope you found this useful! Happy modding\~
---
# Agent Instructions: Querying This Documentation
If you need additional information that is not directly available in this page, you can query the documentation dynamically by asking a question.
Perform an HTTP GET request on the current page URL with the `ask` query parameter:
```
GET https://wiki.redmodding.org/cyberpunk-2077-modding/modding-guides/animations/animations/poses-animations-make-your-own/easy-ik-based-posing.md?ask=
```
The question should be specific, self-contained, and written in natural language.
The response will contain a direct answer to the question and relevant excerpts and sources from the documentation.
Use this mechanism when the answer is not explicitly present in the current page, you need clarification or additional context, or you want to retrieve related documentation sections.