Please keep in mind that you are looking at somebody else's work. Always credit if you use anything from other peoples' mods, unless it's explicitly stated that you don't have to!
Some modders don't want their mods to be unbundled. Most people don't mind if you do it for your own personal use, but you should seek permission and respect their decision.
For a documentation on how to use Wolvenkit CLI, see . Unless you have a very good reason to use the console, you probably don't want to.
Step 1: Switch to mod browser
You can now add the content to your project just like you do it with game files:
Step 2: Find the correct files
The folders in the mod browser correspond to the names of the .archive files you have installed.
E.g., To find all .mlsetup (colour definition) files inside the , search for:
If you want all mesh files from the , search for
f you want to know more, you can read up on .
Step 3: Add the files to your project
Select the file that you want to add by checking the box. Then right-click on it, and click on the Add selected items to project option.
That's it!
Modding Guides
This page contains instructions on making mods. If you want to install mods instead, check here.
Here, you can find
various modding guides in the menu tree to the left
an overview on and
information on inside a mod
A guide on how to
Information and how to configure them
to quickly look up files in the game paths
Information on and
If you just want to look something up or find a file, check the "" section.
Legacy: Analysing other mods with Wolvenkit Console
Unbundling mods with CLI
This technique is outdated as of 2023. If you don't have a very good reason why you need Wolvenkit console, then you should .
You need to download the WolvenKit.Console version for this, rather than the regular one.
Optional, but recommended: Make sure that your downloaded .archive is inside a folder with no other items.
Open WIndows Command (press Windows+R and type cmd, then press enter).
Drag and drop WolvenKit.cli.exe into the command window
Type a space
Type unbundle -p
Type another space
Drag and drop the archive you downloaded into the command window.
You will now see something like
If your paths contain spaces or special characters, make sure that they are surrounded by quotation marks as in the example above, or the command will fail.
If you press enter now, WolvenKit will unpack the archive, putting the contents into the same directory.
You can now copy the extracted folders to your WolvenKit project's archive folder.
This page will gather knowledge and guides about animations.
Summary
This page and its subpages contain links to guides about making animations and poses (static animations) for Cyberpunk 2077 and importing them into the game. For theoretical information, please refer to the .
For individual guides, please check the sub-pages in the navigation tree or use the "Next" button at the bottom of this page to browse through.
archive:ArchiveXL_Netrunner > .mlsetup
archive:my_tshirt > .mesh
For a video on how to edit poses with Redmod, see (official video guides).
This guide will teach you how to make your own static poses in Blender and import them into an existing .anim file.
You can use the same process to make photo mode replacers or create animations with multiple keyframes.
This walks you through the process of hooking an existing .anims file up with AppearanceMenuMod.
How to add standalone poses to photo mode (rather than making replacers)
How to replace the default set of expressions with those from an NPC
All of these articles are out-of-date. Only use if you really know what you're doing.
Custom icons and UI
Expanding Cyberpunk's base UI
This is the landing page for guides that teach you how to influence Cyberpunk's base UI and its textures.
For a full overview of guides linked here, please check the link tree on the left.
Vehicles
This section collects information for vehicle modding. However, all we have as of now are two links.
Boe6 has been so nice to share their (very detailed) guide on Google Doc and given full permission to transfer it to the wiki. However, nothing has happened yet.
A second guide is here, although it is not very detailed.
NPCs & V
This is the landing page for guides on how to change people. Here you can learn how to modify or create custom NPCs.
Please check the link tree in the menu on the left for details.
There's nothing here yet! Maybe you are the person to change that?
Quests
Textures and LUTs
Modify Cyberpunk's visuals
This section contains guides for
the process of modifying Cyberpunk's visuals.
Everything else
Stuff that didn't fit the other categories
This collects all guides that didn't fit any of the other categories. Check the navigation tree on the left / in your phone's menu.
Sound
WIP: This page contains a selection of guides on how to create sound-related mods but is still incomplete.
Feel free to sign up and add your knowledge to the wiki. It doesn't matter if the guide is shitty or if your English is bad, the next person can always improve on your stuff – as long as there is any stuff!
There are a couple of pages about sounds on Roms1383s wiki for his Addicted Mod:
Customise CP77 info on GOG
Summary
Created by @Pinkydude
Published Summer 2021
Go in the two little lines with circle thingies, and go to “edit” / the second option.
Click on the “Media” tab and you’ll be able to put any pictures!
Mind the resolution, and put something smaller than the ones recommended
(it doesn’t work if it’s exactly 660x930px)
f!V and her gremlin feet
Summary
As you have probably noticed, female V has two different feet states because fuck you, that's why. Fortunately, that's why a bunch of really smart people came up with ToggleableFeet, which gives you some freedom for ArchiveXL and EquipmentEx.
To see the documentation, scroll to the bottom of the Nexus mod's page and click on the spoiler tags
Items: Equipment
Weapon, armour, consumable, hair, cyberware..
Welcome to the equipment section. Here, you can find guides on how to edit equipment and wepaons in Cyberpunk. The section is split into the following subsections:
Wait, that's not what I want!
This section contains hands-on guide for editing equipment.
Troubleshooting normal maps
In-game, your normal map isn't looking as expected
Import settings
The texture has to be imported without the isGamma flag. Import over an already-existing normal map to rule out this as a source of error. See for more detail.
NPV: Cleanup and troubleshooting
I'm done, what's next?
Re-path your folder
Why are we doing this?
When packing a mod, Wolvenkit generates an .archive file with the files in your project's
We also have a section on 3d Modelling, where you can find specific knowledge on how to edit objects. For a detailed step-by-step guide, see R&R: Refitting (step by step).
folder. The problem here is that each file can only be
modified once
.
Assume both you and your friend make an NPV. They made Alice, you are making Bob. And because your friend was lazy, they didn't complete this step. And since their project is called Alice_NPV.archive, none of your changes will even show!
That's why you'll have to re-path your folder. If you don't, you will ruin someone's day.
You need to re-name the template folders. Unless you want to make more NPVs, it will be enough to re-name tutorial to your_username. Find a full guide to the process under Moving and renaming in existing projects.
Just install the mod via WKit, launch Cyberpunk the way you normally do.
How to Remove an Animation (and Potentially Replace It)
Guide made by Forsentio - Quest Team member working on WolvenKit at RED Modding Tools.
Summary:
We will demonstrate the step-by-step process which allows you to remove (and potentially change or replace) an animation in game.
Requirements:
(thanks for rfuzzo).
.
(thanks to alphaZomega).
The Steps:
1. Unbundle and uncook basegame_3_nightcity.archive, basegame_4_gamedata.archive using CP77Tools
2. Find the animation you want to remove (in our case we want to remove the idle animation that plays when the player is standing in front of a mirror)
The game works by using .scene files for certain interaction; you should take a look into those and search for the sectionNode that plays the animation you want to remove after you opened it in the 010 Editor, by using alphaZomega's template. The scene file we are using is located in "base\quest\minor_quests\mq000\scenes\mq000_01_apartment.scene"
3. Once the sectionNode is found, open Struct Data, then scnSceneResource, then scnSceneEvent array, then scnPlaySkAnimEvent, then scnEventBlendWorkspotSetup; inside of it you will find a workspotId, which you must take note of.
SIDE NOTE: Most of the game relies on Workspots used as interactable points both by the AI and the Player. In this case, the Workspot we are changing is used for the various interactions in V's appartment. The Workspot's location is "base\worksposts\quest\main_quests\prologue\q001\q001_01_wakeup\q001_01_wakeup__look_mirror.workspot"
4. Return to scnSceneResource and open scnWorkspotInstance. Search for the one that has the same number right next to workspotInstanceId; open it and take note of the dataId5. Return to scnSceneResource and then open the scnWorkspotData and open each of theme until you find the one that has the same dataId. Open it and take note of the path right after the workspotResource7. Open the .workspot file and then go to Struct Data, then workWorkspotResource, then workWorkspotTree, then handle:worldEntry, then workSequence, then worklEntry: there you will find a different named work[...]Anim; search for the one that has the same name as the animation you want to remove and take note of the number right before the name8. Go into the CNAME array and zero out the name9. Save, pack and place in the Mod folder
Adding Locations and Structures with ArchiveXL
This guide demonstrates how to add new locations to the world by creating new .streamingsector files and adding them to the game world by merging them with the all.streamingblock via ArchiveXL
Valid as of March 21 2023
Requirements
Wolvenkit 8.8.1 (bugs in nightlys and stable version 8.9.0 prevent adding new nodes to a streaming sector)
(thanks Psiberx!)
Resources
- this adds a low poly house exterior mesh to the center of the glass dome in corpo plaza (near the giant holo fish)
Adding a custom location to a new streaming sector and merging it with the game world
After following the previous guide to add and position the objects you want to add to the game, open the example mod project in Wolvenkit and open the file new_mod_sector.streamingsector
in the "Node Data" section, right click on the existing node and click "Import from JSON (no coords update)
Gendered preview icons
This is a sub-page of "your own preview icons" and only contains information on how to hook up gendered variants once you already have the files. If you aren't quite there yet, refer to the other guide first.
Requirements:
This will not work unless your item is using the corresponding suffix.
Without it, the game has no way to tell male and female items apart.
If you want to know more about this, you can read up here:
If you don't have a gendered item yet, see the original ArchiveXL guide, section "".
How to do it
By adding an icon property to your item's yaml, you're telling ArchiveXL to create an UIIcon record for you. The generated records will be the same for all genders, variants and tags.
If you want to use a gendered preview picture, you can create a more specific record yourself. In this case, you can delete the icon entry from your item.
Its name will follow this schema:
Wait, what?
ENTITYNAME,APPEARANCENAME, SUFFIXES and VISUALTAGSabove are placeholders for the corresponeding fields in your YAML.
You can look up the actual names of the created records in CET's Tweak Browser and simply copy them to your .yaml
For example, if you have the following item:
… then you'd define a preview image like this:
The trailing underscore separates the empty visual tags from the suffixes entry.
Your items won't need an icon record anymore, the assignment now happens by magic!
Swap Johnny during the Alt's scene
Summary
Created by @Pinkydude
Published Summer 2021
What you’ll need :
A “Never fade away” Savefile before entering the room
First off, grab my FixSwap and Removers mods and drop them in your Mod Folder
Load your “Never Fade Away” save file before entering the room, and open AMM
Spawn > At Own Risk > Johnny mirror
The spawned Johnny will be invisible, you’ll need to scan his feet shadow to be able to swap!
Make a quick save and reload it
Make sure to despawn your V/Johnny before entering the room!
There will be small a moment, when Alt takes off Johnny’s glasses, where your V will turn invisible ; That’s ok, they’ll pop right back when the mirror scene start!
How to Edit Voiceover and Subtitles In a Quest.
Guide made by Forsentio - Quest Team member working on WolvenKit at RED Modding Tools.
Some basic knowledge of what are you doing (Seriously)
First and foremost you need to have the raw files of the game extracted If not, use the latest release of CP77 Tools and extract the archive. You also need to extract and unbundle the lang_eng_text archive for this tutorial.
Now that you have the raw files, head to the "quest" folder (found here: [...]\basegame_4_gamedata\base\quest) then chose a quest from one of the sub folders:
main_quests (the main story quest, internally labled as qxxx)
minor_quests (minor activites such as psycho sighting... etc, internally labeled mqxxx)
side_quests (the side gigs such as Judy's quest, River's story... etc, internally labled as sqxxx)
For this guide, we're going to use the one named MQ041, also known as "War Pigs", avaialable only for the Corpo lifepath.
You should find it here: [...]\basegame_4_gamedata\base\quest\minor_quests
We want to make the main character say a different line then the one he is supposed to. For example replacing "Hey, yeah, sure. Damn, you ol' bastard, been a while since..." with "Fuuuck!" when the holocall starts.
You should have also unbundled and uncooked the lang_eng_text archive.
Okey, now that everything is clear, let's start.
1. Open the scenes folder inside MQ041, and then open the file named mq041_corpo_01_deadmans_switch.scene in 010Editor with alphaZomega's CP77_CR2W.bt template already installed.
2. Go to struct Data, open scnSceneResource, then scnscreenplayStore; inside you're going to find an array named scnscreenplayDialogLine3. We're going to associate each entry with the line we see on screen; to do so we need the locstringIds and another file you can get from the lang_eng_text archive
4. Next, open the lang_eng_text archive and search for mq041 here: [...]\lang_en_text\base\localization\en-us\subtitles\quest
5. Once found the quest folder open the .json named mq041_corpo_01_deadmans_switch6. Open struct Data, then JsonResource, handle:iSerializable, localizationPersistenceSubtitleEntry and finally array:localizationPersistenceSubtitleEntry7. Here in the value column you're going to see lots of stringId; remember the locstringIds from point 3? Good! They're the same
8. We now know that stringId = 1822802647440039936 is responsible for "Hey, yeah, sure. Damn, you ol' bastard, been a while since...", and that stringId = 1874801294016040960 is the same as "Fuuuck!"
9. Let's go back to the the
[PLACEHOLDER FOR A VIDEO]
R&R: Troubleshooting
The troubleshooting section for the Recolours & Refits guide
Summary
Created by @manavortex
Published September 30 2023
This page is a part of the Recolours and Refit guide. It will
The troubleshooting steps below will be expanded as people follow this guide and run into problems. If you encounter anything not on the list,
make sure to double-check the guide — did you complete all required steps in the correct order?
find @manavortex on the , for example in #mod-dev-chat
Import/Export
You can check or see for general troubleshooting.
I can't import my file back
Have you moved any files?
File paths are which files belong together. If you have moved files, do this:
Export the target file again
Overwrite the exported file in your project's raw folder with your changes
Import back
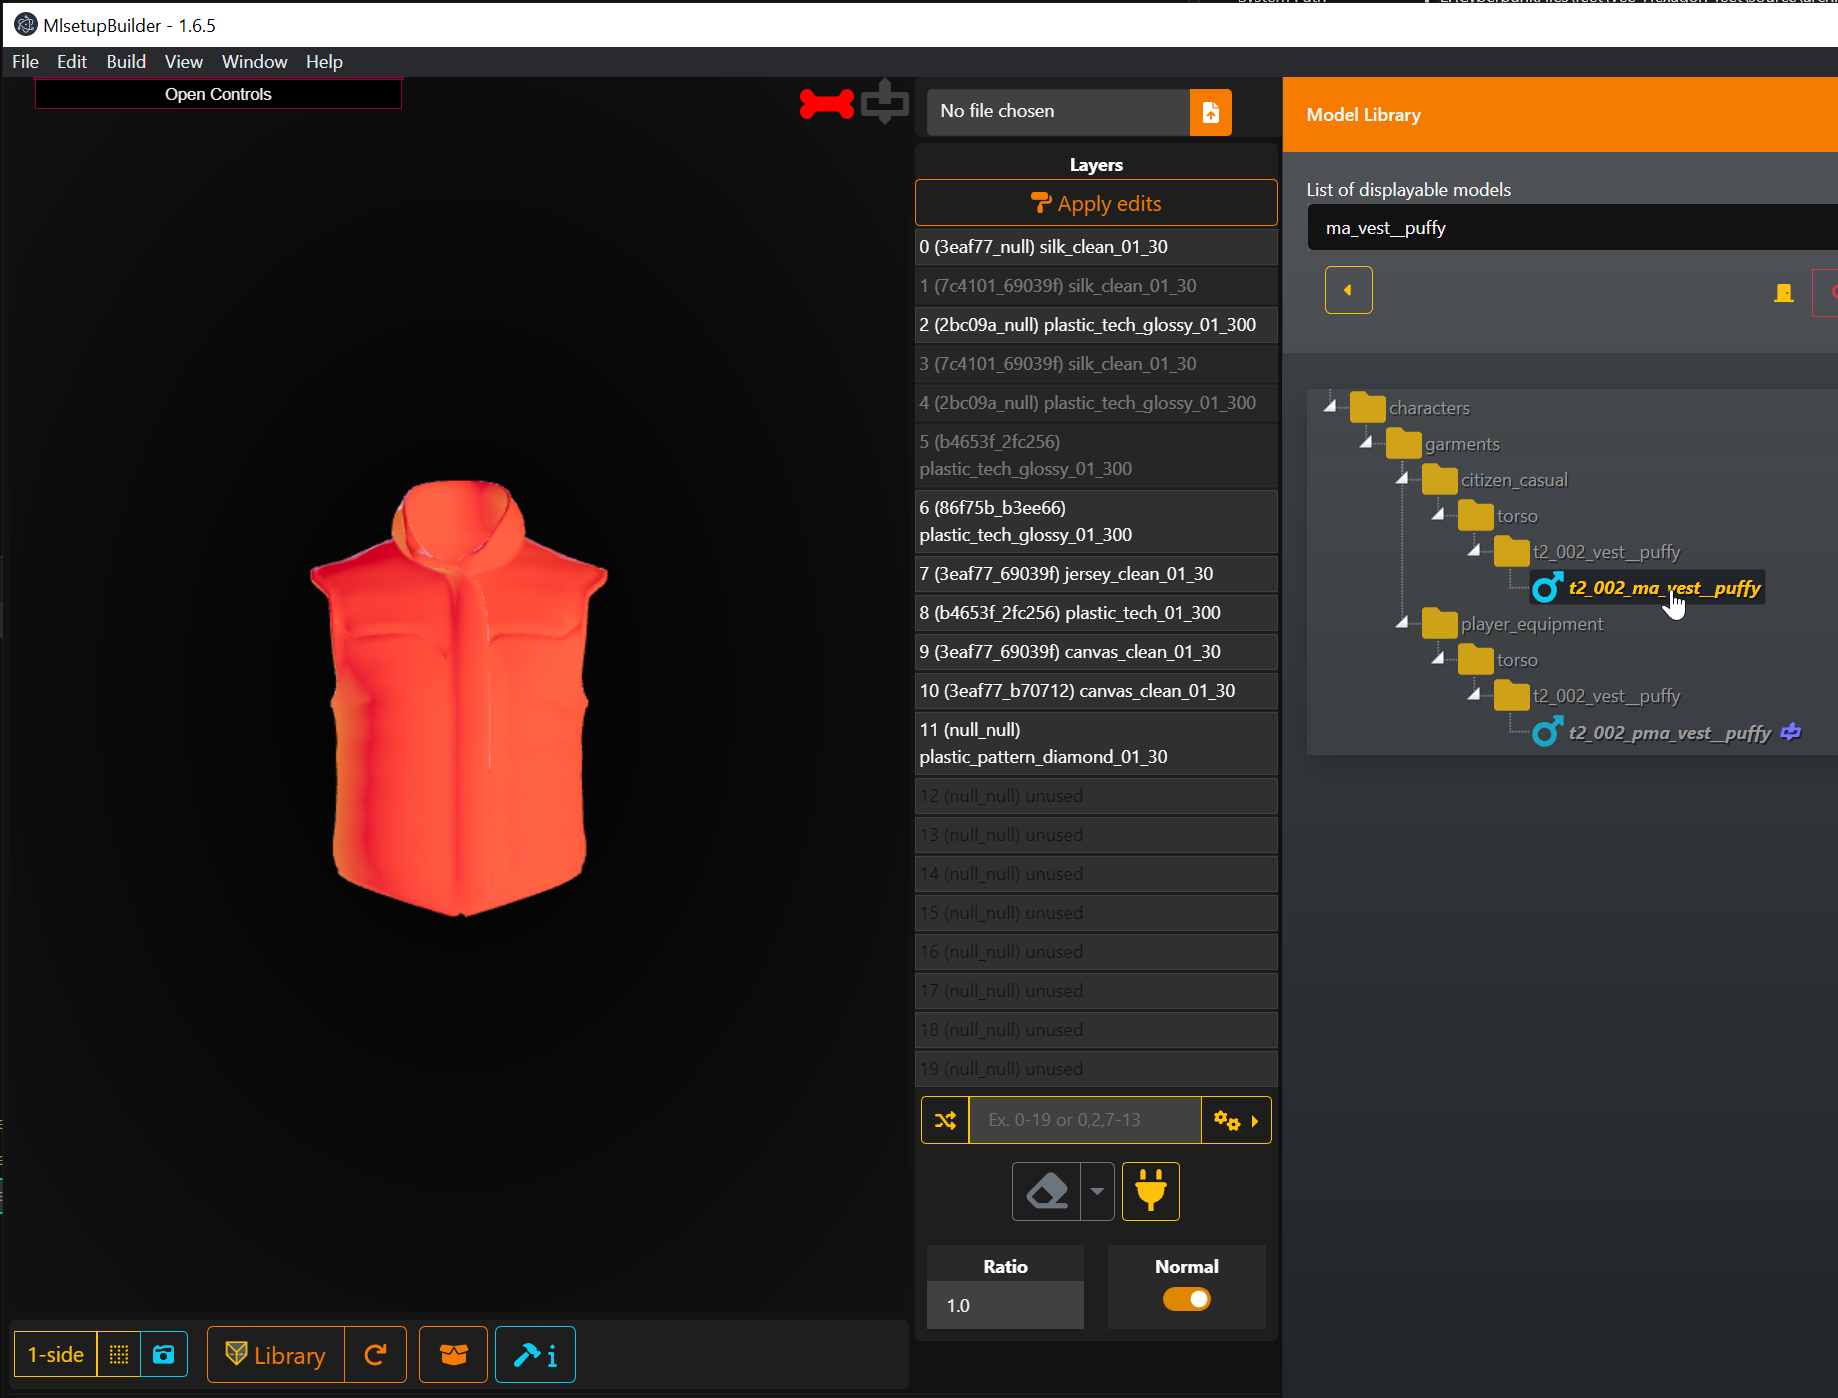
MLSetupBuilder
You can find tool-specific troubleshooting on .
I can't build a depot
That's okay, you can still , or you can check for more instructions.
Refitting
My mesh is string cheese!
You either need to , or .
World Editing
Step by step guide on how to move or delete a object from the world of cyberpunk 2077.
Summary
Created by @Krat0es
Published October 10 2022
This guide aims to teach you moving and deleting objects from the world.
Requirements
or higher
For more documentation on streaming sector files, see .
For a list of interesting locations to modify, see .
For a guide how to export streaming sectors to Blender, see .
Finding the required sector
first of all you will need your in-game player coordinates you can use print(GetPlayer():GetWorldPosition()) in the CET console to get them.
after that search for streaming block in the asset browser and open the block then click on sector preview
After finding the sector you need add it to your project then open it then click on sector preview again, from the menu on the right find the object you want to move or delete, click on the small red box to confirm if its the right object or not (you will see it disappear when you do that)
After finding the object you want to move or delete go back to the WorldStreamingSector tab then click on nodeData then find the object in the list (You can memorize where the node is from the sector preview menu) (edited)
Note: when you delete a object and you see a low res mesh in its place in the game that means the object has a proxy assigned you will have to find the sector the proxy is in and delete the proxy mesh. (you may do that following the same steps)
Adding Objects to the World
will share info on how to add objects like door, loot, walls etc
Summary
Created by @Krat0es updated by Doctor Presto
Valid as of March 21, 2023
This guide aims to teach you adding objects to the world.
Requirements
Recommended
and updated file created by KeanuWheeze - this archive contains an ent for every single vanilla mesh in the game, allowing you to spawn anything you'd like. place the archive in your mods folder and use the allpaths text file to replace the one in your object spawner data folder in the CET directory - should be something like this: Cyberpunk 2077\bin\x64\plugins\cyber_engine_tweaks\mods\entSpawner\data
Adding Objects to the World
Install Object Spawner
Start the game, load a save, navigate to the location you'd like to build and press your CET hotkey. Object Spawner will open along side CET and any other CET mods you have installed
Go to the "Spawn New" tab of Object Spawner and search for the objects you'd like to spawn - simply click on the name to spawn it.
Note: depending on the object spawned, it may or may not have baked in collisions. Keep this in mind and don't worry - there are a number of ways to either add collisions or fake them depending on the context.
Add your objects to a group - if creating a building or other complicated structure, you should also create subgroups for each of your exterior walls and other major components.
after placing the objects, save the group incase you want to change something later on and then use Object Spawner's export function to create a .JSON file which you can use to add these objects permanently to the world.
Now you are ready to move on to the next guide which will help you add these items to a new .streamingsector file and merge your additions with the game world using ArchiveXL so that your items are a permanent addition with no worries about conflicting with other mods.
How to Change Position and Rotation of an entMeshComponent
Guide made by Forsentio with the help of Loomy, PixelRick and Sombra - Team members working on various projects at RED Modding Tools.
Summary:
We will guide you through the step-by-step process that will allow you to rotate and position differently the duvet above V's bed, so that it flows with how the sleep animation plays out.
Requirements:
.
.
Some basic knowledge about modding Cyberpunk 2077.
The Steps:
1. Unbundle and uncook basegame_3_nightcity.archive, basegame_4_gamedata.archive.2. Find the entity you want to modify (in our case it's located here "basegame_3_nightcity\base\quest\minor_quests\mq000\entities")
3. Once you have the entity open its buffer in the Cyberpunk Save Editor by dragging and dropping it inside.
4. Open the entMeshComponent that has the same name as the mesh you want to modify (in our case is 3 entMeshComponent "bed_duvet_poor").
5. Open the localTrasnform array, and inside of it Position and Orientation; you're going to see different values.
IMPORTANT NOTE: ijkr are to be read as xyzw, **** where z is front/backword, x is left/rigth, y up/down.
6. Edit those values accordingly to how you want the entMeshComponent to appear in game (this is where experimenting is encouraged until you get the result you want )
IMPORTANT: For a better understanding of how your changes may affect the ingame position and rotation use this
Playing Sounds in-game : Basics
A Basic guide on the different ways to play a sound effect in-game
Difficulty:
This is a very basic tutorial so you don't need much knowledge to do it successfully.
Any text editor capable of opening a big JSON file without crashing
That's about it.
A quick introduction:
This tutorial presumes that you already have a mod project in WolvenKit and will not walk you through how to create one.
If you don't have redscripts in your project, you will need to add the following structure to your resources folder inside your mod folder:
Actually playing sounds:
There are 3 documented ways to play sounds using scripting. Two are linked to the event system and the third one is linked to a helper function:
Using the event system:
The first way:
The second way:
Using the helper function:
If you try to run the script now it will most likely fail because you don't have the player object used to queue or play the event.
So how to get the player?
It's actually quite easy, once a save has been loaded, you can simply use:
You are not even obligated to get the player. You can use any GameObject capable of handling events in the event way and you can use any GameObject at all using the helper function. If it isn't valid, the GameObject method will use the game engine to play the sound. (It will not be spatialized this way)
Playing any sounds that aren't V grunting:
If you did everything correctly, your sound should be played in the part of the script where you used it.
And now, you will probably want to play other sounds. Sounds played by the game are referenced using a redIdentifier. To find many of these identifiers for sounds, you will need to use WolvenKit and navigate to:
You can then import it into your project, turn it into JSON and explore the JSON file to find all the tags, for example:
Use any of these IDs and experiment!
There is a lot of them so use string search to find them more quickly. You can also search for them in the events array for an easier search with tags.
r6/
├─ scripts/
│ ├─ your_script.reds
let evt: ref<SoundPlayEvent> = new SoundPlayEvent();
evt.soundName = n"ono_v_effort_short";
player.QueueEvent(evt);
let evt: ref<AudioEvent> = new AudioEvent();
evt.eventName = n"ono_v_effort_short";
player.QueueEvent(evt);
This will open a window which allows you to browse to the export folder of Object Spawner. this will be something like Cyberpunk 2077\bin\x64\plugins\cyber_engine_tweaks\mods\entSpawner\export You will find a JSON file named after the main group you created and exported in this folder folder
Select that file and Wolvenkit will create the necessary nodes, in the streaming sector, adding them to the location you selected.
Delete the node which was included as an example and rename the file to something unique for your mod.
Open the new_mod.streamingblock file in the project
Under the "descriptors" tab, edit the 1st entry so that the depot path points to your .streamingsector file
Now you need to set the streaming box for your new sector. The easiest way to figure this out is to just take the coordinates from a central object in your mod (you can find these in your .streamingsector file on each node) and add 300 units to each number for the max, subtract 300 for the min. This will need to be adjusted based on how far away you want your objects to be visible in the world.
rename this streamingblock file to something unique to your mod
Now all that's left is to edit the .xl file included in the resources section of the example so that it points to your streamingblock file. All you need to do is replace "mod\new_mod.streamingblock" with the relative path to your streamingblock.
Once you've done the above steps, install your new mod and launch the game, if you've completed all the steps, your new objects, structure or location will spawn just like the rest of the world
If you run into any troubles, double check the guides and then pop over to #world-editing on the cyberpunk discord server
Use the tools in the "Spawned" tab to move and position your objects. It is a good practice to give each object a unique and recognizable label. Try to proceed slowly and always keep in mind that you may want to move/change or otherwise edit these components later on so a few extra moments to keep them organized and labelled can save you a lot of frustration later on.
Put your item in place of a default game item. Supports variants.
Summary
Created by @manavortex
Published November 05 2022
Updated July 26 2023
This tutorial will teach you how to switch a player mesh for an NPC garment and map its variants to the existing colours.
Other relevant know-how for this process:
For a guide how to import meshes into Cyberpunk, check .
Make sure that you replace an item that you can actually spawn — not all items in V's folder are actually spawn-able =>
Step 1: Replace the mesh
Perquisite: You need a Wolvenkit project.
Find the mesh that you want to use ("the old mesh") and replace it with the one that you want to switch in ("the new mesh").
Example: Replacing the short-sleeved poser jacket with the monk shirt with the tied-back sleeves. For the male variant, replace _pwa_ with _pma_ and _wa_ with _ma_.
Find both files in the Asset Browser and add them to your project.
Move the replacement mesh to the original mesh's folder.
Rename the old mesh (e.g. "t2_084_pwa__short_sleeves.mesh" -> "original.mesh").
Step 2: Enabling variants
The game looks up appearances in a mesh file by name. If none can be found, then game meshes will fall back to the default appearance, which is how the early replacers worked — every variant (base_01, old_01, rich_01) would simply spawn the default appearance.
We can simply transfer the names from the old mesh to the new mesh by renaming the entries in the appearances array.
If there are more entries than variants available, or if you're just curious which spawn code corresponds to which appearance, go for a guide how to find out.
Now that we have done that, we can start recolouring.
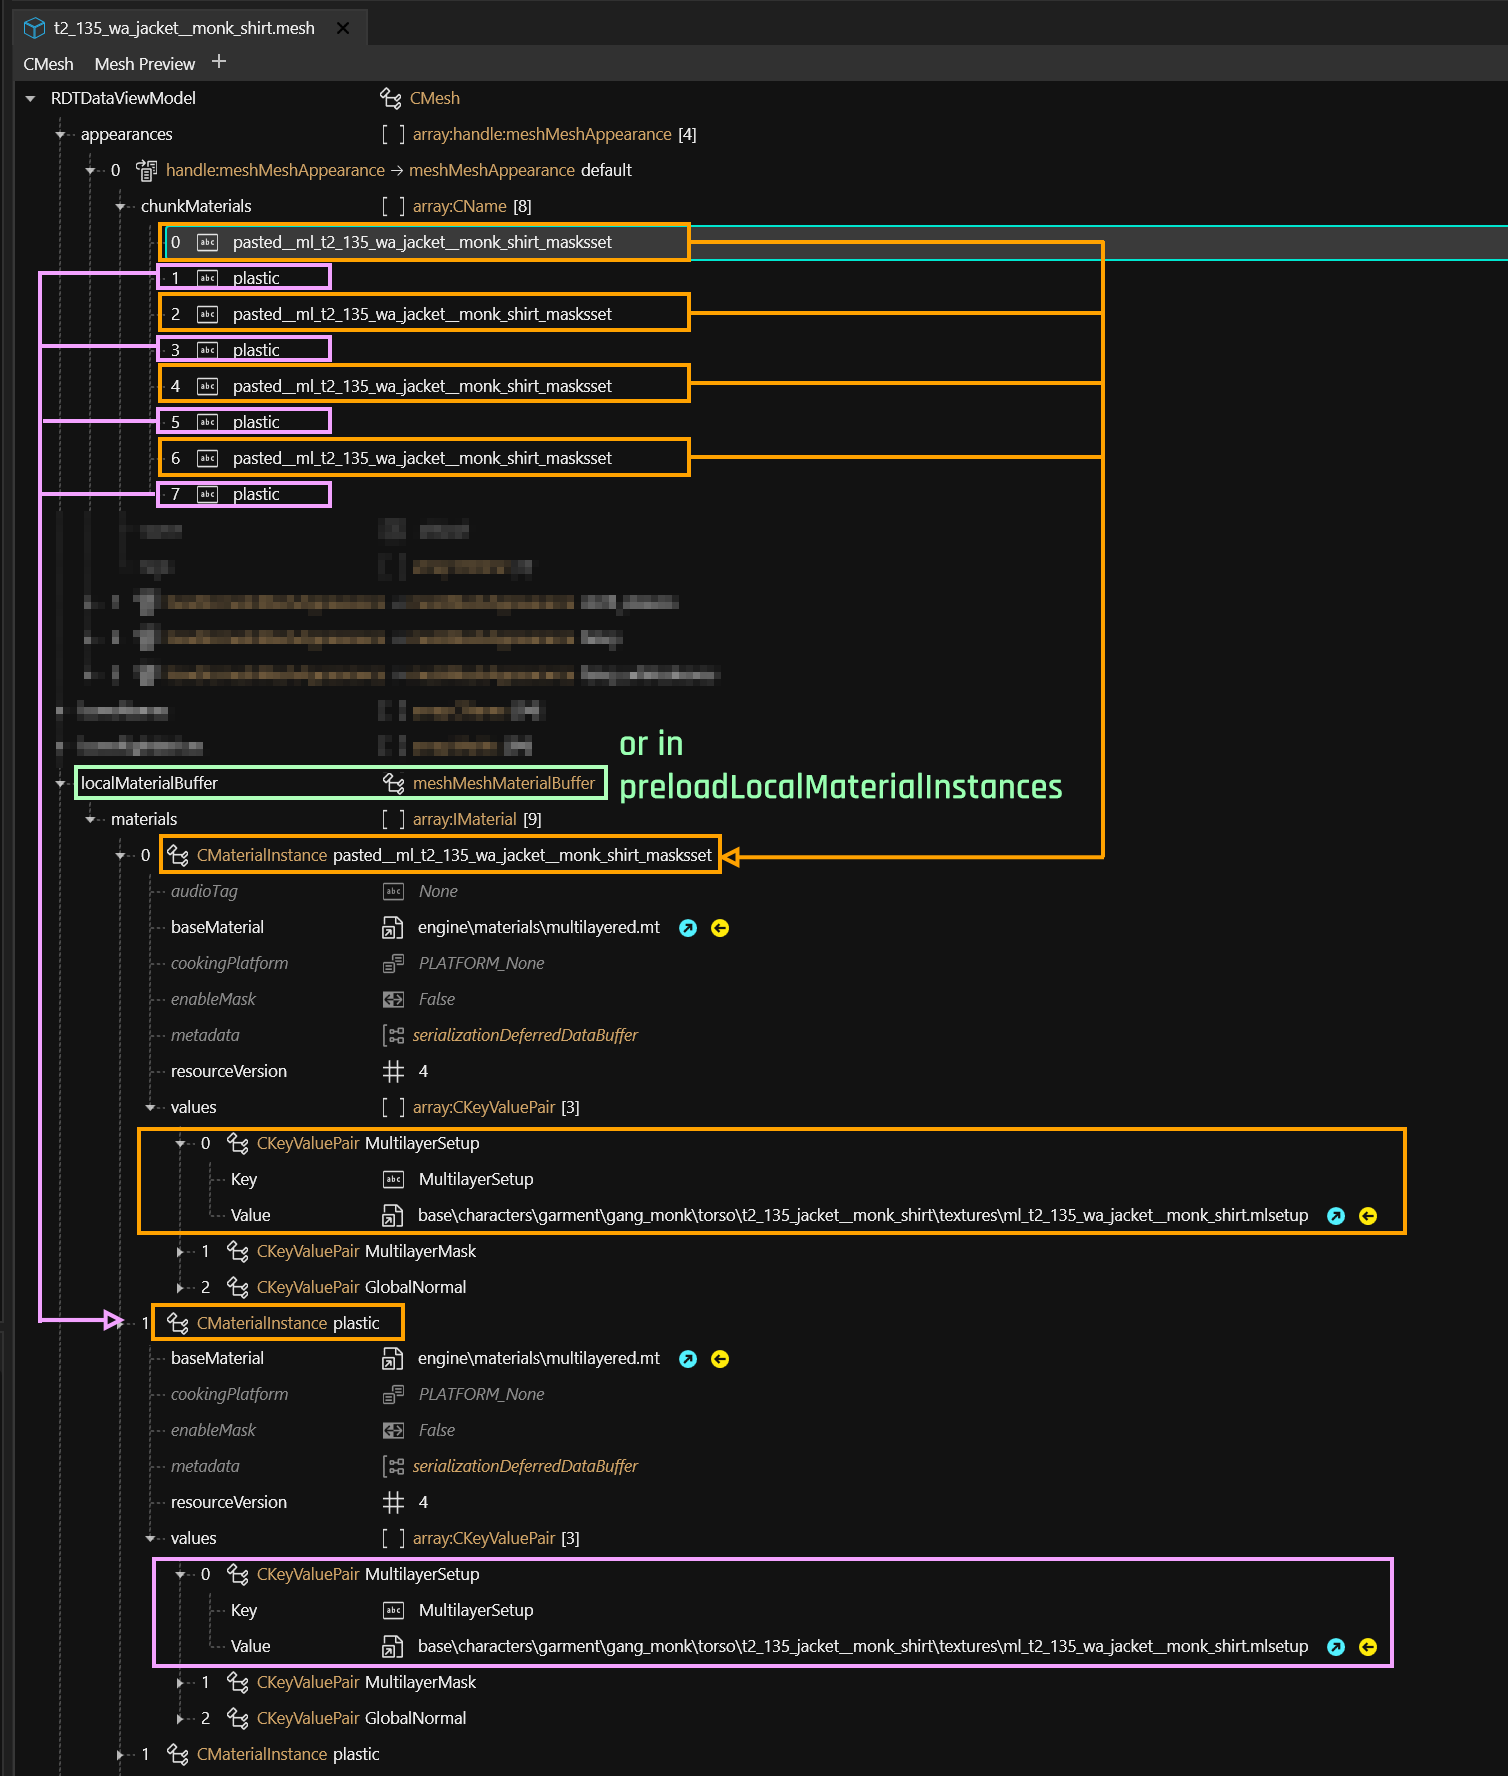
Step 3 (optional): Find the .mlsetups
Each appearance in the appearances array has a list of chunkMask entries (one per submesh), which are assigned a material by name. For a more detailed explanation, you can check , but all we care about right now is this lookup chain:
Step 4: Success!
You can now save your mesh, then install your mod by clicking on the green arrow in Wolvenkit's toolbar. Once you have started up the game, the old item will now look like your new mesh — including its variants.
For a guide on how to edit an .mlsetup file (or to change an item's appearance in general), see .
Enjoy!
Custom bodyhair for NPCs
Summary
Created by @Pinkydude
Published Summer 2021
What you’ll need :
or the game files extracted
[basegame_4_animation.archive]
The 010 hex editing software with the CP77 template as well as the scripts
The WolvenKIT console (CP77Tools)
🟨 WON’T WORK With AMM’s naked/shirtless custom appearances
I’ll assume you already know some basic modding
(extracting the files with the console or WKit etc)
You need to grab the mesh you’re going to use as a body / chest and swap on the NPC. I made edit to mine, but I used the “t0_000_ma_base__full” body
Open the “buffer 0″ and check the files list, search for the skintone your NPC is using. Mitch is using the “male_01_ca_pale.mi” file
You can see I have it custom pathed already, but you can check the other files to see the path
Go to the “base\characters\common\skin\character_mat_instance\male\body” folder and grab the .mi file corresponding to your NPC’s skin tone
Copy and Paste it in a custom folder created at the base of your mod
Also create another folder where you will put the custom texture you want your NPC to use (edited or not)
Let’s go back to our buffer 0 of our mesh
custom path your skintone, in my case “male_01_ca_pale.mi”, to point to your custom folder. In my case “base\materialinstances\male_01_ca_pale.mi”
Open that .mi file. That file point to another .mi file, that we also need to copy and paste in the custom folder, and then custom path
It calls for another file, that we also have to copy and paste into the custom folder. That .mi file finally calls for the texture files! We custom path those as well
Once you have the .mi files all custom pathed, and the texture custom pathed as well (don’t forget to save the edited files of course) you can custom path the one in the mesh buffer as well and save, then rebuild the mesh using the console (so that the edit in the buffer actually have an impact on the mesh!)
Copy that mesh, and create the folders that goes to your NPC’s main outfit, and swap one of the slot. I used Mitch’s jacket to load the body mesh
That specific body mesh will now read and load the .mi files and .xbm files from your custom folders in the mod and your NPC should now have a different texture than your V!
Your own HUD icons
Summary
Created by
Published July 15. 2023
This guide is a subsection of the Weapons ArchiveXL guide and details the process of adding a HUD icon. The same principle applies for other parts of the UI.
Adding custom player HUD icon
To add custom HUD icon:
Add base\gameplay\gui\widgets\ammo_counter\atlas_ammo_counter.inkatlas and base\gameplay\gui\widgets\ammo_counter\atlas_ammo_counter.xbm to your project.
base\gameplay\gui\widgets\ammo_counter\atlas_ammo_counter.xbm as PNG and create a custom icon in chosen editing software. (You can refer to if you need further reference material).
Edit the inkatlas file as in the .
Editing the .yaml file
Now that you have a custom preview icon, it's time to hook it up. You do this by editing the .yaml file.
You'll find written instructions below the screenshot.
The base record
Add a HUDWeaponIcons entry at the root level of your .yaml (no indent). Give it a name, such as HUDWeaponIcons.TheFallout in the screenshot above.
It has the following properties (indent level 1):
Key
Value
Explanation
Making the weapon use it
Add a new property to the weapon that refers to the record you have created above:
For documentation on the Wolvenkit Import/Export tool, see here.
Exporting a texture
Add the texture you want to overwrite to your Wolvenkit project.
If necessary, move and rename it. You should stick to the game's naming convention.
Find the Export Tool (Tools -> Export Tool) and export the texture.
Editing a texture
Editing textures is straightforward: just change them in your image editor of choice. The only hitch for reimport is the transparency.
Wolvenkit supports the .dds file format, but since that is more complex, we won't talk about it here and stick to the .png format.
If you're using .dds files, you probably know what you're doing anyway :)
Paint.NET
is a free image editing software for Windows. It supports PNG transparency out-of-the-box.
Adobe Photoshop
To export with transparency in Photoshop, you need an alpha channel. Fortunately, creating one is simple. (For the initiated: The alpha channel is just a layer mask over the entire image.)
Find the Channels palette at the bottom right of your Workspace and add a new channel:
Your image will turn black now, because the selected alpha channel will not have transparency yet.
To get your image back, select "RGB" on the Channels palette — but we'll stay on the Alpha channel for now.
In the layers palette, use your image as selection by ctrl+clicking on the layer's icon:
With the alpha channel selected, fill your selection with white to mark the transparent parts.
The fastest way to do that is to press d, x, delete
You can now save your image as a PNG with transparency. If you have exported a texture in the first section, you should overwrite that file.
Importing a texture
Find the Import Tool (Tools -> Import Tool) and select your texture.
If you have stuck to the game's naming convention, Wolvenkit will select the right preset for you. Otherwise, you need to select the right preset:
TexG_Generic_Color for a diffuse/albedo
Troubleshooting
My texture shows up completely black or completely white
Change Compression to TCM_None, then reimport
Custom Loading Screens
Summary
Created by @Pinkydude
Published Summer 2021
What you’ll need :
or the extracted game files
Photoshop / Art program
I’ll assume you already know some basic modding
(extracting the files with the console or WKit etc)
First of you’ll need to create your mod folder, it should look like this
This is where the Loading screen image are stocked, so go in that exact same folder in your Game Extracts!
Depending on the resolution you’re using, you’ll have to edit either the 4k files or the 4k_1080p files
I personally need the 4k files ; There is 13 loading screens in total, and you’ll need the .tga .dds and .xbm files for each one, meaning 39 files in total in your mod folder
Now open Photoshop, and edit the .tga files with your screenshots!
You’ll notice that the loading pics are vertically swapped;
be sure to also vertically swap your pics so that it’ll look normal in game
Once you’re done editing all 13 .tga files, you save them
We now open Noesis, and navigate to our mod folder
You’ll need to Right Click on your .tga files and select Export, and change the Main Output Type to .xbm
Click export, you should see a pop up window; simply click OK
Once you’re done exporting all your 13 .tga files to .xbm, you can delete the .tga files from the mod folder (or keep them somewhere else! remember to put them back in the mod folder to export them if you do want to edit them later)
You should now have 52 files - the originals and your exported .xbm with “out” at the end of the name. Delete the originals and rename your exported .xbm to take out the “out” !
Then you’re left with 26 files, it should look like that :
We now open CP77 Tools / Wolvenkit Console ! We need to rebuild the .xbm files
cp77tools import -p [PATH] –keep
Pack your mod and test it!
Archived: Custom poses for spawned NPCs
Summary
Created by @Pinkydude
Published Summer 2021
As with AMM 2.0, this guide is rather obsolete, but will be kept archived!
What you’ll need :
(or any other mods that spawn characters)
or the game files extracted
[basegame_4_animation.archive]
The 010 hex editing software with the CP77 template as well as the scripts
I’ll assume you already know some basic modding
(extracting the files with the console or WKit etc)
It’s important to also know that some characters have their own locomotion files (meaning unique pathing etc) Like Panam, Goro etc
I won’t go over every single ones here!
For this tutorial, I’ll make an animation for Mitch, who uses the Man Average Civilian Locomotion (MAC)
The MAC locomotion [man_average_civilian_locomotion.anims] is located here [base\animations\npc\generic_characters\male_average\locomotion]
This will be the path of your mod!
To grab an animation, you’ll have to go into the Animations folder, there you’ll see multiple other folders- the [main_quests] and [side_quests] have unique animations not used by any other characters outside of that that specific quest!
For example, q103 is Ghost Town, the start of Panam’s quest line
I’ll use the animation of Mitch hugging Panam when we meet them at the camp!
Once you find the animation you wish to use, simply copy and paste it in your last folder in your mod project, the [locomotion] folder, and rename the .anims file with the character’s locomotion file’s name, in Mitch’s case its [man_average_civilian_locomotion]
Once pasted and renamed, you can now open the .anims file in 010!
A lot of .anims file actually have multiple animation inside of it to choose from, simply open the [struct DATA] handle to expand the list. Since mine is an unique animation, there’s only one [animAnimation]
I’ll now click on the [CNAMES] handle and use the PASTE script
(I recommend setting a shortkey, you’ll use it a lot for custom poses among other things!)
A window should pop up asking for an input : Here, type [idle_stand]
(this is the name of the idle animation the NPCs use when spawned!)
This will add a new CNAME to the list. Now, go back into [struct DATA] and open up the [animAnimation] you wish to grab!
The new CNAME we added will automatically be the last one in the list, not wasting time by checking what number it has, I simply put a really large number to be sure to grab the last name in the list!
Click on the OG name and simply put 500 with the numpad to change the CNAME to [idle_stand]
Save your file and pack your mod! You’re done!
Load a save file, spawn any character using the MAC locomotion and VOILA 💛
Custom in-game icons
Creating a custom inkatlas
Preview images
Okay, now you've added something! But it doesn't have a preview icon yet - you'll have to add this manually. For this purpose, you'll have to edit an image.
For a guide how to ensure image transparency, see .
Cyberpunk uses xbm as format for its textures. These textures are then mapped (divided into slices) by inkatlas files. The individual slots can then be used by the game for pretty much everything from UI elements to phone call icons — and image previews.
If you want to use the in-game previews, you can find them under base\gameplay\gui\common\icons\items
Setting up the files
First of all, the template archive (kindly provided by Apart). This includes the following files:
Template
Size of slot image
This guide assumes that you have a bunch of ready-made icons lying around - if you don't and have no idea where to start, you can check , section "Making the icon".
Select 40_items_inkatlas_template and copy the .inkatlas and the .xbm to a folder of your choice inside your Wolvenkit project( this guide will be using tutorial\ops).
I'm renaming both of them to preview_icons so that future me won't be confused about this:
Export preview_icons.xbm via the Export tool — we'll overwrite the resulting file to reimport it.
Open 40_item_template.pdn in and put all your icons in.
Import the file. Make sure that IsGamma is turned off, everything else should already be OK:
You can now open preview_images.xbm in Wolvenkit and see your new, edited items.
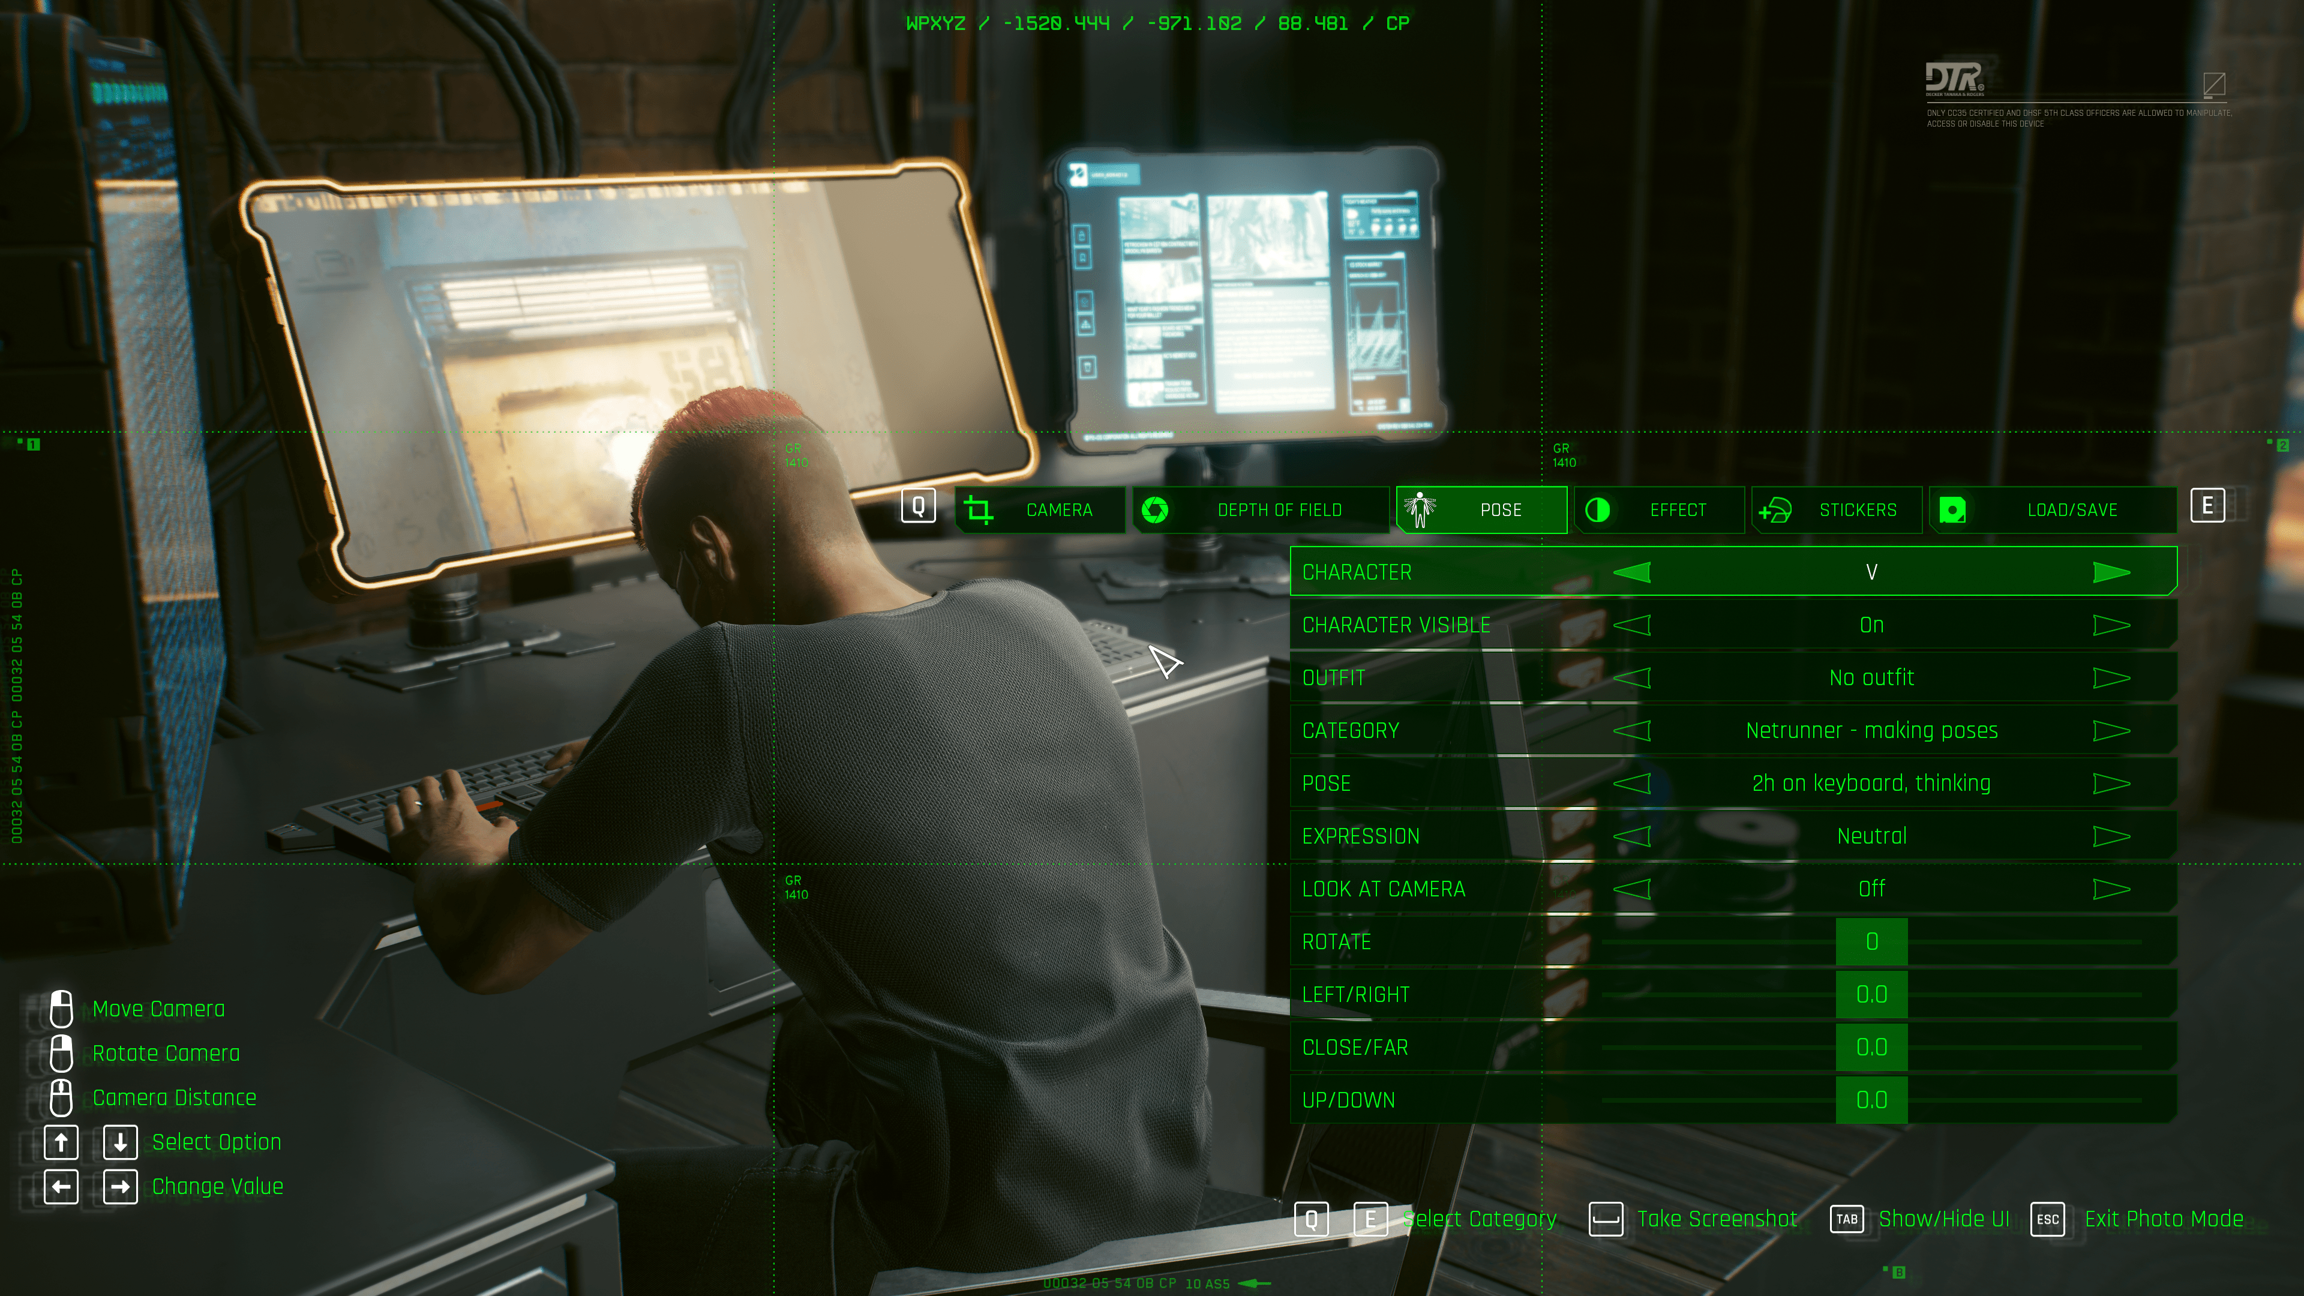
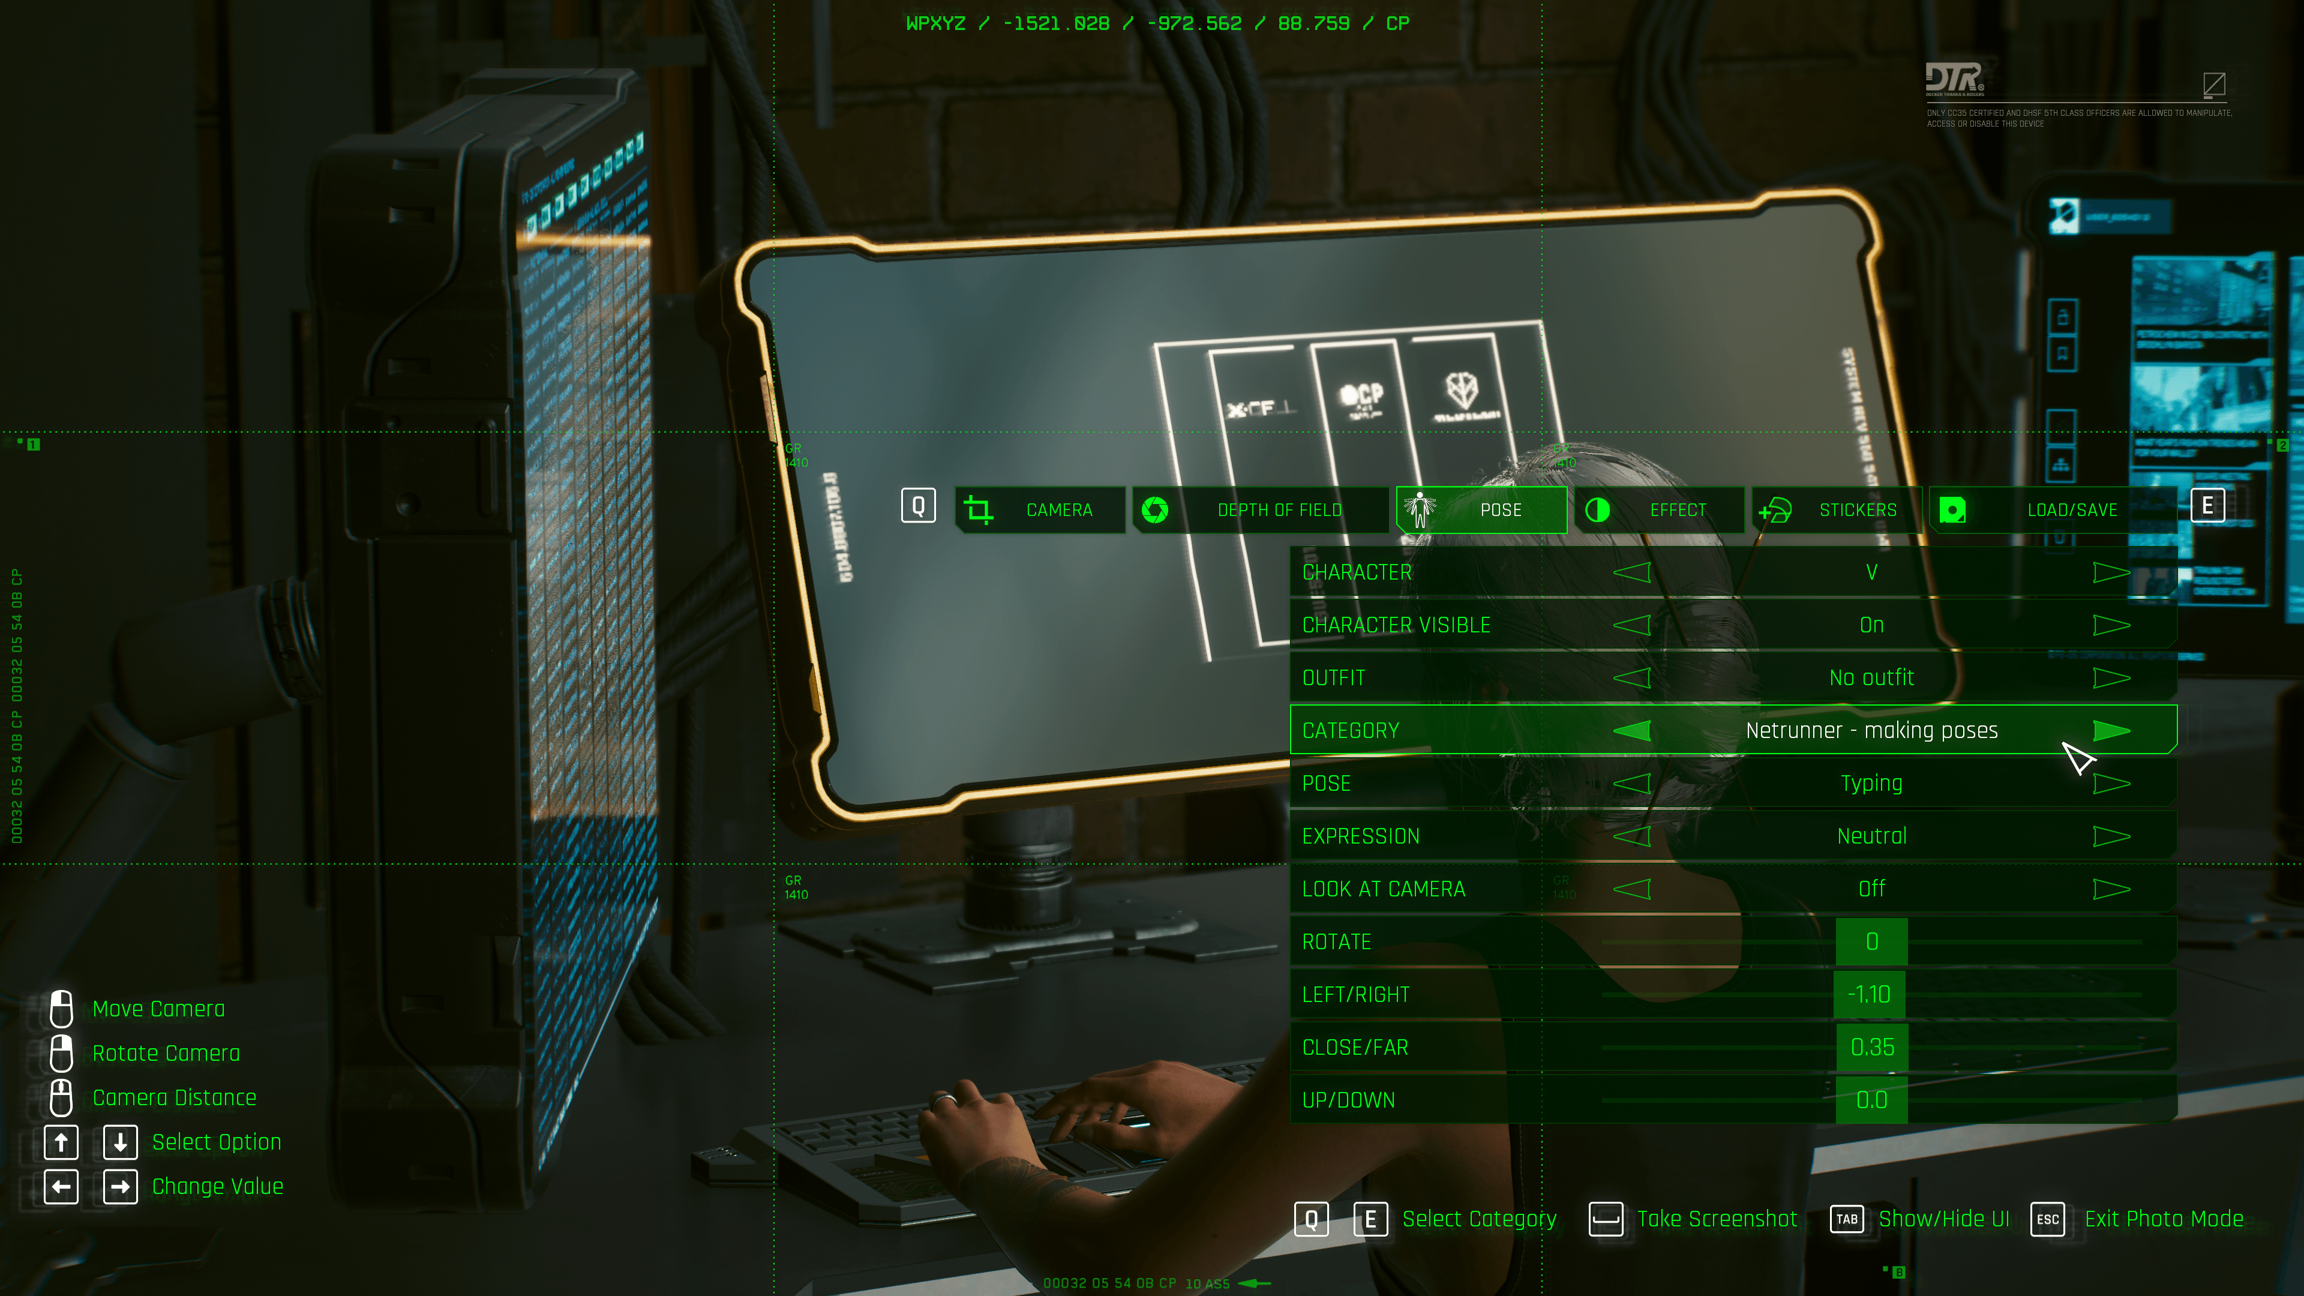
Photo Mode / AMM: Other Facial Expressions
Guide to change expressions for photo mode and AMM
Summary
Created by @manavortex
Published ???
Updated: 15. 09. 2023
This tutorial will teach you how to replace the default Photo mode or AMM expressions with those from an NPC.
Difficulty: You need to be able to read. If you run into trouble anyway, please hit us up on Discord so that we can improve this guide!
Textures: Custom MultilayerMask
How to make a custom MultilayerMask for your mesh
Summary
Created by @manavortex
Published April 12 2023
This tutorial will teach you how to create your own MultilayerMask for an item and then assign an own MultilayerSetup to it.
Difficulty: You know how to read.
Moving and renaming in existing projects
How to avoid changing every single depotPath in your mod by hand
TL;DR:
Check the following steps:
Adding new items: files from scratch
How to set up the folder structure from scratch
Summary
Created by @manavortex
Updated June 10 2023
This page is a part of the guide and deals with finding the correct files for .
external: NPVs (V as NPC) - custom NPCs
A subpage dedicated to custom NPCs
This page is dedicated to the process of creating custom NPCs via community guides and -resources.
For the wiki version of this guide, see .
Throwing weapons: projectiles
How to make a custom projectiles for throwing weapons
This page is a sub-page of and tells you how to create a custom projectile for a throwing weapon.
To create a custom throwing weapon, check the parent guide and use knife as a base type.
Everything after the yaml works like adding regular items with a root entity, an appearance file and a mesh. We won't be using a mesh entity here.
You can find all projectile entities in base\gameplay\projectiles\knife.
base\gameplay\projectiles\knife\tanto_projectile.ent is a root entity with associated .app file, while base\gameplay\projectiles\knife\knife_projectile.ent is a mesh entity with the component directly included.
Create a copy of the entity that you want, then connect it in your factory.
Step 3: The factory
Finally, hook everything up by registering the appearanceResourceName from your .yaml file in your factory.csv. As a reminder, this is the line we're talking about:
Make sure that the corresponding entry points at your projectile's entity file from step 3.
Step 4: The right mesh
In your entity or the linked .app file, make sure that you change all paths to the right mesh. (The mesh path is contained in resolvedDependencies and inplaceResources as well. TODO: Check if this is really necessary, then update the guide or tell mana, who couldn't be arsed to check herself)
Step 5: Test
If you did everything correctly, you should now have a custom projectile for thrown weapons.
This will be called the target file in the rest of this guide
Step 2: Replace the target file with the one you want
NPC animation files have the extension .anims and reside in the folder base\animations\facial. You can find the ones for facial expressions by searching in WolvenKit for
Find the file that you want to use and copy it over the original file.
Although the file names are gendered, you can pick any of them.
If you aren't sure which file you want to use, check the references.
👉 If you are missing reference screenshots, feel free to create and upload them. The existing ones have been created the hard way.
Step 3: Pick the expressions you want
Photo mode uses a total of 12 expressions by looking for animation names in the target file. You need to connect the selection picker with the NPC file you just copied.
Important: AMM and photo mode use different keys. Just make sure to pick the right table, and everything will be fine.
Do this by opening the target file (which you replaced with the NPC of your choice) in WolvenKit.
Find the animation you want to use and change its name:
Replace the original name with one from the .
If you don't know which ones you want to use, check out the .
Rinse and repeat the process until you're done.
Save the file, pack the project, and start the game - voila, you now have custom expressions.
References
You can find a list of screenshots with facial expression references here.
Troubleshooting
My expressions don't work at all!
Make sure that you have replaced the correct file, and that your mod has been correctly packed and installed.
Some of my expressions aren't working!
The game will look for the animation by exact name. AMM is using a different list than photo mode — make sure that you are using the right keys.
It's showing expressions, but not the one I picked!
Check your target file: you have used a key twice.
If the game is looking for the neutral expression, it will stop looking as soon as it finds an animation with the name of facial_neutral. If you have multiple of those, it won't care.
To find out what an MLMask does, see here.
To learn about MLSetups, see here.
Export the MultilayerMask
Start by adding any .mlmask file to your WKit project. It doesn't matter which one, but you can start with this (6 white layers):
Then, export it via the Export Tool.
This will give you the following file structure:
Blender: Painting the MLMask
Add the mesh that's supposed to hold your material to your project and export it.
Import it into Blender and select the Texture Paint perspective.
Switch into Edit Mode
Select those parts of the mesh that you want to color.
Duplicate them (Ctrl +D, ESC) and split off a new submesh (P -> Split Selection).
Switch back into Object Mode.
Select the new submesh; hide the old one.
Create a new image. It can be 512x512 for now; only upscale if you find that you can't get it un-pixelated in-game. Most CDPR layer masks are really low resolution!
Switch the right viewport into "Texture Paint"
Find the "Texture Slots" dropdown in the menu (you may have to scroll)
Set Mode to Single Image
Select your new black image from the list below.
In either of the panels, set your brush foreground color to white (or gray). This determines the transparency of the layer. I recommend that you use white and regulate transparency via mlsetup, but if you want to paint e.g. clothing folds or wear&tear, you might want to paint greyscale.
Optional: Set these properties under "Options":
Paint!
Rinse and repeat until all parts of your mesh that should have your material are white on the left-hand image.
Now for the annoying part: On the right side, make sure the mask is more or less smooth, as you will see this in-game.
Now, save the image: overwrite one of the layers from the mlmask that you have exported. If you run out of layers, you can just add them at the end.
The game assumes that layer 1 is white, so start exporting over layers >0
Do this as often as necessary.
Import the MultilayerMask
Once you're done, open the masklisk and make sure that you have exactly as many entries as you have images in your folder (adding or deleting them as needed). Then, in Wolvenkit, import the masklist via Import Tool.
All images in the multilayer mask need to have the same resolution. Otherwise, it will crash your game.
You can now assign your new Masklisk to your mesh and use it together with custom MultilayerSetups.
In Wolvenkit, save all your open tabs and close them. You don't want any files to be open in Wolvenkit for what comes next.
Move and rename your files and folders, e.g. tutorial\myshirt to your_modder_name\my_tshirt. (If Wolvenkit doesn't let you, you can use the Windows Explorer.)
Make sure that you stick to lower case letters and use _ instead of spaces!
Good: your_modder_name\my_tshirt
Bad: yourModderName\myShirt
Horrible: your modder name\My Shirt
In Wolvenkit, right-click on the top level folder under archive and select "Convert to JSON"
Changing the file paths
We will use Notepad++ to adjust the file paths in all files in your project. For that, we need to find and replace the following entries. If you aren't sure about that, see the next section.
What kind of file:
Find What (your old path)
Replace with (your new path)
Inside the .archive (with double slashes)
tutorial\\myshirt
your_modder_name\\my_tshirt
in resource files (e.g. .xl)
tutorial\myshirt
If you already know what to do, you can skip forward to Importing Back.
Preparation: what do I replace again?
Switch Wolvenkit's project browser to raw, then open one of the created .json files in Notepad++.
Use "Search: Find in Files..." (Ctrl+Shift+F)
In Find What, enter the name of your old folder (e.g. tutorial)
Click Find All - that will give you all the entries you have to replace.
Make sure that you are using the same kind of slashes. If the old path has double backslashes, the new path must have them as well.
We goin' in
You know what to replace now. For every type of entry, do the following:
Use "Search: Find in Files..." (Ctrl+Shift+F)
Check the Follow Current Doc. checkbox.
Click into the Directory field. It now has the path to the file you've just opened
Cut off the subdirectories: you'll want to search and replace directly under source
For Find what put the name of your old folder that you copied in step 6
For Replace with put the name of your new folder. Make sure that you have double backslashes!
Click on Replace in Files
Importing back
Now that we have changed the paths, we need to get those changes back into our Wolvenkit project. In the project's raw view, right-click on the toplevel folder and select "Import from JSON" (however it is named, there's just one item that will let you import your json files)
Deleting leftover files
If you have packed any tutorial projects before renaming files or folders, make sure to delete leftover files from your Cyberpunk 2077 directory. It's easiest to search the root folder for tutorial and delete everything that looks like your old stuff — if it's from your project, the next install will put it back.
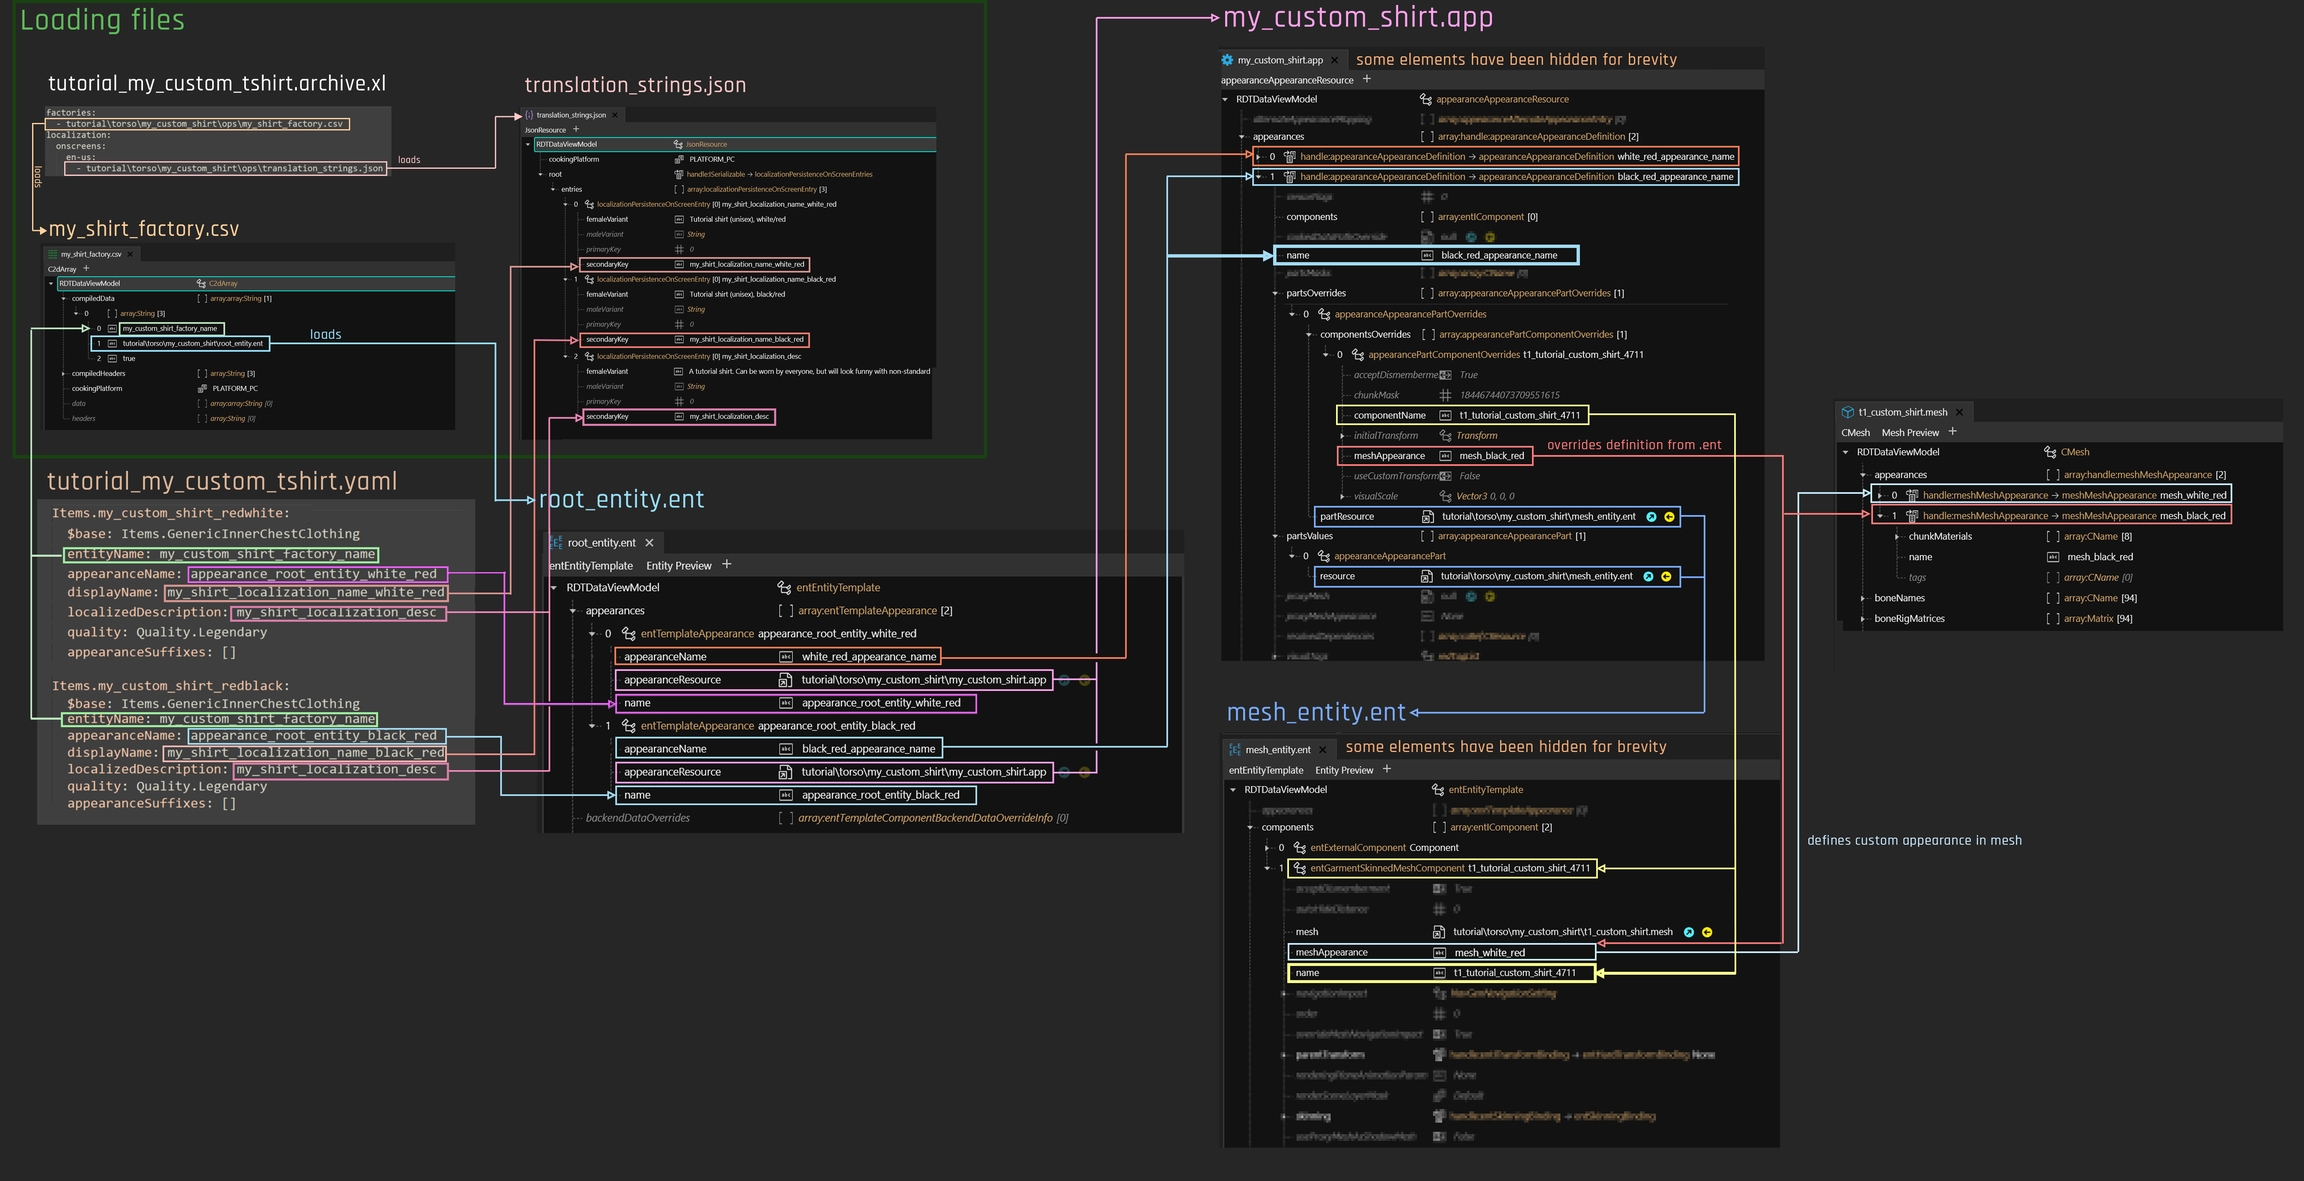
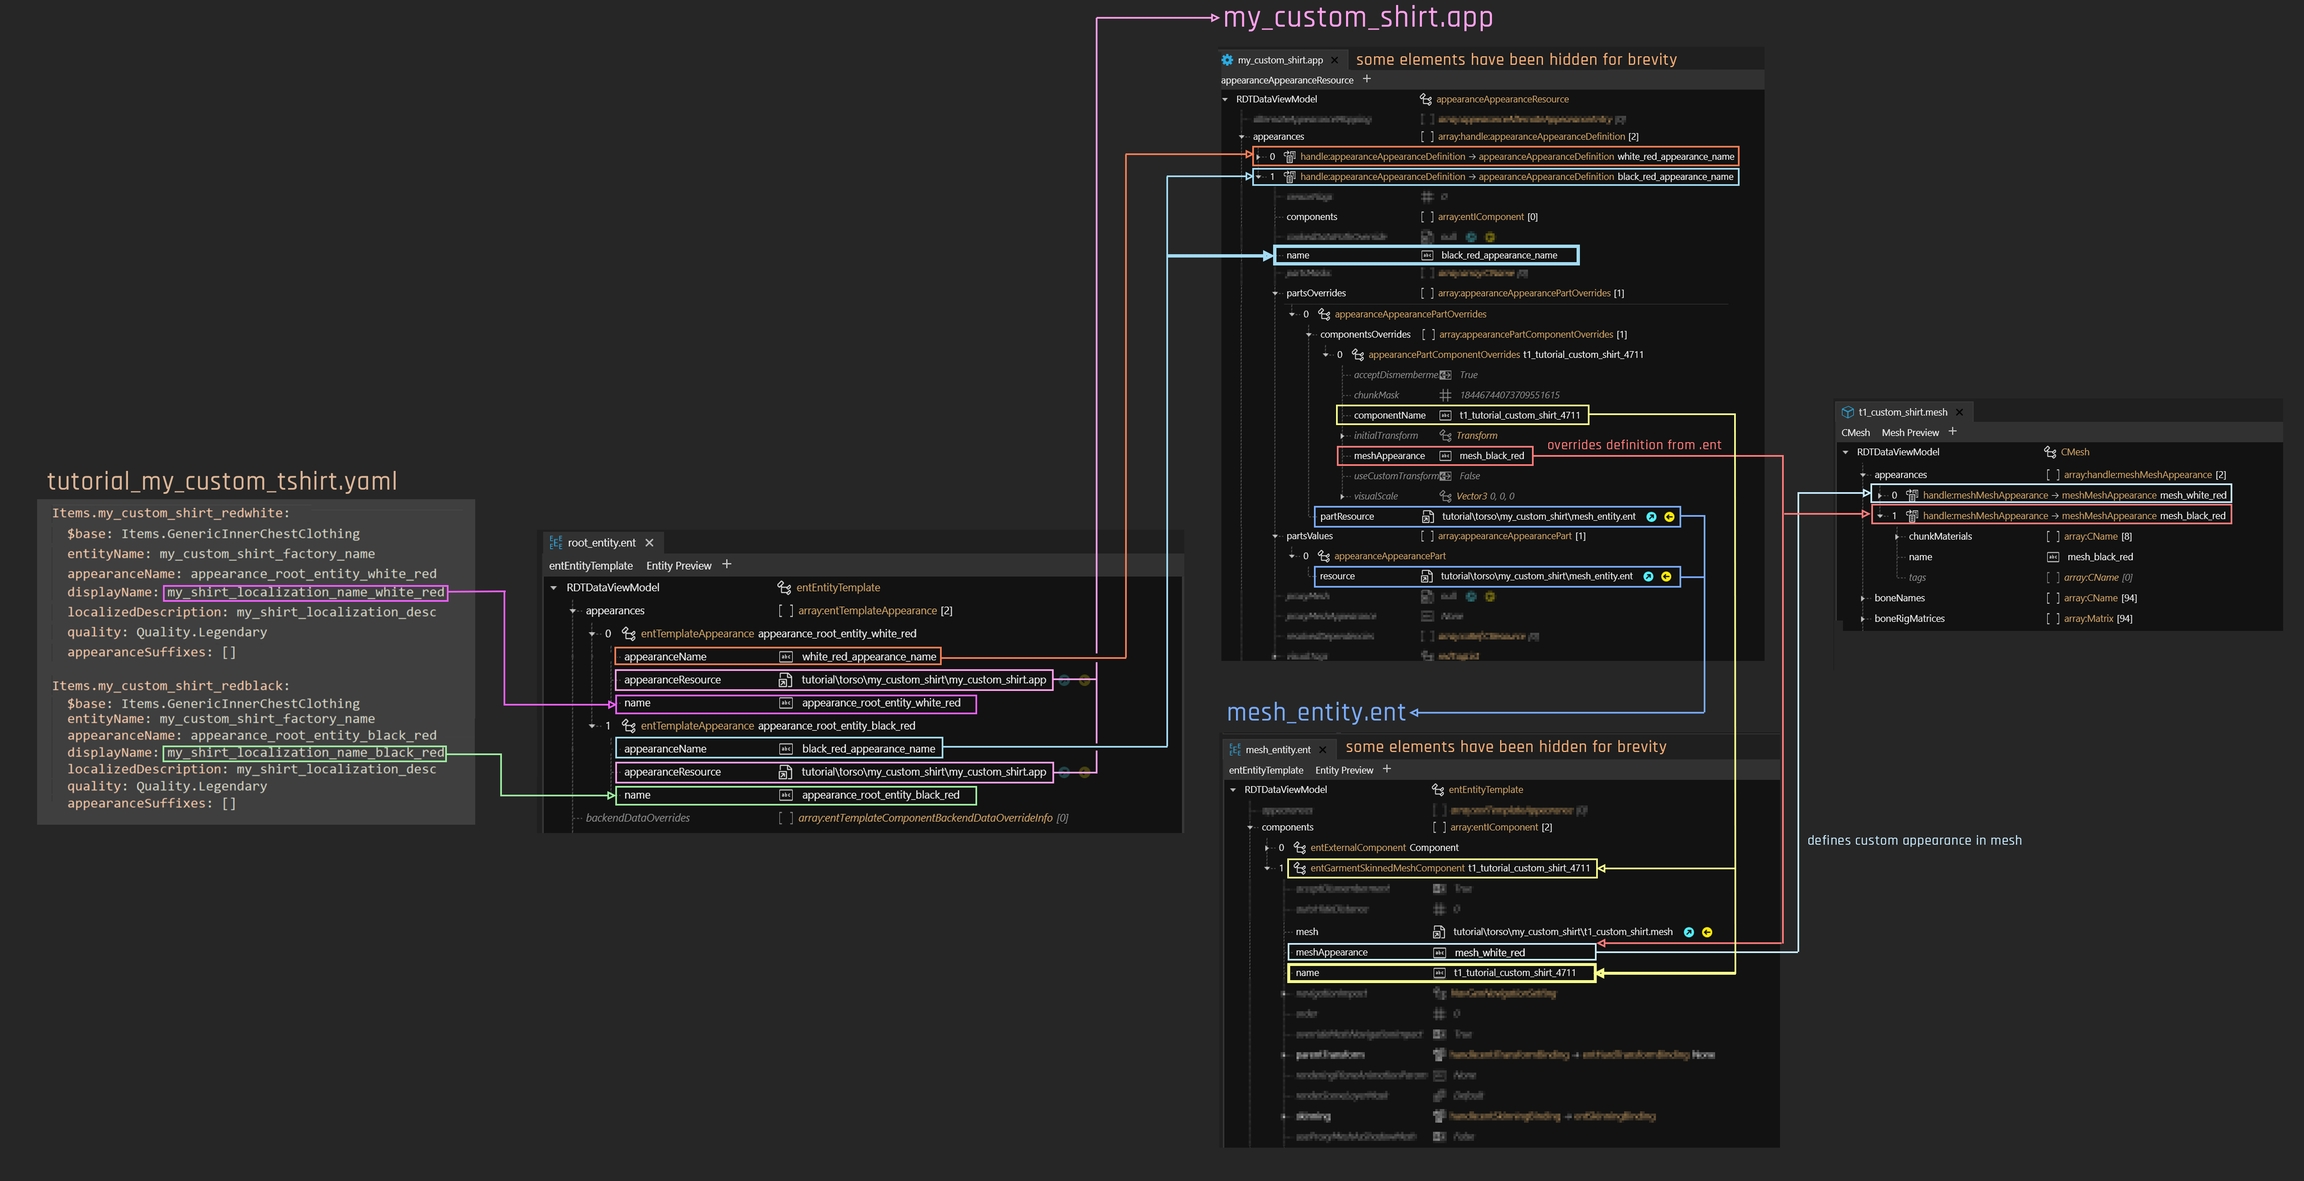
For mesh_entity.ent, your entity file needs to correspond to your item's body part. If you put a shirt in an entity file for shoes, it will deform badly once you put it on.
If you rename your components, we recommend using CDPR's naming prefixes for reasons of garmentSupport. You dont need to understand how this works, just name your component like l1_myCustomPants instead of myCustomPants and call it a day.
For further details, check .
It is good practice to keep local copies of everything that you change (=> custompathing) instead of overwriting files under base. This makes sure that no other mods will overwrite your changes.
ℹ Only keep files under base if you are okay with them being overwritten!
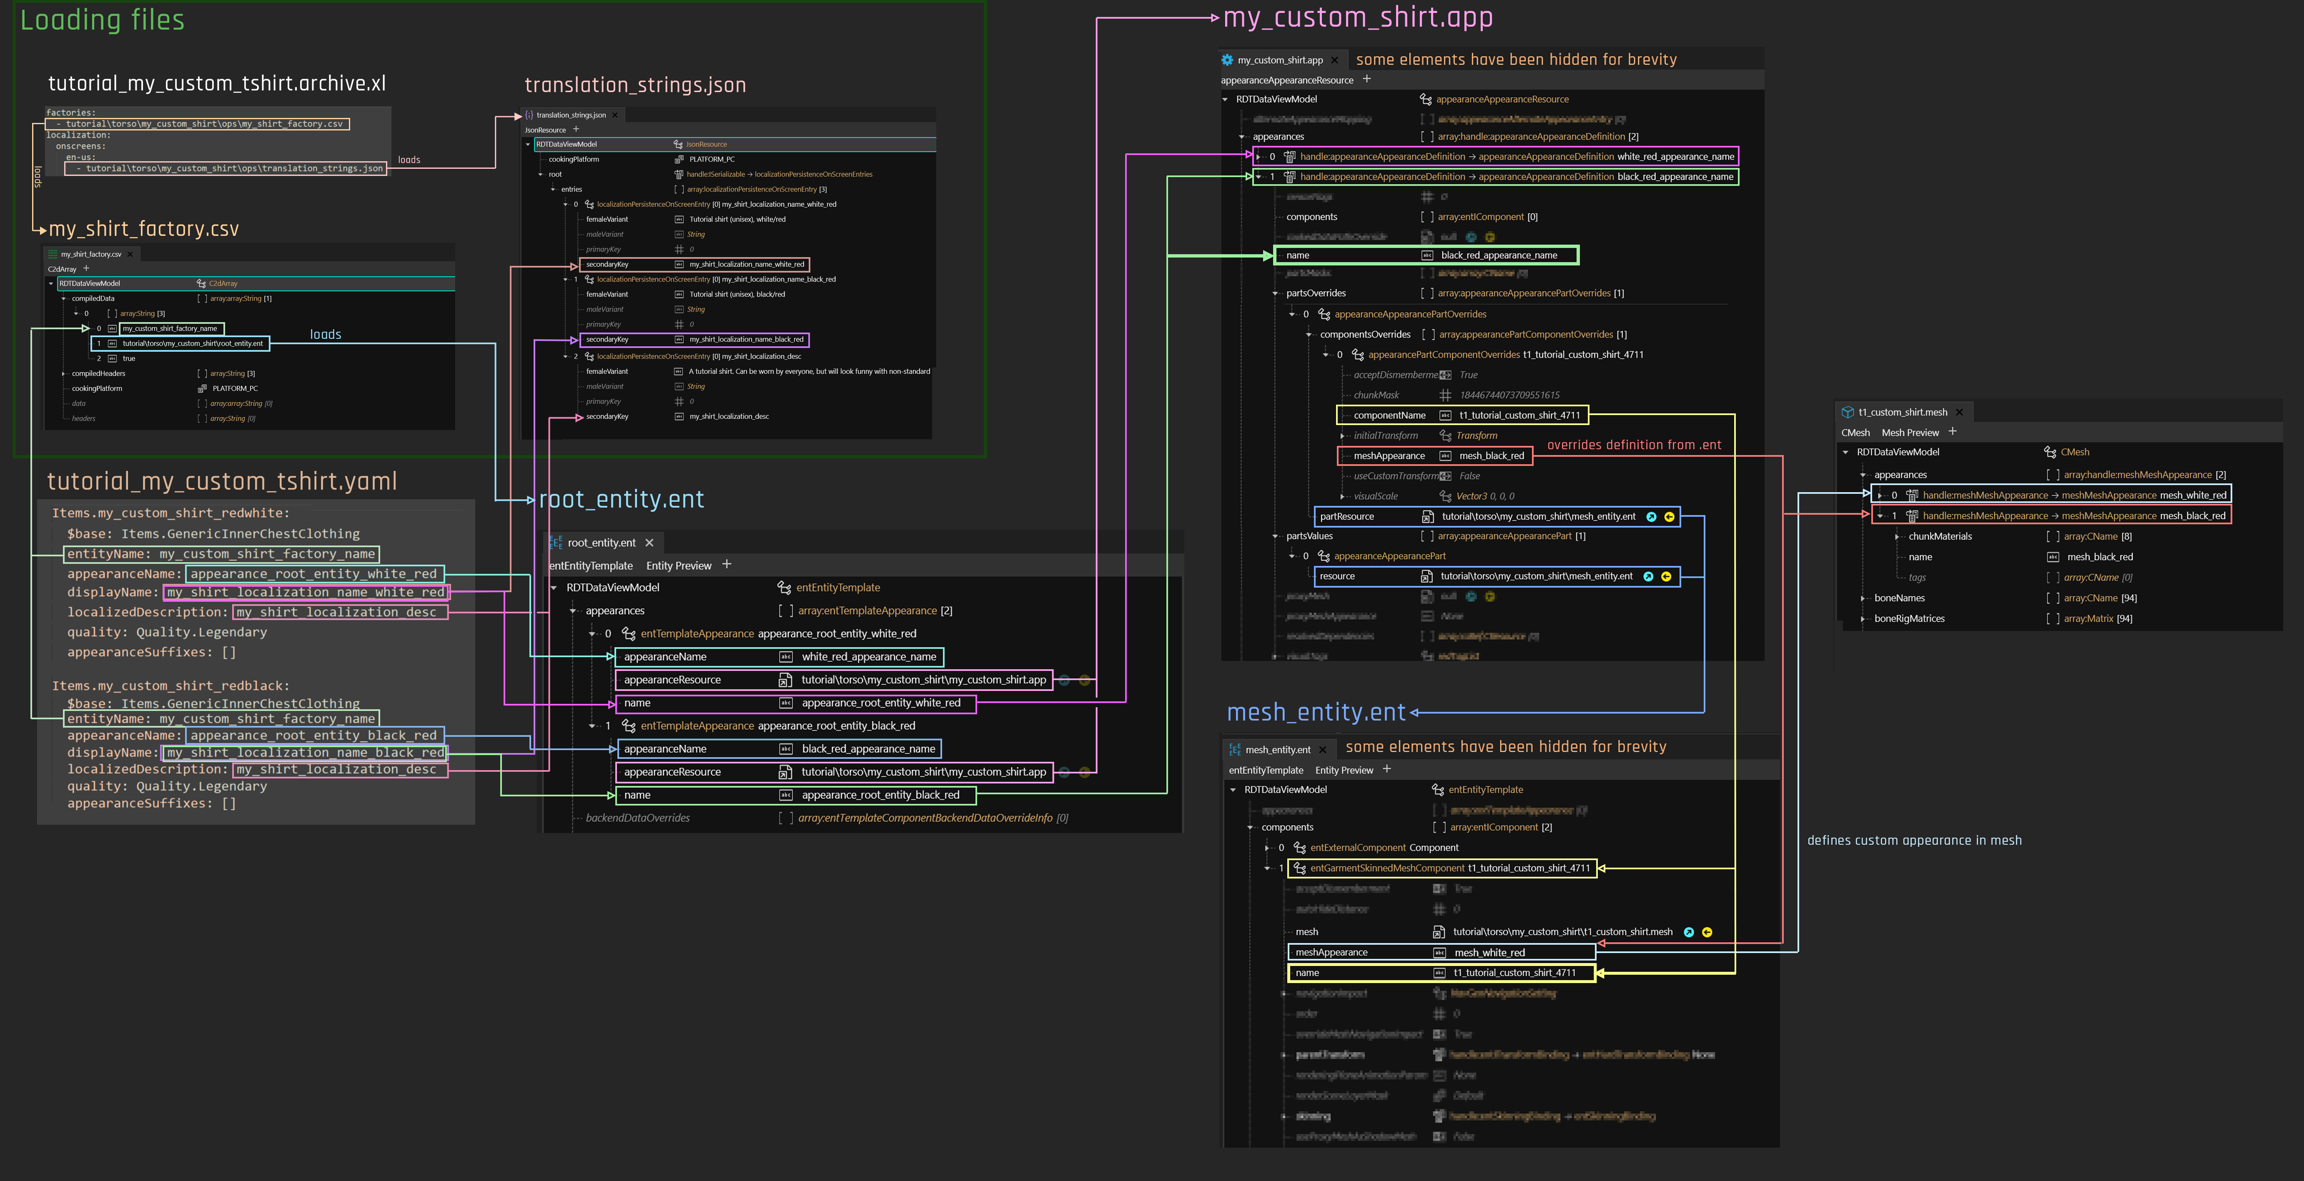
Optional, but very recommended: Clean out obsolete entries
Open the file translation_strings.json in WolvenKit.
Expand the array root and then the array entries. Delete all entries but one.
Open the file my_shirt_factory.csv in WolvenKit.
In compiledData, delete all entries but one. In data, delete everything - these will get autogenerated.
Open the file root_entity.ent.
Expand the list appearances. Delete all entries but the first (most likely default).
Open the file my_custom_shirt.app.
Expand the list appearances. Delete all entries but default.
Open the file mesh_entity.ent
Select resolvedDependencies and delete all the entries. (We don't need Judy's top anymore.)
Make a back-up copy of your t1_custom_shirt.mesh, then open it.
Expand the first appearances at the top of the file. Open the appearance default and check which material is linked in the chunkMaterials array.
Created by @manavortex
Published September 30 2023
This guide is a rough draft. Unlike my other guides, it has not been excessively tested, so you might run into issues. In this case, feel free to hit up #mod-dev-chat on the , or and improve it!
If you want to edit other files for V, you may be able to find their paths in or one of the surrounding pages.
Step 0: Prerequisites
You have
You have downloaded from Nexus, as you will need the .blend file from there
Step 1: Preparing the files
We will do the same thing here as in the guide, just that our files will be in a different path. This section will tell you which files to add and where to put the .blend file; for detailed instructions, see the other guide.
Look up on -> where to find the files you need.
Add all the files with the corresponding extension to your Wolvenkit project.
Export them all via Wolvenkit Export Tool (see )
Copy it to h0_000_pwa_c__basehead in your Wolvenkit project's raw folder
These steps will become obsolete after the 2.0 update of the NPV example files, but aren't obsolete yet.
Open the .blend file in Blender. You should now see the script 00_import_files.py
Replate its content with the code from the collapsible box below:
The code
You're good to go and can proceed to step 2.
Step 2: Getting the head shape right
If you don't want to apply any shapekeys, you can set their values to 1
Follow the until the shapekeys are applied.
Apply custom edits if you want - see or for tips
Go back to the NPV guide and follow the steps until you have run the export script - this will write the .mesh files
Step 3: Testing
If everything has worked, you should now have a broken character creator and a not-broken head. Otherwise, the right place to ask for help is #mod-dev-chat on the .
Happy modding!
NPV - V as custom NPC
How to create your V as an NPC
Created by @manavortex
Published May 13 2023
This guide will show you how to do the following things:
Setting up a Wolvenkit project with the prepared example files
Creating your V's head in Blender (has its own sub-page)
Adding them as an NPC to spawn them with AppearanceMenuMod (has its own sub-page)
Difficulty:
Easy, but not trivial: you don't need any prior knowledge, but the process is complex, and if you miss steps or deviate from the instructions, things will end up not working for you.
If you run into issues with this guide, the right place to ask for help is #mod-dev-chat on the .
This guide uses the following versions:
Cyberpunk 2077 game version >= 1.6
Wolvenkit:
for game versions < 2.0, use
This tutorial should cover your basic needs, but there are many more guides and resources about NPV creation outside of this wiki. You can find them .
If you want to edit original V's files, you're (generally) in the right place. You can find extra information on .
None of this would have been possible without NoraLee, who pioneered the process and taught me everything that I needed to know to set up these tools. This guide doesn't use any of their resources, but a lot of their knowledge. For the full guide with all edge-cases, bells, whistles and context, see their .
This is the speedrun version. If you want extra details and context, please check Nora's Google Doc.
Preparation
I have prepared an example project () for you again, but due to the complexity of V's head mesh, you have to do a little bit of prep work here.
Don't worry, I'll walk you through it step by step.
At any time during the guide, you can install the Wolvenkit project (Wolvenkit has a button in the toolbar) and spawn Tutorial Man and Tutorial Woman via AMM to check out your progress.
The character preset
To create a face, we need to know the following numeric values from the character creator:
Eyes
Eyebrows
Nose
Find the mirror in V's apartment and note them down.
Setting up the files
Body gender:
As a rule of thumb, I'll document the process for an NPV with a female body gender, because as we all know, the other doesn't exist I have one of those. In doubt, double-check paths.
Download the example project of files from and load up your Wolvenkits
In Windows Explorer, find the prepared folders per body gender:
body gender
file path
Delete the one you're not using (do one project per NPC. No, really, I mean it.)
Now it's time to do the actual work.
If you want to create your V's head for Cyberpunk, read on
If you already have a head mesh and just want to set up the file structure, read on
Please remember that before sharing your NPV, you have to change the paths! At the very least, rename the tutorial folders inside of archive and resources to your user name and then do a .
However, you might want to do that after , as you would otherwise have to move the utility script around.
At any time during the guide, you can install the Wolvenkit project (Wolvenkit has a button in the toolbar) and spawn Tutorial Man and Tutorial Woman via AMM to check out your progress.
Advanced: Reverse-Engineered LUT pipeline
An investigation and documentation of several methods of advanced LUT workflows.
This is a complex document meant for experts. Made hastily to finally get the method out there and let others experiment with it. Will be expanded as time goes on.
Understanding CDPR's rendering pipeline
Your own Atelier Store
How to set up an atelier store for your mod
This guide will detail how to add an Atelier store with your items. It is part of the ArchiveXL tutorial, but you can complete these steps independently.
You need to install the mod for this.
You also have to add it to your mod's requirements, as atelier stores will cause script errors if users don't have it installed.
Editing LUTs
Here we will go over one of the first steps to visual modding, editing LUTs!
This article is severely out of date. Please tread lightly.
Example:
To put Rogue's facial expressions on a male V, you copy
base\animations\facial\main_characters\rogue\rogue_facial_idle_poses.anims
over the target file at
base\animations\ui\photomode\photomode_male_facial.anims
To use her expressions in AMM, overwrite
base\animations\facial\male_average\interactive_scene\generic_average_male_facial_idle.anims
Lighting in REDengine is complex. Since the conception of it, REDengine has been using a probe-based global illumination system, which requires a single bake of lighting for all times of day. This method is inferior to baked RT, but is suitable for systems with dynamic time of day and weather.
However, this method has its limitation, several, and we see them being corrected with the initial implementation of fullly dynamic semi-global illumination in the form of Psycho RT. Differing from other quality levels, Psycho implements a pseudo-global illumination tech, instead of other RT levels simply tracing lighting for global light sources, such as the sun and the moon.
After patch 1.62, and after the creation of ReSTIR GI, we see now that CDPR has implemented a fully-realized RT pipeline. Each step of the way is handled by rays rather than normal approximations.
The benefits, other than the obvious ability for fully realized global illumination and direct illumination, are numerous. Each light can now cast shadows, use material parameters for nearly-perfect subsurface scattering, ideal light blending and intensity.
I will go further into detail on the new possibilities with PT in another entry, today, we will focus on...
Color
Recently, I have been working on recreating a cinema-accurate and professional-quality workflow for color grading in Cyberpunk, and generally, trying to retrace the steps CDPR took to get such a unique, albeit, polarizing look to Cyberpunk.
A history lesson
Before 2020, while the game was in heavy development, CDPR used a different, more parametrizable method for handling HDR assets and lighting. They would simply running through a TMO (tone mapping operator) to get back to 8-bit range and afterwards apply color grading.
This, while convenient, did make handling HDR display quite difficult. How could you apply a color grade made for SDR on top of HDR without losing precision or missing data? This required a full restructuring of the method.
Eventually, CDPR landed on the method I have been able to reproduce. They used a normal, neutral LUT texture and ran it through ACES (Academy Color Encoding System) transforms to go to a neutral color space, ACES AP1. I do not know the gamma they used (could be ACEScct or ACEScc, maybe even the linear ACEScg), but I do know that eventually, the HDR data was ran through the RRT (Reference Rendering Transform) as a tone mapper, then through the ODT to go to either HDR or SDR.
Unfortunately, I have not been able to single out a method to generate HDR LUTs from scratch, however, I have been able to create a workflow to create tone mapped LUTs for SDR.
Tools used/required
DaVinci Resolve
Does not matter if it is studio, but studio will be required for the eventual HDR workflow.
Photoshop
WolvenKit
NVTT Exporter and the respective Photoshop plugin.
Can be found on NVIDIA developer, does require an account to download.
Intermission: Troubleshooting DaVinci
Right here is where I almost gave up.
DaVinci refused to open. I tried all I could, searched the internet, tried every damn solution. Nothing worked.
BUT, looking at the log files, I was able to deduce the culprit.
SyManager.DeckLink failed to respond due to some USB issue, I even looked that up and well, no dice.
Eventually, I came to think that it may be an issue with the control panels utility for Resolve, as Blackmagic sells some cool decks and accessories for colorists to work faster. But, I'm not rich enough for those, so, I figured, why not just uninstall the entire framework for them.
Boom, DaVinci opened right after.
Setting up your project
Some of you who are more familiar with DaVinci may be already going ahead and setting up ACES in the DaVinci color settings, changing and messing with color science and management, etc. Stop. We're gonna be using nodes.
Below are 2 sample pictures captured with the method, we will be getting a grasp with non-destructive color grading this way.
Insert these pictures into your timeline and head into the Color tab. Then, select your clips and add them to a group, the group name doesn't really matter. We'll only be doing this to use pre-clips and post-clips.
Head into the pre-clip level and apply an ACES transform node. Set your input transform to SRGB and output transform to ACEScct (ACEScct behaves better than ACEScc at times, use your preference) and don't forget to turn on the reference gamut compress.
Afterwards, go to the post-clip level and add another ACES transform node. Now set your input transform to ACEScct (or ACEScc) and set the output transform to SRGB.
Your clip level now has full range and fidelity. You can color grade to your heart's content in the clip level, but I won't be going into detail in how to do this. Or you could proceed onwards, if you do so, then ignore anything about importing your color graded LUT.
So, how do we put your grade into the game? Glad you asked. After you're done grading, turn off everything but your effects in the clip level. Generate a LUT from here. It doesn't matter if the image you see doesn't match up with the one you graded with, we'll be correcting for it further on when we generate the LUT.
Generating a finished CUBE LUT
A LUT texture from the ReShade project. This will be useful when we output our grade to the game.
It's now good to mention that Cyberpunk outputs data with an ARRI LogC3 encoding, but SRGB color space. ACES, on the other hand, expects ARRI LogC3 encoding but ARRI Wide Gamut 3 color space as well. At the end, Cyberpunk expects SRGB data with SRGB gamma too, so you need a TMO to handle this conversion from HDR data encoded in a Log curve to fit in SDR range, but decoded and then put into the display gamut and dynamic range.
ACES is apt for the job.
Take the LUT texture above and add it to your timeline as well, and assign it to another group.
Go to the pre-clip level for your LUT clip and add a Color Space Transform node. Specify the input color space and gamma as SRGB, but output color space as ARRI Wide Gamut and output gamma of SRGB as well.
Subsequently after the CST (Color Space Transform) add your IDT (Input Device Transform) using an ACES transform node. Set the input transform to ARRI LogC3 with an exposure index of 800 and output transform of ACEScct (or ACEScc depending on what your color grade was made in/for). Make sure you enable color gamut compression, or else you will get horrible clipping in higher exposures.
At the post-clip level, add your ODT (Output Device Transform). Set your input transform to ACEScct/cc and output transform to SRGB. Once again, turn on reference gamut compress.
Now, in your clip level, add a corrector node and then drag your generated color grading CUBE LUT atop the corrector node (skip this if you didn't grade)
Once you have done all of this, right click and select "Generate LUT" and export a CUBE.
Creating the LUT texture
Congrats! You have now reached the homestretch in the reverse-engineered LUT workflow. This part could be confusing for some, but it's easy enough if you're familiar with visual modding or handling XBM textures on a very high level.
Once your CUBE is done exporting, open the lut.png file you downloaded before in Photoshop. Here, you need to add a "Color Lookup" layer. Select the 3D LUT file to be your generated LUT from when you finished the CUBE LUT in the last step. Once it is applied, apply a channel mixer correction layer and flip the blue and green channels.
After this is done, export using the NVIDIA Texture Tools plugin as a 32x4f DDS with no mipmaps as well as highest quality compression.
Once you are done, put the texture into WolvenKit and import using these settings:
Afterwards, set the depth, height, and with properties to 32, then go to renderTextureResource -> renderResourceBlobPC -> header -> sizeInfo and set all of the properties there to 32 also. Don't forget to change the texture type to 3D in textureInfo!
There it is. Your tonemapped LUT from scratch.
Footnotes
This initial revision is messy, very messy. Ideally I would've loved to make a video showing off the process in detail, being able to go on tangents and show you around exactly how I stumbled and developed upon the system, reasoning behind a few of the decisions I made in this entry, but I lack the resources right now (notably a microphone)
Normally I'd try to make the entire thing seem more accessible in general, but really, this is an extremely complex topic that would take some experts press their eyes in frustration. I know it happened to me a ton.
If you're looking for pre-made examples, I have a few right here:
Gamut compressed, ACES-tone mapped without AWG3 gamut conversion. Has clipping problems that are simply inherent to the incorrect color due to not using AWG3 conversion, but has a very unique look.
A variant of the undocumented method that is similar to the ACES-tone mapped SRGB LUT but has less clipping.
Generating an icon
First of all, download the template archive (kindly provided by Apart) and find the folder virtual_atelier_inkatlas_icon_template with the following files:
Put the .inkatlas and .xbm into your project (if you're using the example project, you can put them into the ops folder). Then, rename them to atelier_icon:
Now, create your icon. The process is the same as for "preview images". The resulting slot will be named slot_01.
In atlasResource, you have to replace all \ with /
Your atelier store will cause script errors if you don't.
Field
Content
TweakDBID
as defined in your yaml, e.g.
Items.my_custom_shirt_redwhite
Price
Whatever price you want, 0 means that it's free
Quality
Are we settling for anything but legendary here?
Ignore "Icon path" and "description", we have these in the item itself.
Click "Add Item". Repeat the process with as many items as you want.
Click "Generate".
In the downloaded file, check that atlasResource has forward slashes / instead of backwards slashes \, as per the warning box above.
Placing the atelier file
Move the atelier file from your download folder to WolvenKit's resources folder:
Now, it's time to test! Install the mod and start Cyberpunk.
Troubleshooting
My atelier store causes scripting errors!
I'm not sure how you managed to read past all the red and yellow boxes on this page, but make sure that the path under atlasResource has forward slashes / instead of backwards slashes \.
If that wasn't it, you might have to re-generate your Atelier store.
My atelier store makes the game crash!
That happens when there are two atelier stores with the same store ID. Do a full-text search for the store ID (MyTutorialAtelierStore) in r6\scripts and make sure that you don't have any duplicates.
The term LUT has its origins in mathematics, where a Look-Up Table would be able to shorten certain math operations by containing readily-calculated values for any input value, or an operation for an input value for a desired outcome. This shortcut was quite efficient and sped up many operations, and was normally designed as a matrix of different numbers and variables. Soon enough, this improvement in speed would be applied in many other fields, and eventually reached computer graphics and film production.
LUTs are essentially a texture or text file containing every single possible color that can be displayed, and the transformation of an input color into an output color through it.
Cyberpunk's use of LUTs
There are many different types of color-grading-related LUTs, such as .CUBE files and .3DL files, but video games often use a texture.
Initially, Cyberpunk took an approach like many other games, and encoding the LUT as an unwrapped 3D texture:
"3D" LUT texture from ReShade project.
Afterwards, Cyberpunk would repackage LUT textures with the blue and green channels inverted to get higher quality, as the human eye values green more than other colors and is more efficient to get all gradients laid on top of green instead of blue.Here we can safely assume is where the switch to using true 3D textures was also made, but we will not show a 3D texture due to redundancy and inability to do so, so just assume from now on all textures are actually just a 3D cube.
An edited version of the ReShade project's "3D" LUT texture to show the G-B inversion.
To get even more odd, Cyberpunk would then put the image tone mapping, the process in which HDR colors are processed into SDR, inside of the LUT! This came with the conversion from using a normal sRGB transform, which is industry standard, to using an input of ARRI LogC1 and outputting a linear color which is afterwards processed into normal sRGB gamma by the linear tonemapping.
The actual base-game LUT with tonemapping applied within. You can see the reason why there is so little highlight fidelity in SDR now! It all just gets mapped to white!!!
Editing base-game LUTs
With all that backstory done--how do we start?!
You will obviously need WolvenKit, but we also require Adobe Photoshop CS4 and on, preferrable Photoshop CC, and also NVIDIA Texture Tools Exporter's Photoshop plugin.
All of these can be found with a quick Google search, but the last requirement is a bit strange. We need an old version of CP77Tools. Pre-WolvenKit days. You can find it here:
Okay, now we can get started!
Create a new WolvenKit project and call it whatever you want.
After that, import the file base\weather\24h_basic\luts\cp2077_gen_lut_nge_v017.xbm into your project.
Then open it, and change depth to 1, height to 32, and width to 1024. After that, navigate to renderTextureResource/renderResourceBlobPC/header/sizeInfo and apply the same edits as before.
Export the file into a DDS...
Open it up in Photoshop and... voila!
We now successfuly have the 32-bit HDR LUT imported into Photoshop. You can do any color correction here, or do some ReShade edits in-game and then put that into a LUT image and then use a Photoshop plugin to import it and apply it ontop of this LUT. Make sure you DO NOT simply replace this image with your exported LUT from ReShade or some other editing app, as you will completely ruin the tone mapping the base-game does. I recommend DaVinci Resolve as well and then exporting as as .CUBE file from inside of it.
When you edit your LUT, make sure you flip the vertical axis (make it upside down) inside of Photoshop!
Re-importing your edited LUT.
Let's say I just did some curves tweaking and contrast, etc., etc. Maybe make the green saturation lower and other saturation higher to get rid of the green tint. Now what?!
Save back your DDS using NVTT and apply these settings:
Format: 32x4f RGBA 128bpp | floating-point
Generate Mipmaps: OFF
Image Options - Compression Quality: Highest
If you forgot to flip your image inside of Photoshop, turn on the Image Options - Flip Vertically option inside of NVTT.
We finally come to the hardest part of the process--as if the rest was not. Importing our LUT back into an XBM!
It's too much of a complex process to encapsulate in an image or two, so listen up:
Extract the downloaded CP77Tools archive somewhere safe and open it up in PowerShell
Copy the original XBM (cp2077_gen_lut_nge_v017.xbm) into the same place that your DDS file is.
Inside of the PowerShell window, type .\CP77Tools.exe rebuild -b -t --keep --unsaferaw -p and then drag the folder your DDS and XBM files are in onto the console window. It should fill in the path after the -p.
Hit enter, hopefully there are no errors.
When your XBM file imports, overwrite the original XBM file in the project.
Go back into the XBM and do the opposite of changng the depth, width, and height: setting them all back to 32. Since we've already gone over this, you can just remind yourself how to do it by just doing the step where we stretched out our texture backwards.
After you've done all that, go ahead and test out your LUT mod. I personally added a bit more contrast and saturation in Photoshop, but go ahead and be as creative as you like.
Results!
Before
After
As you can see, vanilla's red saturation leaves more to be desired.
After our edits the red saturation is a lot better and the contrast is more satisfying!
How to add custom preview images by using a custom .inkatlas file
Summary
Created by Updated July 27. 2023
The guide below will teach you how to make preview icons. While it's a technically a subsection of the ArchiveXL item additions guide, you can use the steps below to make any kind of preview item.
Difficulty Level: You know how to read and can either edit images or make use of . It's easy!
If you want to have gendered preview icons, check .
The required files
If you downloaded the example project (), the preview is already hooked up. Otherwise, the template archive (kindly provided by Apart).
Go away with your examples, I'll do everything by hand!
Okay, you do you. Here's how:
Finding the files by hand
search in Wolvenkit for icons > .inkatlas
Pick one of CDPR's icon files (look inside first, you want the right format) and add it to your project
You should now have a structure like this:
Taking preview pictures
You have two options on taking preview pictures. Both are relatively tedious, since you have to do it by hand. This is not a step-by-step, but you can find a few pointers here:
Blender
You can to Blender and take your preview pictures there.
In-game
Make sure V isn't on the screenshots with 's invisible V toggle, , or the
Get an outfit manager like to create outfits where V is wearing nothing but the item
Optional: Use
Fixing up your texture
Export the original .xbm file via Tools -> Export Tool
Find the resulting file under "raw"
Open it in your image editor
Hooking up the inkatlas
Open the file in WolvenKit.
Open the list slots.
For the first two inkTextureSlot items, set the value for DepotPath
Congratulations! You now have a preview icon!
Using it
You can now hook up your preview icon(s) to whatever mod you are making.
If you want to use gendered preview icons, check . In this case, you do not add an icon record to your item.
ArchiveXL: Add it to the .yaml
Check the code box below — the last three lines add a preview icon.
Please refer to the for an explanation of the other properties, as this page will only hold information about preview icons.
atlasResourcePath: relative path to your .inkatlas file
atlasPartName: slot name in your .inkatlas file (which you can see in the PartsMapping tab)
Again, please note that indent is crucial here, as it determines the node structure. The first line needs to have an indent of 0, the lines from $base to icon need to have two spaces, and the lines atlasResourcePath and atlasPartName need to have four.
That's it! Time to test!
If you run into any issues with your texture's transparency, please
ArchiveXL: adding Photo Mode Poses
How to hook up custom photo mode poses with ArchiveXL
Summary
Created by @manavortex
Published May 09 2023
This guide will walk you through adding poses to Cyberpunk 2077's photo mode with ArchiveXL.
Difficulty: You know how to read ;)
Weapons
Adding weapons
Summary
Created by @manavortex
Published July 08. 2023
Weapons work a little different from regular ArchiveXL items, starting right at the root entity. With the help of @Apart and psiberx, I was able to figure out the process and document it for you.
Abusing workspots
Or how to play an animation on an entity through clever gimmicks in Redscript.
This is an advanced tutorial that requires you to understand the basics of wolvenkit
Credits
R&R: Emissive
How to change the Netrunner suit's glowey bits
This page is a part of the and will tell you how to change the suits' emissive materials.
will show you how to swap between existing colours in the .yaml file.
import os
import bpy
import re
# path of your blend file
filepath = bpy.data.filepath
directory = os.path.dirname(filepath)
morphtargetDirectoryFile = os.path.join(directory, "morphtargets")
if not any(filename.endswith(".morphtarget.glb") for filename in os.listdir(morphtargetDirectoryFile)):
parentFolder = os.path.dirname(directory)
if any(filename.endswith(".morphtarget.glb") for filename in os.listdir(parentFolder)):
morphtargetDirectoryFile = parentFolder
targetPath = ''
for root, dirs, files in os.walk(morphtargetDirectoryFile):
files = [ file for file in files if file.endswith( ('.glb') ) ]
for file in files: # loops through directories and files
pot2 = os.path.join(root,file)
armatureName = file.replace('.morphtarget.glb', '').replace('__morphs_default', '__morphs').replace('__morphs', '_c__basehead')
print("\nimporting = ", file)
imported_object = bpy.ops.import_scene.gltf(filepath=pot2, loglevel=0)
selectedObject = bpy.context.scene.objects.get("Armature")
selectedObject.name = armatureName
print("imported to ", armatureName)
bpy.ops.object.select_all(action='DESELECT')
atelier_icon_template.inkatlas << map for the game
atelier_icon_template.png << 200x200px image for a final slot
atelier_icon_template.xbm << game texture
virtual_atelier_png_to_xbm_import_settings.png << image, also embedded here
This guide will teach you how to hook up an existing .anims file to the photo mode. If you don't have an .anims file, you can find a dummy file in the AMM pose guide, or you can learn how to make your own.
At any point during this guide, you can press the green Install button on Wolvenkit's toolbar to check the mod in Wolvenkit.
Step 1: Rename the folders
This step is optional, but if you want to release your mod, you have to complete it (or cause mod conflicts for your users. Don't cause mod conflicts for your users.)
We usually do this at the very end and I'm leaving you alone with it. However, this time we start by renaming the folders.
The screenshot below shows suggestions. Name your files and folders whatever you want, as long as they have no uppercase letters.
The .xl file
This file tells Cyberpunk to load your custom poses and will be in the same folder as the .archive file for your mod. It looks like this:
You have to adjust the paths under set and en-us to your new changed folder structure.
If you want to support more body types from the Nibbles Replacer, you can switch to the Mod Browser and enter the following search query to find all the entities:
base\characters\entities\photomode_replacer > .ent
Here's what those things do:
animations: A list of entities and animation files that you want to add to them
animations/entity: The relative path to the photomode .ent file. There are just three of them.
animations/set: The relative path to the .anims file in your Wolvenkit project.
localization/onscreens/en-us: A file with translation strings. Holds the name of your photo mode pose set.
localization.json
You can name this file whatever you want, just make sure that you change the path and name in the .xl file.
Change the yellow box UI-Photomode-tutorial-netrunner-making-poses to something unique to your mod.
The green text is the name that will show up in photo mode — the female variant is the default.
The .anim file(s)
If you have created your own animations (as a replacer or for AMM), then you are already familiar with this kind of file. If not, it is time to appropriate one from the game files - pick any, since the process is just like with a replacer.
Optional: If you want your pose to move, you can set the duration in the .yaml as well!
The .yaml file
This file will go into r6/tweaks/yourfolder and appends the poses that you defined to the photo mode. Without this file, the animations will be in the entity, but the photo mode won't know about them.
You can use this tool by @wolv to autogenerate your .yaml. If you do that, then you can skip this entire section and check the result.
It has three sections:
Adding the category
The first block will introduce your new category to the photo mode.
I recommend doing search and replace on netrunner_making_poses, because it's used a bunch of times.
PhotoModePoseCategories.netrunner_making_poses: This is the name of the category, used to assign individual pose entries to your category.
displayName: This must match the secondaryKey in your .json
Define the pose entries
If one of your poses is called idle_stand, that will break a bunch of other mods. Please re-name it in both the .anims file and the .yaml before releasing.
Now comes a long list of entries. They'll look like this:
You need to add one of those for every pose from your .anim file that you want to show up in photo mode.
PhotoModePoses.sit_chair_table_keyboard__2h_on_keyboard__make_amm_addon: This is the unique key to assign your pose to your pose set. You'll need it in the third block.
animationName: This must match the animation name in your .anim file (the green box).
category: This must match the category in the first block.
displayName: What'll show up in photo mode
Telling photo mode about the poses
You register your poses for photo mode by creating the following entry categories:
An entry looks like this:
The entries in the list must match the unique keys that you've defined in the second block, and you need one entry per pose. If you have different names for differently-gendered poses, you need to use the correct lists.
photo_mode.character.quadrupedPoses enables Nibbles photo mode replacer support for AMM >= 2.2.4
Finishing up
Before you can share your pose pack, you need to change the paths. If you don't and the next modder also doesn't, then only one of your mods will work.
You can find a full guide on changing the paths here.
If you rename files or folders under resources, remember to delete the old control files from your game directory.
The result
At any point during this guide, you can press the green Install button on Wolvenkit's toolbar to check the mod in Wolvenkit.
She has no idea what she's doing
Fortunately, you can hire specialists
This guide assumes that you are at least somewhat familiar with ArchiveXL item additions as per the "Adding new Items" guide. If you have no idea where to start, make sure that you set up a working shirt and then start making the changes below.
Selecting the base
Start by finding the .app file of an original weapon of the type you want to make (Theres a list here) and adding it to your project. We will change that file, rather than assembling anything by hand.
In the app file, you can also find the value for the yaml file's $base property:
Getting the mesh_entity.ent
You need the correct mesh entity to go with your appearance file. You can find them under base\weapons\ - search for the name of your weapon, or just navigate through the folders.
This file makes the weapon show up in photo mode. Instead of going into the PartsValues, it will be linked in the app file's root as baseEntity (there's a screenshot below). Leave it alone for now, it's easier to make the appearances working correctly in the .app file and then copying over an entire component array.
Factory: .app instead of root_entity
Instead of a root entity file, you need to point your factory.csv directly to your iron's app file (the one from the section above).
Appearance selection
An equipment item's lookup chain goes from the appearanceName in the yaml to the root_entity, where the appearanceName will lead to the correct appearance in the .app file.
With a weapon, all that happens through visualTags.
YAML: Define the field:
.app file: Define the visual tag
visualTags (violet): Must match the visualTags in your .yaml file. If multiple entries match, one will be chosen at random.
Unlike with an entity file, the appearance name doesn't matter. You can name all of them foo, and as long as you had the visual tags right, it still works (I would advise against it, though)
visualTags (violet): Must match the visualTags in your .ent file. If multiple entries match, one will be chosen at random.
Step by step
As the process is finicky and there can be all sorts of sudden unexpected behaviour, here's the best way to go about this.
The list links you to sections of the guide which tell you to change things. Optimally, you do a dry run with one appearance to make sure that something shows up in the game at all, then start fine-tuning, but you do you.
Here's what's worked for me (@manavortex):
Find the .app file of a suitable base weapon, add it to your project, and rename it. Don't change anything for now, future you might need the original data for troubleshooting later.
Find the correct .ent file under base\weapons\ (it's linked in the .app's baseEntity field).
Optimally, the number of components in the .ent file should be the same as in any appearance's component array (red arrow on the screenshot above).
If it's not, that could indicate that you have the wrong .app file. It could also mean nothing, but if you run into trouble in step 6, this might be why.
Set up one (1) appearance for testing by assigning the correct visual tags.
Do not delete the other appearances yet, future you might need them for troubleshooting.
Start the game and make sure that you can spawn a custom weapon with the apppearance you picked and that it
shows up in inventory/photo mode
shows up in first person
If that's not the case, check the mesh entity (see the blue box in step 2).
If that doesn't help, you may have taken the wrong .app file - go looking again.
You haven't changed anything at this point: the goal here is to make sure that your visual tags are correct and that you can spawn a weapon addition.
It's crucial that you make this work — anything you do after this point will add complexity and make troubleshooting more difficult, so this is where you shore up your bases.
Optional: You just added a weapon to the game that didn't exist before. Take a moment to bask in the success!
Custompath your mesh entity:
Create a copy of the file and move it to a custom folder
rename it
Change the baseEntity path in your .app file
Optional, but recommended: Repeat step 5 and make sure that everything spawns
Now it's time to actually change things. Open your appearance's component array and make sure that the MeshComponents load your custom stuff (anything that has a depotPath pointing to a .mesh file).
After you've changed the paths, launch the game and make sure that your weapon
shows up in your inventory with your meshes
shows up in first person with your meshes
Fix any issues that might arise before you proceed.
This is why we kept the original appearances around: if you run into any issues here, you can compare your stuff with the original, un-changed game variants.
Don't forget that you can
split off meshes or submeshes for individual pieces (for chunkmask hiding or extra materials)
add more components (duplicate existing ones, or copy them from the mesh entity)
Once everything works, delete all the default appearances, then duplicate and adjust the one you customized to show your color variants.
Now, finally, copy a working appearance from the .app file to your mesh entity. This will make your weapon show up in photo mode.
Luanch
If you wish to add a custom icon, follow the steps in the corresponding guide.
Your own HUD icons
To make your own HUD icons for the lower right corner, check here.
Custom throwing weapons
You can set up throwing weapons just like a regular weapon, but the projectile (when you throw it) will default to . Check here for how to have custom projectiles.
Editing weapon meshes
When exporting an existing weapon mesh for your custom weapon, make sure to uncheck LOD Filter — the lower LOD mesh is used for calculating the hitbox.
This is especially important if you add a melee weapon of a different size than the original: if you only replace LOD 1, there will be a separate, invisible hit box that does not align with your new weapon.
Mesh export LOD Filter
In Blender, put your custom mesh in both LODs.
If your weapon is significantly bigger than the original one, you'll notice that the hitbox won't auto-scale with your mesh. If you know how to solve this problem or want to brainstorm, hit up @Mx_OrcBoion Discord!
Troubleshooting
My weapon is fully invisible, no matter what I do!
First of all, unequip and re-equip
First of all, let's give credits to people out there:
Cyberscript and Smoke Everywhere authors donk7413 and Eli,
who originally found out how to play animation through workspots.
All credits to them in that regard.
psiberx for his numerous hints and advices, as always.
When asked details about how they managed to have V smokes a cigarette anywhere in-game, they mentioned having merged all .workspot files in a gigantic file for convenience (namely Cyberscript Core Animation Archive), so that Cyberscript can play any animation in-game on V or any NPC.
At first it didn't ring a bell, but then @psiberx mentioned about modders "abusing" .workspot by spawning an invisible .ent to have the target being animated.
🤔 ...
The trick is actually to spawn an invisible device (.ent) right onto your entity, which then allows to trigger animation(s).
WolvenKit
So it happens that we need a .ent file whose components contains a workWorkspotResourceComponent which references a .workspot by name and DepotPath.
In turn, .workspot file contains a list of worksSequences containing workAnimClip which are the animations to play with idleName and animName.
Of course the .ent must be made invisible and contain a set of specific properties, and this is where all hard work was already made by Cyberscript people.
💡Generally speaking if you need to play a ton of animations I would recommend you to useCyberscriptdirectly, since it already does everything for you and also comes up with a ton of useful more features to build a mod with ease.
On the other hand, if like me you only want to play 1 or 2 animations at most,
then it's probably a lot of overhead and you can keep reading.
What I personally did was to reuse Cyberscript archive .ent stripped of components that I don't need, and .workspot with only the animations that I'm interested into.
To do the same, you will need to download the Cyberscript Core Animation Archive, install it in your mod folder so that Wolvenkit can find it, and locate the workspot_anim.ent file in the following directory structure:
You can then use wolvenkit and your file explorer to move the workspot_anim.ent in the location of your choice inside your mod. Then you can strip it of every components that isn't aworkWorkspotResourceComponent using wolvenkit.
Then you will need to locate an interesting .workspot file inside the base/workspot of the game and place it in the location of your choice inside the archive folder of the mod you are creating.
A theorical mod file structure
Redscript
Once the previous files are ready, we need something able to spawn an entity in Redscript (once again if your preference goes to Lua, I'd recommend you to use Cyberscript directly).
(You will need to replace the paths to the .ent and .workspot files with the paths to your files )
Adding the script to your mod
to add this script to your mod, you will need to create the following structure in the ressources folder of your mod:
Clearing misconceptions
.ent can be anything, not just a "living entity". it can be a cigarette, the act of smoking.. it can really be "whatever".
it contains components with e.g. workspotMapper, entSlot, etc
it also contains obviously a workWorkspotResourceComponent with points out to the .workspot.
.workspot gets triggered throughout .ent: you don't spawn a workspot and play it on a target, you spawn an entity which references the workspot and plays the workspot through the entity (which in turn play the animation(s), and you can "jump" from one animation to another in the same workspot).
~ 30 min tops for the tutorial
once you know how it works:
< 1 minute for .yaml edits
< 5 minutes for material edits
Switching existing colours
Since ArchiveXL's Dynamic Appearances feature is that cool, you can switch the emissive material simply by changing the property in the .yaml file. You can choose from the following emissive colours:
Static
Animated
blue
glitch_blue
green
glitch_green
orange
glitch_orange
To change the emissive of an existing suit, you only need to change a single thing in the yaml file. Find it in your game directory:
Open it in a text editor, and find the list $instances near the top of the file. It will look like this:
Change the current entry against one from the list above. Make sure that you don't delete the comma or the colon, the amount of spaces only matters at the beginning of a line (other than for my personal OCD).
Save the file and start the game.
If you did everything correctly, the emissive will now have a different colour.
If you made a spelling mistake (or selected the appearance off), then the emissive will be gone.
If V is naked, then you fucked up (deleted the , or the :). In that case, remember that you can un-do the last change with Ctrl+Z!
Can I do this for every mod???
Unfortunately not!
Changing the presets
I won't document this step-by-step (yet), since it's pretty self-explanatory once you have the right file open.
All the emissive materials live in .mi files. Inside the archive, they're bundled in this folder:
Each file will be named emissive_VARIANT, (VARIANT being the colour as listed in the table above). E.g., the file for the regular green emissive will be called emissive_green.mi
Open the file in Wolvenkit and check the values. You'll see something like this:
You can change the values in the panel on the right — feel free to experiment. You can make a copy first in case you break something, but even then, you can still install the original mod again and re-extract the file.
This page is a subsection of the Netrunning Suit guide. It will teach you how to recolour Cyberpunk items via MLSetupBuilder.
Assumed level of skill:
You know how to read — if you can read and struggle with this guide, then it's not yet good enough. Please reach out to on the redModding Discord so that I can improve it.
Time to complete:
<1h for the tutorial
< 5 minutes once you know how it works
Prerequisites:
If you can check all those boxes, let's go.
Overview
MLSetupBuilder can't directly edit game files. For that reason, we need to
export our .mlsetup to an .mlsetup.json
edit that file via MLSetupBuilder
import it back
You can't skip any steps in this section that don't say otherwise.
Do not move any of the files. Wolvenkit will lose track of them if you move them around.
Step 1: Loading the file into MLSetupBuilder
Getting the file into the tool, and opening the right preview
Now that you have added the right file(s) to your project, right-click on them or on their folder and select the option to export them as json:
Once you have done that, switch to your project browser's raw tab, right-click on the first file, and select the option to open it in MLSetupBuilder:
This will open MLSB with the correct file already loaded.
Alternatively, you can also open MLSetupBuilder by hand, then press Ctrl+I or select Import from the menu.
If your material list is saying [object object], check the
(Optional) Step 2: Preview and Layer Masks
If you don't care for this, you can skip to
Enable preview
Switch to MLSetupBuilder's .
Check if the .mlsetup that you want to edit is in a subfolder layer_mask_2
No: Search for t0_005_pwa_body__t_bug
Songbird's suit has a custom mlmask, which I've been too lazy to set up. Future MLSetupBuilder updates will support dynamic switching.
What's going on here?
This is an optional theory block. You can skip this box.
An .mlsetup is a list of 20 material definitions, which are projected on the 3d object like layers of paint. The is a list of 20 cut-out stencils, which block out parts of the layer. (You can see a live example by clicking through the list of layers in MLSB!)
The layers will be applied in order: first Layer 0, then Layer 1, then Layer 2. This is how we can colour the arm stripes separately on t0_001_wa_body__t_bug.
Step 3: Recolouring
Prerequisites
There will be a bunch of links in this section, which you can absolutely ignore.
They'll lead you to look-up tables or extra theory.
Potential breaking point
If you are here to edit other mlsetups, you can skip this section
Some suits are using custom materials, which MLSB isn't yet equipped to handle. You can identify them by the missing icon in the preview (see the screenshot below).
For details on how to handle those, check below.
Change the colours
Click through the layer list on the left (1).
The Material value (2) changes based on your layer selection, as will the available options
Change the colour by clicking on it in the Color Picker (3)
Repeat the process until you're satisfied
Now export the .mlsetup (shortcut: Ctrl+E).
Overwrite the file you imported (e.g. mirror_hex_black.mlsetup.json
Custom material paths
This section tells you how to deal with custom materials. You can identify them by their broken preview icon.
If you don't have any of those in your .mlsetup or if you are just recolouring MlSetups independently from the Netrunner guide, then you can skip to
Since I knew that I was going to share this, I've moved custom materials into a subfolder manavortex in their original path.
To get the original color picker back, we'll need to change the path while you're editing the material, then put the original back when it's time for export. You do it like this:
Click into the material path (orange box)
Press Ctrl+A to select the path.
Press Ctrl+C to copy it. Paste it into a text document so that you can restore it later.
Find the subfolder manavortex\
You now have a working colour palette and can edit the material.
When you're done, click into the material path again and restore the original value.
You can now export (ctrl+E)
Step 4: Importing into Wolvenkit
Switch back to Wolvenkit.
Make sure that the Project Explorer shows either of the tabs source or raw
Find the file that you just edited
Right-click on it and select the option to convert it from JSON:
Step 5: Testing
Time to test! Install and launch your Wolvenkit project:
If you did everything right, your recolour will now be active.
Otherwise, check .
Creating a LUT from scratch
A description of a streamlined, refined, accessible, and relatively easy system for creating Cyberpunk 2077 LUT mods from scratch.
This method is for LDR. Little to none is known about HDR LUT creation, so please, do not expect anything on HDR LUTs.
What is a LUT, really?
It's imperative to understand what LUT really is before starting. Often, beginners have a misconception caused by other software which often uses different formats for LUTs and different ways to apply them, such as ReShade.
Cyberpunk LUTs are distinctly different from ReShade LUTs due to two things:
They are 3D textures, not 2D textures with tiles describing different parts of the RGB cube, no, Cyberpunk LUTs are full-on 3D textures sampled with trilinear filtering.
They are applied with an input of ARRI LogC3 data with an sRGB color space. This means you can't go and use any ReShade LUTs, as they often do not expect LogC3 output. Along with this, many tools expect ARRI LogC3 data with an ARRI Wide Gamut 3 color space when generating your LUT. If you do not convert to it, you will end up with clipping colors.
But, aside from that, they are similar. Any LUT expects an input of a color, with an output of a new color. That's it. Cyberpunk's implementation is as simple as extracting the pixel out of the LUT texture that matches the input color, and if there isn't an exact match, it interpolates linearly to get a near-perfect approximation of the true output color.
If you're still confused, I recommend looking at .
Prerequisites
A backup of NVTT can be found here
If you don't trust a random exe file, that's good, but if you want to download it from the source you need to create or use your current NVIDIA account and add yourself to the developer program.
DaVinci's website prompts you to fill out some data before being able to download the software. You can fill this out with fake data, it doesn't really matter.
You can use Fusion Studio just as easily as well for parts of the guide, and DaVinci Resolve Studio is also recommended in general.
By the way, if you just wanna skip the steps on repeat projects, there is a reference GitHub repository containing NVTT settings, DaVinci Resolve and WolvenKit projects, as well as pre-made LUT files if you just wanna test them out quickly.
Workflow
WolvenKit
Create a new project in WolvenKit and import the file base\weather\24h_basic\luts\cp2077_gen_lut_nge_v017.xbm and export to a DDS, then rename it, removing the xbm file extension. You should have a dummy name with a file path containing that same file in the "raw" folder. You can delete the file in there, we only need the folder set up correctly.
DaVinci Resolve
If you have issues getting Resolve to run for the first time, uninstall the panels program. It causes crashes if you don't have any DaVinci panels or sliders.
Create a Resolve project, and head straight over to the Fusion tab, without importing any media. Add a LUT Cube Creator node, change the type to vertical and size to 32, 48, or 64. Remember this number, as you will use it later. Select for the generated Media Out node to output to both sides of the preview by enabling both of the circles below it. On one of the sides, select Views>3D Histogram. You should now have a LUT cube present. If you'd like more accuracy, right click and go to 3D Histogram and select solid with 1:1 sampling.
Right after the LUT Cube Creator node, add a Color Space Transform node, and matching the fact that tools expect ARRI Wide Gamut 3 with ARRI LogC3 data, but the game outputs sRGB with ARRI LogC3 gamma, we need to go from sRGB color space with ARRI LogC3 gamma to an output color space of ARRI Wide Gamut 3 with output gamma of ARRI LogC3
After this, we need to go from this LogC3 data to sRGB, which is what our display expects.
ACES method (recommended)
This is the method used by the original game to go from the input LogC3 to sRGB output, so it's what's recommended.
Add an ACES Transform node after the Color Space Transform node. Set the input transform to ARRI LogC3 with an output transform of sRGB and use ACES reference gamut compression.
ARRI LogC3 method
This method uses LUTs from ARRI themselves, and as such gives us two options: LogC3 and LogC3 "classic". I encourage you to use the normal LogC3 LUT, but experiment with Classic and see if you like it. Though, this method requires a change in the settings that are described later.
In the link above, select LogC wide gamut as the source format and destination format as video. Select your preference of ARRI Classic 709 and ARRI 709 in the conversion parameter. The file type can be either Blackmagic Fusion or Blackmagic DaVinci Resolve, it really doesn't matter.
Add a serial File LUT node and point to your downloaded file.
ARRI LogC4 method
It may share a name with the LogC3 method, but is distinct from it as it uses a more recent revision of the color science compared to the LogC3 method, but we will need to change things before and after this step if you decide to use this method.
Follow the same link described in the section until you reach this part. Download the "ARRI LogC4 LUT Package".
Once you have downloaded it, extract the Rec.709 Gamma 2.4 65-point .CUBE file from the zip file. Add a serial node after the Color Space Transform called File LUT and point the LUT file to your extracted .CUBE file.
We have to make some changes to the Color Space Transform node, change the output color space to ARRI Wide Gamut 4 (instead of 3) and then the output gamma to ARRI LogC4. Your LUT should now look correctly exposed.
You can mess with the Tone Mapping Method, but just select None as a good option.
We need to change an option afterward that will be described later for both the LogC3/4 methods.
Resolve Color Managed method
This method uses DaVinci's integrated tone mappers to go from the LogC3 input to sRGB output. It produces a neutral and accurate output. It's also very minimal.
For this method to work, we just need to change the settings in the Color Space Transform.
Instead of having an output color space of ARRI Wide Gamut 3, set the color space to sRGB and gamma to sRGB as well. Then, change the tone mapping method to DaVinci, or some other method if you know what they mean.
This method creates a color cube that is very "unbiased"--it has fidelity in all directions, which, while creating a good representation of true color, can result in unnatural saturation. To account for this, the saturation compression gamut compression method can be selected.
After you have used your preferred method, you need to apply gamma correction. If you do not do this, you end up with incorrect gamma, which can mainly be seen on skin tones.
For the ACES method, you need to add another Color Space Transform node, with input color space and gamma of sRGB, with the output color space of sRGB but output gamma of linear.
For both ARRI methods, nearly the exact same steps are taken as the ACES method, but, instead of sRGB input color space and gamma, we use an input color space of Rec.709, but input gamma of Gamma 2.4. Keep the output color space at sRGB and output gamma at linear.
For the Resolve Color Managed method, simply change the output gamma in the color space transform to linear, but turn on Apply Forward OOTF.
This is the final stage. We now just need to output to an image, and use the right format. To do this, use a Resolve FX Transform>Transform node (not any other transform node) and switch on "Flip Vertical" to correctly output.
Right click on the LUT picture and save your image as a TGA or PNG file.
NVIDIA Texture Tools
Drag on your exported file onto the NVTT window and tick off "Generate Mipmaps" and select format as 32x4f. Tick off KTX2 compression and tick on DXT10 header as well turn on Highest compression quality.
Turn on "Extract From Atlas" and set "Depth of Volume" to the exact size of your LUT that you set up when first creating it. To verify you got it right, you should see a Z slider on the top right of the NVTT interface. Drag it and see if there is any vertical shift in the texture. If there is not, you got it right.
Save as a DDS file (only DDS) and put it in the folder that was generated after you exported the XBM file at the start of the article.
WolvenKit again
You should now see it in the import tool in WolvenKit. Change its TextureGroup property to TEXG_Generic_LUT, turn off IsGamma, VFlip, GenerateMipMaps, IsStreamable, and PremultiplyAlpha. Set compression to TCM_None. If your file doesn't have RawFormat as TRF_HDRFloat, then something in the DDS importing went wrong, and you need to re-set the format as 32x4f in NVTT.
Import the DDS. We need to tell the file it is actually a 3D texture in the header (even if the 3D data is already there), so go to renderTextureResource>renderResourceBlobPC>header>textureInfo>type and change it from TEXTYPE_2D to TEXTYPE_3D.
Make a copy of the XBM file and rename it to cp2077_gen_lut_nge_v017. Our dummy file there is for being able to quickly copy the filename, so, select your LUT XBM, C-c, C-v, select the dummy file, F2, C-c, select your LUT copy XBM, F2, C-v.
Your LUT is now correctly set up. You can install and launch now!
Results
Changing materials, colors and textures
Changing how an item looks in-game
Summary
Created by @manavortex
Published November 05 2022
This guide will teach you how to change an item's appearance by editing its MultilayerSetup (*.mlsetup file), how to rename materials, and how add your own mlsetups (custompathing).
// minimal example
// use in CET console like: Game.GetPlayer():Smoke();
@addMethod(PlayerPuppet)
public func Smoke() -> Void {
// first listen for entity spawning events
// this is because spawning happens asynchronously
GameInstance
.GetDynamicEntitySystem()
.RegisterListener(n"MyMod", this, n"OnEntityUpdate");
let spec = new DynamicEntitySpec();
// then designate entity to spawn
spec.templatePath = r"base\\mymod\\entity\\smoke.ent";
// position it on the player
spec.position = this.GetWorldPosition();
spec.orientation = EulerAngles.ToQuat(Vector4.ToRotation(this.GetWorldPosition()));
// add a tag to differentiate it once spawned
// this is because DynamicEntitySystem listen to all the entities spawned
// not just the ones it creates
spec.tags = [n"MyMod"];
// process with entity spawning ...
GameInstance
.GetDynamicEntitySystem()
.CreateEntity(spec);
}
// and this is the method that will be called by DynamicEntitySystem
// with entity spawning events
@addMethod(PlayerPuppet)
private cb func OnEntityUpdate(event: ref<DynamicEntityEvent>) {
// make sure this is our .ent and it has spawned succesfully
if Equals(event.GetEventType(),DynamicEntityEventType.Spawned){
// retrieve our invisible device
let device = GameInstance
.GetDynamicEntitySystem()
.GetEntity(event.GetEntityID()) as GameObject;
// make our player enter workspot
GameInstance
.GetWorkspotSystem(this.GetGame())
.PlayInDevice(device, this);
// when player smokes,
// it probably need to own a cigarette and a lighter in the first place :)
GameInstance
.GetTransactionSystem(this.GetGame())
.GiveItem(this, ItemID.FromTDBID(t"Items.crowd_cigarette_i_stick"), 1);
GameInstance
.GetTransactionSystem(this.GetGame())
.GiveItem(this, ItemID.FromTDBID(t"Items.apparel_lighter_a"), 1);
// and these objects better be in his/her hands too :)
GameInstance
.GetTransactionSystem(this.GetGame())
.AddItemToSlot(this, t"AttachmentSlots.WeaponLeft", ItemID.FromTDBID(t"Items.crowd_cigarette_i_stick"));
GameInstance
.GetTransactionSystem(this.GetGame())
.AddItemToSlot(this, t"AttachmentSlots.WeaponRight", ItemID.FromTDBID(t"Items.apparel_lighter_a"));
let left = new AIEquipCommand();
left.slotId = t"AttachmentSlots.WeaponLeft";
left.itemId = t"Items.crowd_cigarette_i_stick";
let right = new AIEquipCommand();
right.slotId = t"AttachmentSlots.WeaponRight";
right.itemId = t"Items.apparel_lighter_a";
let controller = this.GetAIControllerComponent();
controller.SendCommand(left);
controller.SendCommand(right);
// more steps eluded for simplicity:
// you probably wanna play SFX and VFX too...
// finally start anim on player!
GameInstance
.GetWorkspotSystem(this.GetGame())
.SendJumpToAnimEnt(this, n"stand_car_lean180__rh_cigarette__01__smoke__01", true);
// from there on, you probably want to use Callback
// and coordinate each step of the anim :)
}
}
The essential tool for all Cyberpunk modding. Nightly is preferred (and what this guide has been made with), but stable works just as well with newer versions (older versions will have errors).
MLSetupBuilder: 1.6.5 (older versions won't be compatible with WKit 8.7 and game version 1.6)
Most items in Cyberpunk are not textured, but use a procedurally generated material consisting out of an mlmask (a list of alpha masks) and an mlsetup (a list of material paths and -colours). There is a section on the exceptions below.
If you want to learn how mesh material assignment works in general, you can check the corresponding page.
For an overview of base materials and example files, you can check here.
This tutorial assumes that you already know which mesh and appearance you want to change. If you don't know that, you need to find the correct game file. If you only have a cheat code, see Spawn Codes instead.
Add the item to your project and open it in WolvenKit. You want the original to look up material names, even if you overwrite it with your own mesh.
Step 2: Finding the correct appearance
If you don't know which appearance you want to edit, check here.
default is the fallback appearance that'll be used if anything can't be resolved by name or index. This is the reason why most item swap mods give you only a single appearance - people didn't set up the variants.
We will change the appearance bwstripes, which is used by Vest_17_basic_01:
find material bwstripes and remember the name of the chunkMaterial
chunkMaterials corresponds to the chunkMasks: For submesh_00, the material at array position 0 will be used, for submesh_01 the material at position 1, and so on.
This vest has only one chunkMask, so there's only one material.
Remember its name (ml_t2_002_ma_vest__puffy_bwstripes) and find the corresponding material definition:
Most meshes have their materials under localMaterialBuffer/materials. However, some of them (especially those with physics) use preloadLocalMaterialInstances instead.
It's ml_t2_002_ma_vest__puffy_bwstripes
You will (hopefully) see a material with three entries in values (order doesn't matter):
For the purpose of this guide, all that matters is the mlsetup, which determines all the individual material assignments in this CMaterial. For an explanation of the shader, check here.
This is the path to the mlsetup file. By editing this, you can change colours and surface materials.
If you have your own mlsetup file, this is where you need to set tohe path. See custompathing for further details.
Most materials in Cyberpunk use the engine\materials\multilayered.mt material and assign colours via an .mlsetup file. If you're used to textures, you are probably going to hate this. As somebody who has been where you are: the mlsetup system is cool. Genuinely. Give it a chance!
multilayered material
If you would rather use a textured material, check here.
A multilayered material consists of multiple layers of materials, projected on the mesh through the mlmask: white parts get affected, black parts are blocked out. (Again, for a full explanation, check here).
You can turn any multilayered material into its cyberspace variant by changing the material from engine\materials\multilayered.mt to base\characters\common\cyberspace\silverhand_overlay_cyberspace_mml.mi
Exporting the .mlsetup
We're going to edit the mlsetup file and then import it back, causing a global change in the appearances of every item which uses this particular material file. (If you don't want that, see Custompathing below).
We do that by editing the MultilayerSetup:
Find the file and add it to your project.
Right-click the file and select "Convert to JSON".
If you have set configured MLSB, you can make use of MlSetupBuilder's export feature, rather than doing it via WolvenKit:
Move your new json file in the same folder as the multilayer setup.
The json file will be named ml_t2_002_ma_vest__puffy_bwstripes.mlsetup.json (originalFileName.originalExtension.json)
Step 3: Editing the .mlsetup file
Open up MlSetupBuilder and load your .mlsetup.json file.
If you select WolvenKit's "Open in File Explorer" option, you can copy the path from the explorer's address bar and paste it into the MlSetupBuilder's address bar.
If you want to see which layers correspond to which part of the mesh, you can load it from the library:
Optional: Find your mesh in the library
This step requires the tool to be set up correctly, which is not part of this guide. Fortunately, it's also optional, as you can tweak values around without seeing the affected areas or material previews.
Change the colours and materials to whatever you want.
TBD: Create/link to material description
Save the file and overwrite the original .mlsetup.json:
If you have configured MLSB and had both files in the same folders, you will see a notification when the MlSetupBuilder has overwritten your original *.mlsetup. This takes a few seconds.
Otherwise, you need to right-click on the json file under "raw" and select "import from JSON".
This is already working. You can pack the project and see it work!
Since you haven't changed anything in the mesh itself, you can (and should) delete it from your mod. Only keep it if you want to do the steps below.
Step 4 (optional): Custompathing
If you want to put up your own .mlsetup, rather than overwriting the original one, you can do that. All you have to do is changing the DepotPaths to the relative path of your mlsetup.
Keep your folder and file names unique! If you have two mods adding a file at the same location, the second one will be unable to overwrite it and will use the first mod's file. That is, unless your mods are in REDmod format, which will be loaded even later and in order of their folder names.
Understood? No? That's fine. Just keep it unique. :D
Step 5 (optional): Renaming materials
You can rename a material by changing the "name" property inside the CMeshMaterialEntry in the materials array:
Inside the appearances block, the material assignment to the individual submeshes happens by name, so don't forget to change the chunkMaterial names!
Step 6 (optional): adding new materials
To add a new material to a mesh, you need to create two entries. The first of those needs to be in the materialEntries array:
Edit the new material's index and name. This is crucial!
Now, add an entry in the localMaterialBuffer.
If your mesh doesn#t have entries under localMaterialBuffer, use preloadLocalMaterialInstances instead.
The new material will have the name you defined in the CMeshMaterialEntry in the previous step.
You can now use your new material just like the regular, old materials.
Adding custom facial piercings through PRC Framework.
Created by Mx_OrcBoi
Published on 12/07/2023
PRC Framework was created by eagul, he also taught me how to do them, so I'm passing on the knowledge.
Required:
Blender 3.5
Wkit 8.9.1-Nightly
Level: If you can read and follow instructions you should be ok.
Disclaimer: The detailed steps show how to place piercings in spots where vanilla ones already are.
For any other location on the face the steps are slightly different, as you will need to create your piercing on the head mesh and import over head mesh.
This is explained in a separate section.
I would suggest trying to create one in an existing location first, so you familiarise yourself with the steps and then play around with different locations.
Getting started
Download and install the below:
In wkit import the below to your project depending on which V you want to create the piercings for:
Export to GLB so you end up with those files in the raw folder.
Import them into Blender using Cyberpunk GLTF import plugin. In this example I will be working on fV. You should end up with files like this and be able to see the head, vanilla piercings and a set of shape keys.
Each shape key corresponds with the number on the character creation slider. Basis is 1 on all sliders or no shape keys active. The rest is divided into ears, nose, eyes, mouth and jaw and subsequent numbers correspond to the character creator settings (1x is slider 2, 2x is slider 3 and so on).
You can see the shape keys actually working by selecting one of them and setting Value to 1.
For easier selection merge head mesh vertices by distance. To do this, select the head mesh, go into edit mode (Tab) and go to Mesh -> Clean Up -> Merge by Distance. Set merge distance to 0.0001.
Import your piercing mesh. I’ll use the septum half ring as an example. Make sure the mesh is already UV unwrapped if using custom mesh.
Duplicate the vanilla piercing. To do so select it in the viewport (object mode), press shift+D and then click the right mouse button. Hide the original mesh.
With vanilla mesh duplicate selected, go to edit mode (TAB) and press Del -> vertices. You will end up with an empty submesh.
Select your piercing mesh, then Ctrl select newly emptied vanilla submesh. Press Ctrl+J to join.
Weight painting
Now we need to either weight paint, or transfer weights if your new piercing is in the same position as vanilla one. Mine is, so I will go over transferring weights.
You can see the current weights the mesh has in Weight Paint mode.
I’ve selected the vanilla piercing here. By clicking different vertex groups you can see the colour of the mesh changes. This colour denotes how much influence each bone has on the mesh. Red is 100% and dark blue is 0%.
Go back to object mode if you’re in weight paint mode. Select your mesh and remove all vertex groups.
Go to modifiers (wrench icon) and add Data transfer modifier with below options. The source would be the vanilla piercing submesh that has weights.
Click Generate Data Layers, then apply the modifier.
You can now see that your mesh has weights the same as vanilla mesh:
Creating morphtargets (shape keys)
Unhide the head mesh if hidden and make sure no shape keys have value other than 0, then select Basis shape key.
Go to edit mode (TAB) and position your mesh where you want it to be. You can keep the vanilla piercing visible for reference.
I wanted mine to be a bit further back than the vanilla one, otherwise it clipped with the nostrils.
Now go through all the nose shape keys and position your mesh in the best position for each. You can set the value of the corresponding shape key on the head and vanilla piercing meshes to 1 for easier positioning (to do that come out of edit mode back to object mode) - if you do that, make sure you’re not setting any shape key to 1 on your new piercing mesh, they all have to stay 0.
If creating nose piercing you only need to go through all the shape keys with nose in the name, if creating earring, go through ear shape keys and so on. No need to go through other, like for example eyes for a nose piercing.
Delete all unnecessary meshes if you have them, like head reference. Also delete the original piercing submesh, so only yours is left and rename the submesh accordingly (it should be something like submesh_00_LOD_1 and not something like submesh_00_LOD_1.005)
Exporting the mesh from Blender and importing in Wkit
Once you’re done export your mesh as gltf 2.0 with below settings. Save it over the glb exported in wkit.
If your piercing is influenced by more than 4 bones, also include this option on export.
Next import it in wkit.
Creating the mod
Add to project a morphtarget from PRC or create folder structure manually. They need to be named exactly like this, do not create a custom folder.
Now rename the morphtarget you imported from blender to whichever slot you want to use. The number will correspond to the slot. It does not matter which you use really, but if you want your mod to be compatible with any specific set of piercings made by someone else, check what slot they used and use different.
Move the file to eagul/piercingmorphs/.. (if you added to project a morphtarget from PRC to create the folder structure, delete it first, just leave empty folder before moving your new renamed morphtarget).
Now you can delete the character folders in base and install the mod.
Naming is important, your mod needs to load before PRC, so it is best to follow PRC’s naming convention: PRC_f/m_slot#.
To test your mod, set piercings to slider 12 for fV or 14 for mV and you should see your creation.
Supplement for creating piercings in non-vanilla locations
You can only export the head morphtarget as it is the only one we’ll need.
Import selected one into Blender, merge by distance, duplicate the mesh and delete all vertices from your duplicate in edit mode. This is similar to points 4-8 from the first section of the guide, except we’re working just with head mesh, not piercing meshes.
Weight paint your piercing. Since the location is not covered by any vanilla piercing, transfer the weights from your head mesh. Delete unused vertex groups (the ones that do not affect your piercing, ie have 0 weight).
Since piercings are solid objects we don't want them to stretch, so go through the vertex groups that affect your piercing in weight paint mode and colour them in one sold weight colour (you can use the picker to pick one from somewhere around the middle of the mesh).
Change the path to:
eagul\piercingmorphs\wa_linked.mesh for fV
eagul\piercingmorphs\ma_linked.mesh for mV
If you ever need to re-export your mesh again for editing you’ll have to change this back to the original path.
Now install your mod and enjoy.
Appearances: change the looks
Changing an NPC's default appearances (and adding more via AMM)
If you want to create a custom NPC from scratch, look here.
This guide will walk you through editing NPC appearances for Cyberpunk 2077.
If you want to create your own custom NPC, see .
It uses the following versions:
Cyberpunk 2077 game version >= 1.6
>= 8.7.1-nightly.2022-11-04
(only if you want to add new appearances) >= 1.15
Assumed skill level: You're able to read.
The .ent file
The game's first point of contact is the .ent file. You can find it by searching WolvenKit like this:
If you come up blank, try around with variations. E.g., Johnny is "silverhand", Viktor is "ripperdoc".
You don't need to add the .ent file to your project, unless you want to .
However, the file contains the path to an .app file. Find and add it to your project.
Major NPCs have their own .app files:
base\characters\appearances\main_npc\.
Others are not so lucky - e.g., Mamá Welles is lobbed in with the other valentino goons:
base\characters\appearances\gang\gang__valentinos_wa.app
The .app file
The array appearances will contain a list with every appearance that's defined for this NPC, matching the key appearanceName in the .ent file.
Not all of these have been "published" (as in "hooked up to .ent files"). For an example of this, check base\characters\appearances\citizen\citizen__children_mc.app
The only thing you need to care about is the components array, where you can add, remove, or modify parts of an NPC's appearance:
The names of components need to (read: "should") be unique so you can .
CDPR's style of unique naming allows us to find components and their usage across the game files, which will come on handy when we're trying to add items.
This is where the magic happens.
Changing and removing components
Change items by selecting a or a :
Remove items by deleting their entries from the list:
Animations: if you can't avoid them, copy them as well!
Anything of the type entAnimatedComponent means that components are animated. That's mostly the case for physics-enabled stuff influenced by gravity, such as coats, jackets, or long hair.
Physics gave us the atomic bomb. (It also gave us computers, but this is besides the point right now.)
Animations are usually unique to meshes on a by-pixel basis and do not react kindly to edits or swaps. (Try splitting the obi from Saburo's kimono into its own submesh if you don't believe me).
If you copy an animated component (e.g. Johnny's vest), then you need to copy the corresponding entAnimatedComponent as well, or the mesh won't move.
If you delete a physics-enabled component, you can safely delete the corresponding AnimatedComponent.
(Safely) adding components
If you want to exchange an NPC's hair, check .
The obvious thing to do if you want to add a new item is to duplicate another component and then act as if it was just another change:
And this might work. Or it might end up leaving them standing in an exploded pixel cloud. In case of animated components, editing them will almost certainly break them.
Anything of the type entGarmentSkinnedMeshComponent will not take kindly to manipulation.
In that case, you need to browse the files for any occurances of the component you want to add and copy the relevant components. For example, if you want to put Johnny into a different kind of vest, this is how you'd go about it:
Search for the mesh name of the vest that you want to use (e.g. ma_vest__high_collar*.mesh)
Select the mesh, then "find files using this":
If you run into an error, make sure that you have the "Wolvenkit Resources" plugin installed!I
Find an .app file that looks promising - for example Scorpion's:
Open it without adding it to the project (you don't need the file).
Save the .app file, pack your mod, and go testing!
Adding new appearances
This part of the guide requires
Adding a new appearance to AMM requires you to register it in three files:
the .lua
the .ent
the .app
If you are using HotReload, don't forget to "reload all mods" to make AMM pick up the changes in the script.
The .lua file
To tell AMM about your new appearances and make them available, you have to create a LUA file in the following folder: Cyberpunk 2077\bin\x64\plugins\cyber_engine_tweaks\mods\AppearanceMenuMod\Collabs\Custom Appearances. Let's call it AMM_JohnnyTutorial.lua.
Give it the following content:
The entity_id is unique for each NPC and tells AMM which file to load.
You can find the correct entity ID by looking at the character with AMM:
If the NPC doesn't yet exist, you can create a custom entity. For an example file, check one of .
Now, we have to hook up the new appearances.
The .ent file
Find the .ent file that you've identified in the , and add it to your WolvenKit project. Open it, then duplicate the last item in the appearances array. Now, change the new entry to match your custom appearance:
The .app file
In the app file, duplicate one of the already existing appearances, and change the name of the new item to the one you specified in the .ent file:
Congratulations — that's it! Install your mod and go testing!
Troubleshooting
My new component won't move at all!
You may have forgotten to copy the animation file. Look for an entAnimatedComponent inside the .app — they're usually called something like xxx_dangle(s) or collar.
I added an appearance, but a random one is showing when I select it
That's what happens when the game can't find the appearance you picked. You're probably trying to add an AMM appearance. Check the spelling between your lua file with the appearance name, the mapping entry inside the .ent, and the appearance's name in the .app file.
By doing step 7 and 8 you’ll end up with your mesh having the correct bones for where it is placed.
The result should be like this:
Once you’re done with the weight painting proceed to creating your shape keys as in the morphtarget creation section of this guide. You can use your original head mesh as reference.
Tip: If you want to test if your mesh works ok before going through all shape keys make sure you create at least one, otherwise it will flatline your game. Creating means moving at least one of the shape key positions to where they should be, not at the same position as the basis shape key.
When done, delete the original head mesh and rename your own submesh. It should be called submesh_00_LOD_1.
Export your file to gltf with the same settings as in the guide.
Import your file in wkit over the existing head file, place in the correct folder and rename to whichever slot you’d like to use.
Open your morphtarget and edit the path in this section:
I’ve hidden the rest of the piercings for visibility, only leaving the one that will help me to adjust the position.
Find and select the components in the other NPC's appearance list:
Select "Copy Selection From Array/Buffer"
Go back to your original .app file and select either the "components" array or any component inside it. Now right-click and select "Paste Selection From Array/Buffer".
If you haven't done that yet, delete the original component(s) and animations:
This tutorial will use animation and pose interchangeably. An animation is simply a pose that moves.
Getting started
Create a new Wolvenkit project and download the prepared files from mana's mega, either
the source folder for a working project that you can use immediately
the files to set up your own structure and start from scratch
The screenshots show the example project, but it's absolutely no problem if you set up everything on your own: the guide will tell you which path goes where.
If you have downloaded the example Wolvenkit project, you can start it (the "Install" button has an "Install and launch" option in the dropdown) to see everything in action:
- Spawn an NPC (generic male or female)
- Switch to the Poses tab
- Find the Netrunner making AMM mods category and select one of the poses
- Your NPC should now move!
Connecting the files
Start by customizing your file structure. If you leave it as it is and publish the mod and somebody else does the same, only one of the two will work. Create a folder structure that is unique to you.
It is good practice to leave base for the game files, and simply have a folder with your username at the root level of archive.
Your file structure must not contain spaces, capital letters, or any funky characters, or the game might not find your files. Stick to a-z, 0-9, - and _, and you're safe.
File structure: The .lua
Rename your_optional_subfolder to something you want to group by, e.g. your username. You can also remove it, we only need the file
Rename amm_tutorial.lua to something that identifies your pose pack, e.g. netrunner_coding
Open the file in a text editor. Let's look at the entries (we'll ignore anims for now and look at it in the second part about customizing animations):
Change modder to your name so people know who made this.
Change category to the name of your pose pack. This will be used for AMM to sort your poses into categories, which people will use to browse, so don't go overboard.
Change entity_path: Right-click on your .ent file in WKit and select Copy relative Path and paste it into the lua.
Don't forget the duplicate \.
File structure: The .ent
Open the components array, find the component with the name of amm_workspot_collab, and set the depotPath of workspotResource to the relative path of your .workspot file.
Do not change anything else — we're done here.
File structure: The .anim
You don't need to change anything here yet, we'll be doing this in the next step.
An .anims file is targeting a specific rig and holds a list of animations. These hold the pose data; they're what you overwrite when importing from Blender.
File structure: The .workspot
Scroll to the bottom of the file and find the node named workspotTree. Open it and find the list finalAnimsets.
Each of the workWorkspotAnimsetEntries inside finalAnimset connects animation files and rigs.
You can delete entries if you don't have animations for that rig.
The tutorial version uses the same .anim file for V's first person animations. Looks weird, but works. You can change it later on your own.
For each of the entries you keep, make sure that the following paths point at the right animset:
animations.cinematics[0].animSet
loadingHandles[0]
If you have launched the game before, make sure to delete the file
A good time to check: make sure that everything works again and that the files are correctly connected. If not, check the troubleshooting section of this guide.
Custom poses
Now that we have the basic structure covered, let's talk about pose names. This time, we start at the end and make our way backwards.
Custom poses: The .anims
Files for each type of rig are included in the example files, but you can also find them yourself by searching Wolvenkit for rigName > .anims or character > .anims (e.g. massive > .anims or Smasher > .anims)
Find and open your .anims file. Here's what you're looking at:
Open the animations array to see data for all defined animations (poses). You can make more by duplicating them, delete obsolete entries and change their names; any other changes are coming from Blender.
An animation's name must match the .lua and the .workspot, spelling mistakes will break it. They must not contain spaces, use _ instead. AMM will take care of that for you.
Custom poses: The .workspot
Open your .workspot file and expand the following nodes:
workspotTree
rootEntry
list
First, we're going to look at workSequences.This data type is used for pose transitions and -definitions (e.g. an NPC standing up). For our purpose, we don't need any of the fancy stuff.
While this list in the example file contains two workSequences, you're gonna need one per however many animations/poses you have. Duplicate to your hearts content.
Here's how a workSequence looks. Note the duplicate ID property - and each of those has to be unique!
You need one workSequence for each of your animations!
Open the workSequence and expand both id and list.
Expand the first list entry (workAnimClip) and its proprety id.
Point it at the right animation: Change the workAnimClip's property animName to the name of your animation (green on screenshot)
Make sure the IDs in the workSequence are unique. (You can skip this for the two entries from the template - if you continue they pattern they establish, all id's will be incremented and unique.)
Find the workSequence's property id and increment its numeric value +1 from the previous id (orange on screenshot)
To clarify - our first example workSequence had a property id of 2 and its workAnimClip's propery id was 3. Our second example workSequence had a property id of 4 and its workAnimClip had a property id of 5. Therefore, your next workSequence should have a property id
Optional, but recommended: Set the workSequence's property idleAnim to the name of your appearance (purple on screenshot). This is purely for your convenience, as you can see which is which when scrolling through the list.
The numeric values for all theid properties - under workSequence and workAnimClip - need to be unique within the scope of the workspotTree. As soon as you have duplications here, things will be out of order.
Custom poses: The .lua
As of version 2.2, AMM doesn't know anything about the file structure. For that reason, you need to tell it about the poses you added, and the anims array is how you do that.
The lists tell AMM which poses belong to which rig, allowing to hide them when they aren't supported. As you can see, it's no problem if there are duplicate names, and you can even reuse entries in the workspotTree — the game knows which animation to use because of the file structure above.
Troubleshooting
If you have launched the project in its default state before starting to customize it, delete the file
A pose gets correctly added by AMM if you see it in the list and can delete it.
AMM doesn't show my poses
The problem is in your .lua, AMM fails to pick up the pose information you provided. You can check AppearanceMenuMod.log, which might tell you what's wrong, but it's probably fastest to just start over from the template .lua file.
Make sure that you don't add or delete any commas or quotation marks.
I click, but nothing happens (no pose shows up in AMM)
The problem is between your .lua and your .ent file: the poses were registered correctly with AMM, but Cyberpunk can find nothing to spawn.
The NPC briefly T-poses, and then the game crashes
Check your .workspot file for copy-paste mistakes when hooking up your .anim files.
My custom pose changes are ignored
The error is between Blender and your .anims file. Double-check names and make sure that you actually imported.
The wrong pose is triggered
You messed up the indices in the .workspot file. Go back and make sure that they're all unique.
As much of the information here has been documented in other guides, the information below will be kept initially brief. Might write more to a later point, but there is a lot of documentation already.
This page is a part of the NPV guide. It will show you how to use the provided example project to create a custom NPC for Cyberpunk 2077, whom you can then spawn with AppearanceMenuMod.
This guide assumes that
you already have a head mesh (see this section otherwise)
that you're using a set of default paths (if not, read the last paragraph of this box)
the corresponding files are in either of these folders
tutorial\npv\your_female_character\headtutorial\npv\your_male_character\head
the meshes are named like their in-game equivalents, e.g. h0_000_pwa_c__basehead.mesh
It's not a problem if you use your own custom paths, although it is easier to . If you decide to go for it, keep in mind that your paths are different and that you need to put different values into the provided .ent and .app file.
At any time during the tutorial, you can install the Wolvenkit project (Wolvenkit has a button in the toolbar) and spawn Tutorial Man and Tutorial Woman via AMM to check out your progress.
Skipping and skimming
This guide contains as little fluff as possible. Extra information
The .lua file
We're registering our NPC with AppearanceMenuMod via a .lua file, which needs to end up in AMM's Custom Entities folder. The full path in the Cyberpunk directory will be this:
I have prepared two example files in the Wolvenkit's project's resources. Delete the one that you aren't using, then let's take a look at the other one:
tutorial_custom_female_character.lua
tutorial_custom_male_character.lua
The file structure
This is the file content for the female example:
It loads our root entity from tutorial\npv\your_female_character\ops\your_female_character.ent. That's the file which tells the game what to load.
You can and should change this file — see the inline documentation above for what to change.
The root entity hooks up your .app file and the appearance names in the .lua file, and that's about everything there is to say about it. Here's how it looks:
Adjust entries as needed. If you want to
If you want to add more appearances:
duplicate an existing entry
change the last key name to match the one in your .lua
change the first key appearanceName to the one you want to put in your .app
Let's look at the .app file now.
The app file
This section will tell you how to edit your NPV's appearance – their skin colour, chrome, piercings, tattoos. We will do this in the .app file.
When changing component names, you want to leave the (t1_) in place — the game needs them to calculate collisions!
This is where all of your NPC's appearances are defined (appearanceDefinition, linked to the root entity via name). The appearanceDefinition's components define your NPV's properties, pulling in equipment, facial expressions, hair and skin.
change the key name to match the one in your root entity
change the components
How do I know what to put?
To find out which variants and appearances to use, I suggest that you use NoraLee's excellent NPV Part Picker. It will look like this:
Find it at
The NPV picker does this for you, but here's how to select your eyebrow appearance by hand:
open up the mesh file and expand the first list appearances
see a bunch of entries with naming schemas like colour_01
the numbers correspond with the type of eyebrow in the character editor (look them up )
Select the correct colour and appearance number
Customizing Cyberware
If you skip this step, you will end up with invisible cyberware or the wrong colour/appearance.
When selecting a different cyberware than the preconfigured one, you have to set the appearance name, or the whole thing will show up in grey. The appearance names are usually identical to the cyberware (cyberware_01, cyberware_02 etc.), but if you are uncertain, you can also open the mesh file and check the appearances list at the top.
Customizing piercings and chrome: Chunkmasks
If you skip this step, you will end up with the wrong or too many piercings and cyberware.
You have the full piercing or cyberware file, but you're only using parts of it — yet the game stubbornly shows you the whole mesh.
Fortunately, you don't have to edit it in Blender, because you can hide the parts you aren't using via chunkmasks.
Find the piercing or cyberware component in your .app file:
This is where you can turn off submeshes
How do I know which numbers to put?
You can see that inside the .mesh file (which you can see in the component's depotPath). Open it in Wolvenkit, then switch to the Mesh Preview tab and toggle the checkboxes on the right; those directly correspond to the boxes you need to uncheck in the .app file:
Here we see the indices of these three submeshes: this is what we need to uncheck in the .app file
To hide those bits in the .app, we simply need to uncheck the corresponding boxes - check the previous screnshot!
Hair
This section will teach you how to add another hair mesh to your NPV. We will first remove the default hair, then replace it with the one you want.
To use modded hair, find the correct files inside the mod and add them to your project.
Delete the current hair from the .app — there should be 2-3 components, their names will start with either hair_ or hh_0
Find the correct hair mesh. You have three options for this:
Looking it up on
Using
Filtering the files and clicking through their previews:
female: base\characters\common\hair > wa_ > .mesh > !shadow
male: base\characters\common\hair > ma_ > .mesh > !shadow
Enter the name of the hair mesh that you want to use into the Asset Browser's search bar (see next screenshot) and hit Return.
Once you have found the correct mesh file, right-click it and select "Find Files Using This":
This will give you a list of files, which you can mostly ignore. The only thing we care about is the hair's .ent file:
This is how you find the hair's .ent file
Open the .ent file and expand the components array. You will find three components in there, which you can now copy over to your .app!
And that's the gist of it!
Go forth and create custom apperances!
You can check this guide, or look through the .app files for other NPCs for ideas. If you need further details, I highly recommend checking out NoraLee's much more detailed tutorial, which will also give you all the context you could possibly need.
For guides on how to export a whole animated character to Blender, you can check here.
Please remember that before sharing your NPV, you have to change the paths! You can find a full guide on the fastest way to do that here.
Don't forget, you can pack the Wolvenkit project by pressing the green button in Wolvenkit's toolbar, spawning Tutorial Man and Tutorial Woman via AMM to check out your progress.
Summary
Created by @manavortex
Published January 06 2023
Version
>= 3.3
Assumed skill level
You know what a is
You're able to draw stick figures
You are not afraid of Blender
If you don't have Photoshop, Photopea offers almost the same thing online for free.
For a free tool for faster normal baking, check out xnormal.
Switch to the "Shading" perspective and add an "Image Texture". Select your image by clicking the corresponding button:
The viewport should already be set to "Solid". Click on the dropdown arrow next to the options and select "Texture" from the list.
You will now get the selected texture directly as an overlay.
Step 1: The Displacement Map
As the first step, we create a Displacement Map for our 3d object. This black and white image will turn your mesh into an object with actual (simulated) depth, which we will then "bake" into a normal map.
image source:
This tutorial won't cover the process of how to draw such a map in-depth, but there will be a few tips how to do that in Blender.
The displacement image should be saved in 32 bit image depth rather than the usual 8. This will yield better results with the normal maps.
Texture Paint Mode
The Texture Paint perspective lets you draw directly on your mesh's surface:
You will probably want to fix this up in Photoshop (Photopea).
UV edit mode
To see how the mesh is projected on your image, you can check out the UV edit mode.
Switch to "Edit" (shortcut: Tab) and select all vertices (shortcut: ctrl+A). You will now see them projected on the texture:
Feel free to change the UV mapping. You can export this back into Cyberpunk!
Step 2: High Poly and Low Poly meshes
Once you are done with your displacement map and the UV mapping looks like you want it to, it's time for the next step: projecting!
Take your displacement map and create a slightly blurry version of it. This will prevent artifacts on the normal map, as the algorithm doesn't like perfectly straight edges.
I create a duplicate of my entire armature, just to make certain that I don't accidentally overwrite anything I want to keep. Only work on the new object, since we're getting destructive here.
Make sure that your viewport is in Object Mode
Select all objects that you want to go on the same normal map, then join them together (shortcut: Ctrl+J).
Create a duplicate of this mesh (Ctrl+D, ESC to stop moving), then rename that to "Low Poly".
Select the mesh you duplicated and rename it to "High Poly".
Open the "Modifiers" tab and assign the following modifiers after the armature modifier (check screenshot in Step 6)
Generate -> Subdivision SurfaceLevels Viewport: 2 or so
Render: As many as Blender lets you get away with without crashing, I used 7
Advanced:
UV Smooth: Keep Corners, Junctions
Boundary Smoothing: Keep Corners
For the "Displace" Modifier, create a new picture, then click on the two sliders to show this texture in the textures tab
Load your blurred texture:
If you hide your "Low Poly" mesh, the modifiers should now let you see creases on your high poly object! Exciting!!
The normal map will only care for relative depth, so keep the creases on your mesh shallow. If you make them too sharp, this can lead to artifacts on the baked normal map.
Step 3: Prepare the material
Switch to the "Shading" perspective again. Add another image texture and create an image with your target resolution. Call it "Bake" or whatever.
Remove the link to your material's normal input - otherwise, it'll bake your normal map into your normal map, and the results won't be pretty.
Step 4: Prepare the low poly mesh
The high poly mesh needs to be completely covered by the low poly one, like plastic wrap. If that isn't yet the case, you can inflate your low poly mesh:
Set the viewport to Object Mode
Select the Low Poly mesh
Switch into Edit Mode (tab)
Select all vertices (ctrl+A)
Fatten (Alt+S, adjust amount of fattening via mouse)
Fix up whatever parts didn't fatten correctly by hand.
If your mesh inflates asymmetrically
Undo your action and select all vertices again.
Put the 3d cursor in the center of the selected vertices:
Right-Click -> Snap Vertices -> Cursor To Selected
Set the Pivot Point to 3D cursor (Shortcut: . (dot), Numpad 6)
Fatten again!
Step 5: Baking
In Blender, the "active" object is the "previously selected" one. Select your meshes in the following order:
Low Poly
2. High Poly
Find the "Render Properties" tab.
At the very top, set "Device" to "GPU Compute" (unless you'd rather bake on your CPU)
Scroll down all the way to "Bake". Configure it like this:
Bake Type: Normal
Influence / Space: Tangent
Selected to Active: Checked
Extrusion: 0.04 m
If your generated normal map shows artifacts, try tweaking this.
Max Ray Distance: 0.04 m
If your generated normal map shows artifacts, try tweaking this.
Output / Target: Image Textures
Clear Image: Checked
Margin / Size: 16px (or whatever suits you)
Save. Your. File.
Things are looking like this now? Great, then click "Bake"!
Baking takes time (several minutes) and most of your PC's free resources. This is normal.
If everything went well, the image editor on the bottom left will change and display your normal map.
A normal map with no artifacts or distortions: this is the kind of result we want.
You can export the image via the hamburger menu in the image editor (bottom left panel of the screenshot).
Troubleshooting
This troubleshooting section is for the baking process — the one for normal map textures is here.
First of all, make sure that all your normals are pointing the right way. In the viewport editor, click the "Show Overlays" button and select "Geometry -> Face Orientation" near the bottomn. Blue means outside, red means inside.
The baking process works by capturing the rays of light that bounce between the high poly mesh and the low poly mesh. If you have artifacts, then some of those rays bounced off something else first, which makes them register as inverted. That's the reason why steep creases are a problem — a ray of light might get caught in there and be flipped around.
< 1h for import, export and setup (< 5 min once you know how it works)
as long as you want on the actual editing
You don't need the Wolvenkit Blender Add-on for this, but it is really cool, and if you want to keep editing Cyberpunk stuff, you should definitely install it.
Step 1: Adding the meshes to your project
The body
First, you need the mesh of the body that you want to refit for. (Technically speaking, you could do without, so if you like suffering, go ahead and skip this step.)
There are two ways of acquiring the body mesh:
From Nexus
Check the Nexus page of the body mod you're using — there's a good chance that the modder is simply offering a resource that you cna import into Blender.
From the mod itself
It might be easier and faster to simply export the base body.
In Wolvenkit, switch to the raw folder (or scroll all the way down). Right-click on the glb file, and select "Open in File Explorer":
Windows Explorer Path
You will now see a Windows Explorer window. Copy the file path like this:
Alternatively, you can also navigate Blend
Step 3: Importing to Blender
You might see the submesh and armature numbers changing through the guide. That is to keep you on your toes because I didn't take them in one setting, and also because they don't matter - any number from .001 to .999 will be removed on reimport with Wolvenkit.
Open Blender and create a new file. You will probably be greeted by a bunch of standard objects that we need to get rid of:
Now, let's import our meshes.
From the "File" menu, select "Import" and then one of the entries for "gltf":
You will now see a file picker.
In the path bar at the top, paste the path from the previous step.
Select the mesh(es) that you want to refit, and import them
Now, repeat the process with the body mesh. If you don't know where it is, you can find it here (.. means that you need to co up a directory from the one with the netrunning suits):
..\..\..\..\base\characters\common\player_base_bodies\player_female_average\t0_000_pwa_base__full.glb
If you have imported without the plugin, you will see something like this and need to hide the armatures. If you have imported with the plugin, it will already have done that for you.
You are currently in Object Mode, which will let you select whole objects.
Change the colour of the body mesh to better see clipping (see the next screenshot for details):
Click on the body mesh, or find it in the Scene Collection under its armature parent, and select it there.
Select the "Material Properties" tab in the right sidebar (a round red icon near the bottom at the list)
Click on "Use Nodes" to uncheck it
Set a base colour that is not white to see clipping
Step 4: Refitting
We will use the Proportional Editing mode here. If you don't vibe with that, you can read up here on other approaches for refitting, or refer to the community guides section.
Proportional editing will leave the garment supports intact, preventing the risk of string cheese.
While still in Object Mode, expand both armatures (not the one with the body) and select all included meshes.
Switch into Edit Mode by hitting Tab or selecting it from the dropdown at the topleft
Turn on "Proportional Editing" by checking the round button at the top of the viewport
Hide the body mesh by shift-clicking on the body armature's eye icon twice: it's in the way, and we need to select some vertices.
Shift-click will hide the entire armature and its children.
Make a selection — somewhere close to the future highest point.
Show the body mesh again:
Shift-click on the eye icon next to the body armature to show everything
left-click on the eye icon (no shift, just a regular click) to hide only the armature)
The tools
We will use scaling (shortcut: S) and movement (shortcut: G).
You can lock the axis on which you are moving by pressing X, Y or Z
You can scale the strength of the proportional modifier by using the mouse wheel — but only after you have a tool selected.
I'm afraid that this is where you draw the rest of the owl - you need to refit the suit. Try playing around with the settings. For example, you can start by pressing G - Y to let out the chest, then try scaling.
Do this until you have covered all skin that you don't want exposed. Now it's time to export our edited meshes, and import them back.
Pro tip: Keep the .blend file open until you have seen the refit in action. It's quite likely that it still clips somewhere and that you'll have to get active again.
Step 5: Exporting
Switch back to Object mode by pressing Tab
select all meshes under one armature (e.g. the emissive meshes)
If you are exporting without the Wolvenkit Plugin, select the armature as well.
From the menu, select File -> Export
If you are exporting without the Wolvenkit Plugin, find the correct settings in the , then check Selected Only.
Overwrite the file you originally imported from (pwa_emissive.glb)
Repeat the process with the other armature.
Step 6: Importing into Wolvenkit
As of 8.9.1, Garment Support is still experimental. If your meshes look like string cheese or twitch all over the place, you can delete the parameters. That will destroy the automatic deform when you put a jacket on, but at least your mesh will work.
In the Import Tool, select the first file that you want to import, then check the Import Garment Support box.
Do the same for the second mesh. (As of 09/09/2023, the emissive component doesn't have garment support, but eventually I will make this work)
Import both glb files.
OK, what now?
Time to test! Install and launch your Wolvenkit project:
If you did everything right, your refit will now be active. If not, it's troubleshooting time.
Check the Export/Import guide for step-by-step instructions
As of now, there are no problems limited to the scope of this guide. You can find the general troubleshooting for 3d edits and -imports under Troubleshooting your mesh edits.
This guide will explain how to influence meshes by directly in the .app file, overriding whatever is defined for the components in the .ent file which loads them.
For even further customization options for wardrobe items, see 's readme.
PartsOverrides
This section assumes that you're loading appearance parts via rather than including them as components.
In the .app file, each appearance lets you define , which — as the name implies — let you override the appearance of parts. An entry looks as follows:
Where partsValues lets you define the individual entity files that you'll load, partsOverrides lets you assign properties which take precedence over those defined in the .ent file:
Components need to be unambiguously identified by their name as defined in the .ent file. For that reason, it's good practice to have globally unique identifiers.
Starting with version >= , ArchivXL can understand the following variables for meshAppearance in appearanceOverrides:
So depending on your PC's body gender and colouring, the meshAppearance my_app_{gender}{skin_color}_{hair_color} could translate to my_app_w__01_ca_pale__blue_red_ombre.
Arms
Due to cyberware, V has more arms than Shiva the Destroyer (although not at the same time). For a full list of component names, see .
The list below is a summary, but might not be up-to-date. Please refer to the linked page if you're missing anything.
You can find the corresponding entity files in base\characters\common\player_base_bodies > .ent, the file names will start with a0_.
Body
The player base body component name is
ArchiveXL
Normally, you can override only components from .ent files that you include via partsValues in the same appearance. ArchiveXL expands this by letting you manipulate any components that are loaded as part of the player.ent:
To delete an already existing reference, set the numeric value to the right of the depot path to 0:
VisualTags
These can be used in addition to PartsOverrides and will let you influence your item even further. You can find an array named visualTags.tags in both the root entity and the .app file's appearances.
This mechanism is how e.g. your sunglasses disappear when you put on a helmet.
Visual tags in the root entity will get applied to every appearance in the app.
However:
Due to technical limitations, any visual tags that hide parts of the mesh must go into the .app file to take effect.
ArchiveXL
The following tags are used by the base game; however, to make use of them, you require .
For the most recent documentation of existing tags, see , or see .
Tag
Effect
hide_Genitals will hide only the genitals, not the entire body submesh!
ArchiveXL additionally defines the following :
Tag
submesh(es)
hides…
Visual tags: diagram
Your image as custom mesh
Guide to creating neon signs from 2d textures
Summary
Created by @manavortex
Published August 2023
This guide uses the following tools and versions:
This guide will take you through the steps of replacing one of Cyberpunk's neon signs with a custom mesh. If you want to add custom props to the game, you can check out the corresponding after you're done with this one!
Step 0: Make or find an image
Start with an image. We're aiming for our own neon sign here, and we'll aassign the colours later in Wolvenkit, so make sure that it is something with clean lines and good contrasts. I'll use this:
Make sure that your image is as clean as possible.
Step 1: Convert to SVG
I started by following , but I'll write you a TL;DR
Open Inkscape and create a new document
Select File -> Import and import your .png from step 0
Make sure that your image is selected (click on it if you're not sure, it will have that resizing handle)
Time to switch to Blender to turn it into a mesh!
Step 2: Making a mesh
For this, I've originally followed guide, but here's a TL;DR for you again:
With an active selection, find the curve properties panel in the bottom right (the green icon).
In the "Geometry" section and find "Extrude".
Set it to something like 0.001 — play around with it until your mesh is appropriately extruded.
We're now leaving the previous guide.
Step 3: Fixing up the mesh for Cyberpunk
Scale, rotate, and move your curve to the centre of the viewport
Fix rotation: Press R -> X -> 90
Fix scale: Press S and move the mouse
Cleaning up the geometry
You will get much better results with the Blender AddOn QuadRemesher; however, after the first 30 days it costs money. You can download a trial version .
Let's reduce poly count and clean up our mesh. For a detailed guide, see , I'm going to give you a TL;DR again:
Remesh modifier
Switch to the "Modifiers" tab in the sidebar panel on the right (the wrench, below the one highlighted in the screenshot above)
From the dropdown, select Generate -> Remesh
Your mesh will be a black box now. Don't panic, we'll fix this by setting the modifier proprerties:
Setting
Value
explanation
Switch back to Object Mode (press Tab) and apply the modifier. The result should be something like this:
Now, triangulate: switch to edit mode, select everything, and press Ctrl+T. It's necessary for the Cyberpunk reimport.
For better results, I cheated: I split off the ghosts' eyes, the ghosts themselves and Pacman, and used Quad Remesher on each of them. This guide will show you the basics, you can make prettier meshes on your own later once you got it to work.
Creating an UV map
Switch to the Object Data Properties in the right sidebar, fold out "UV Maps" and click the + button. This is necessary for material projection, and Wolvenkit won't let you import if you didn't do it.
Naming
Rename your original mesh to submesh_00_LOD_1 — we need that for the import in Wolvenkit.
Optional: More submeshes for more colours
You can assign one material per submesh. To split off a part of the mesh,
Change back to Edit Mode
Turn on X-Ray (Alt+Z) and select the shape that you want to split off
Press P -> S (Split -> Selection)
Creating a Wolvenkit project
Time to pull up Wolvenkit.
Assuming you have Wolvenkit , you can now . Let's find ourselves an in-game neon sign to replace by searching in the Asset Browser for neon > .mesh and scrolling through the entries until we find one that we like.
You can obviously use any kind of mesh or material here!
I'll be replacing base\environment\decoration\advertising\signage\sex_shop_neon_sign\sex_shop_neon_sign_b.mesh, the heart-shaped ad banner.
Decide on a mesh and add it to your project.
In the project explorer, right-click on the exported file (sex_shop_neon_sign_b.glb) and open it in the Windows Explorer. We will now overwrite this file in Blender.
Exporting
In Blender,
select all the meshes that you want included (in Object Mode)
use the to overwrite the file from the previous step.
In Wolvenkit, use the Import Tool to import sex_shop_neon_sign_b.glb. The preview in the File Information panel should update.
Assigning Materials
I'll give the TL;DR version, you should be able to follow along. If not, feel free to read up on or find us on !
Open sex_shop_neon_sign_b.mesh in Wolvenkit and open the appearance on (as this is the one they're using on Jig Jig Street).
ChunkMaterials
At the very top of the mesh, we'll need to change the chunk masks as follows:
MaterialEntries
Now, we register the materials:
Find the array materialEntries
Add four new entries (or duplicate one four times, or…)
Name them according to the entries in the ChunkMaterials step
LocalMaterials
… and finally, we actually add the materials.
Find and expand the array localMaterialBuffer and its child materials
Copy the second entry, sex_shop_neon_sign_emissive_red_on via right-click menu
Let's pack the project!
In Wolvenkit's top bar, select Install and then boot up Cyberpunk. Let's hit up Jig Jig Street to look at our sign…
Please remember that before sharing your custom neon, you have to change the paths, or you'll conflict with the next modder! You can find a full guide on the fastest way to do that .
return {
-- Your beautiful name :)
modder = "your_name_here",
-- A custom category for your poses that will appear on the list in the tab.
-- You could use your name or a description of your pose pack.
-- You can also add your stuff to a category that somebody else has already defined.
category = "Netrunner making AMM mods",
-- relative path to your ent file. You can copy this from Wolvenkit.
-- Don't forget to add the extra slashes!
entity_path = "tutorial\\amm_custom_poses\\making_addons\\ops\\amm_tutorial.ent",
-- we'll get to these at "Custom Poses: The .lua"
anims = { --[[ here be code ]] }
}
anims = {
["Man Average"] = { -- male body gender, e.g. spawned masc V, Johnny, Viktor, Takemura…
"sit_chair_table_keyboard__2h_on_keyboard__make_amm_addon",
"sit_chair_table_keyboard__2h_on_keyboard__01__thinking",
},
["Woman Average"] = { -- female body gender, e.g. spawned femme V, Panam, Judy, Mamá Welles…
"sit_chair_table_keyboard__2h_on_keyboard__make_amm_addon",
"sit_chair_table_keyboard__2h_on_keyboard__01__thinking",
},
["Big"] = {}, -- any body gender: big folks, e.g. Jackie, River, Rhino…
["Child"] = {}, -- any body gender: children
["Fat"] = {}, -- any body gender: fat folks, e.g. Dexter
["Man Massive"] = {}, -- Smasher
["Player Man"] = {}, -- first person: male body gender V
["Player Woman"] = {}, -- first person: female body gender V
}
return {
-- Your beautiful name :)
modder = "tutorial",
-- This must be UNIQUE so be creative!
-- NO SPACES OR SYMBOLS ALLOWED
unique_identifier = "tutorial_female_character",
-- This is the info about your new entity
entity_info = {
-- name: The name that will be shown in the Spawn tab
name = "Tutorial Woman",
-- path: The path to your entity file. Must use double slash bars \\
path = "tutorial\\npv\\your_female_character\\ops\\your_female_character.ent",
-- record: This is the TweakDB record that will be used to add your character. More information below.
record = "Character.afterlife_merc_fast_melee_w_hard",
-- type: Character or Vehicle
type = "Character",
-- customName: Set this to true if you want the name you set here to appear in AMM Scan tab.
customName = true
},
appearances = {
"tutorial_woman_casual",
"tutorial_woman_business",
},
-- Here you can pass a list of attributes from different records to be copied to your new character.
-- More information below.
attributes = {
},
}
Overwrite the component "kimono" and "kimono_filler", which are defined in the file "kimono_meshentity.ent"
This is the reason why Cyberpunk has all the player components stored in .ent files!
componentsOverride > .ent file
This is hiding a submesh of the default body, which isn't part of the referenced pants_leggins.ent.
This is only possible because of ArchiveXL!
by Halvkyrie#4000 - identifies the internal names of the hair colour swatches in character creator with picture references. Update required as of patch 1.6 due to the addition of 8 new hair profiles.
If you just want to change the emissive colour, check
This will guide you to the process of making your own custom edit of my . It has several sections, which you can find linked below (but please check the wiki's navigation tree anyway).
Assumed level of skill:
You know how to read — if you can read and struggle with this guide, then it's not yet good enough. Please reach out to on the so that I can improve it.
The steps in this guide teach you how to recolour or refit almost every item in Cyberpunk. Keep reading!
Time to complete:
Setup:
If Wolvenkit is already set up: ~ 5 - 30 minutes for MLSB
Full setup: 30 minutes to ~2 hours (most of which you can spend afk)
If you are editing modded items, you should seek permission first. For your personal use, you can (legally) do what you want, but making mods takes time and effort.
Please respect mod creators' wishes in that regard.
You can check find the standard permissions on a mod's Nexus page, Description tab, under the
Tools and versions used
Skipping and skimming
TL;DR
Do not skip or skim anything. Also, if you find a TL;DR block, this sums up all sections until the next header (in this case, until ).
I'm writing these guides with the minimal amount of fluff and no background information — that will be linked, but not included, which is the opposite approach from the rest of the internet and the .
The sections are annotated with a rough estimate of how long a total newbie would need. They're guesses, so if you're slightly off, don't worry. If you're wildly off, you might want to get in touch.
If you skip or skim in these guides, you will get in trouble. Unless a section's first paragraph offers you to read on somewhere else, do not skip. Don't skim and do ok it was something like this. You're supposed to stick to the road, where you won't run into monsters, and the guide will not tell you what to do if you encounter any.
The bright side of this approach is that you don't need to understand what you're doing as long as you do what the guide says.
Links
You will find two kinds of links. It's usually clearly annotated which is which.1
The first will help you do something, leading to other guides on this wiki. They usually link the specific section that you need to complete. Please be thorough here as well, as the rules above apply.
The second contains background information and references (like "here's how this can look"). They are optional, you can browse or ignore them, and skim all you want.
Overview
To do this, you must have MLSetupBuilder running at least minimally. If you don't, then please complete the section "" below.
This guide will walk you through the following steps
Doing the
If you already have MLSB working, please read !
Creating a with the right files
R&R Step 0: Setup
This section will link you to guides for installing Wolvenkit and MLSetupBuilder, which allows you to use the cool preview of which parts of an item you're colouring.
You will also be told how to download and extract the files for the .
If you have done both, you can skip it and proceed with .
: You need Wolvenkit on your computer, and you need to be able to start it. Follow the steps in the linked guide until you can open the program.
Follow the steps under until you reach Configure MLSetupBuilder.
Make a decision if you want to use these features independently of the Netrunner suit
Netrunner Suit Preview
In this step, we'll enable custom previews by downloading the files I've prepared and extracting them into MLSB's depot. It should take you no more than five minutes.
The Netrunner suit uses custom multilayer masks. To get an accurate preview in MLSetupBuilder, you need to complete this section.
You can make recolours blindly by just tweaking the colour values without knowing which parts of the mesh they affect, so you can skip this step and ,
MLSB's Uncook Folder
This is where MLSB (and Wolvenkit) store the files they extracted.
Go to Nexus page. You can find two files here, one with the modded multilayer masks, one with the original ones
Download the archive with the modded mlsetup
Extract the entire archive into MLSB's uncook folder, or drag and drop the base
Open the Model Library and search for t0_005_pwa_body__t_bug.
Click on the entry. If a 3d model shows up, you're done here and can go on.
If no model shows up, select View -> Logs from the taskbar. It will complain about files being in the wrong spot. You need to make sure that the files you downloaded in Step 1 end up in exactly these folders and none other.
If the file paths are ending in .dds, open MLSB's preferences and configure it to use pngs instead.
Install the mod
The tutorial assumes that the mod is installed manually rather than via Vortex. If you have already done that, no sweat — it means that a few files might be in different places, and all this is annotated.
If you don't want the extra complication, simply deactivate the mod in Vortex and follow the steps below.
TL;DR
Extract the downloaded archive directly into your Cyberpunk 2077 directory and go to .
Detailed instructions
Download the mod from
Open the downloaded .zip file. You will see something like this:
These files need to go directly into your Cyberpunk 2077 directory, where they will merge with the existing folders.
This is the same directory that contains REDprelauncher.exe.
Extract or
OK, what now?
Now that you're all set up, we'll .
Poses/Animations: make your own
Make your own pose, then import it into photo mode
Summary
Created by @manavortex
Published September 2023
This guide will teach you how to create a custom pose in Blender and import it into the game via Wolvenkit.
You will make a photo mode replacer - your custom pose(s) will replace to existing vanilla pose(s) provided by Photo Mode in the game.
This is a prerequisite for pose sets for both and .
Check the section for more general knowledge.
It has been tested with the following software versions. Install these or newer.
We all stand on the shoulders of giants: this process has first been documented by , who also provided the . Thank you!
Skipping and skimming
This guide will include the minimum amount of fluff and will link background information rather than giving it.
For that reason, you shouldn't skip or skim unless the section tells you that it's optional.
Any links in the text will either
provide additional information which you do not need to complete this guide
lead to step-by-step instructions for any given process
Follow them if you want to learn more, or if you are unclear on how to complete the current step, then come back here.
Step 0: Preparations
Your Wolvenkit project
To import your pose into Cyberpunk, you need a Wolvenkit project.
. Give it a name that you can identify later.
Now, your project needs the photo mode .anims file appropriate for your pose(s). The table below shows your options.
for the correct photo mode file and add it to your project:
body gender
file
Export the file(s) to GLB via . Default settings are fine.
(We will overwrite these glb(s) with our new pose, then use Wolvenkit to merge them into the existing .anims file.)
You can not move these .glb files. Wolvenkit needs them to stay where they are so it can splice your new animation into the existing .anims file.
Download the template files
Download the animation template(s) for your rig(s):
for single characters: from
for multiple characters: of Angy's templates
Move/copy them somewhere, then open the one you want in Blender.
I'll be using Angy's template for female V, because the other one doesn't exist I happen to have one of those.
Step 1: Posing the mannequin
This step will happen in Blender.
If the written instructions aren't clear enough for you, check the screenshots below them.
Open up the file
Select the armature by clicking on one of the bones in the viewport (the red circle on the screenshot below). They will be highlighted if you did it right.
Switch the viewport to Pose Mode in the dropdown menu at the topleft of the viewport, immediately below the "File" and "Edit" menus. This will turn the armature red.
Now, you need to create your pose. Before you do that, check the box below:
Nice-to-know about creating poses
General
The real human skeleton changes pose only via bone rotation — moving bones leads to dislocated joints. Do not move bones.
Tooling
As of today (September 2023), we can only create poses and animations by adjusting each bone by hand. This is how:
Select a bone by clicking on it (it will appear highlighted)
Rotate the bone by either
Now, , then proceed to the next section.
Step 2: Creating the animation
You now need to create an animation that Wolvenkit can add into the existing file. For that purpose, we will create a nonlinear animation in Blender.
In the panel at the bottom, click on <No Action> to select it.
In the Armature -> Animation Data panel, click on the New button.
Now, we need to add keyframes, one for the fallback position and one for the pose.
Make sure that the keyframe selected in the animation timeline is 0 (see "Animation Timeline" screenshot below)
Click into the main viewport next to the armature
Now, rename both your NLA strip and your animation to idle_stand_01. This will overwrite the "Tabula Rasa" animation. (Find a list of animations and their associated names .)
If you aren't planning on replacing the in-game idle poses (i,e., Tabula Rasa), it is still required that your NLA strip and your animation have the same name.
This is important!
This step is crucial. If you don't do this, then Wolvenkit won't import your animation.
The names must be the same, and they must match the name in your .anim file.
Go back and read the warning box under step 4.
Double-check the names. (Yes, this is that important)
Optional: To add another pose, you can go back to Step 1, then rinse and repeat.
This will open a file picker. Do the following things:
Check the As Photomode Pose box on the right
Navigate the to the path of the file you exported in the and click on it to overwrite it
Now it's time to import the file back into Wolvenkit.
Step 3: Importing and testing
Switch back to Wolvenkit and open the .
Click on photomode__female__idle.glb to select it and open the import settings panel.
In the panel on the right, change Target File Format
Hit the Import Selected button.
Youc an now test your mod: Install your Wolvenkit project by clicking the green button on the taskbar, and launch the game.
If all went well, entering photo mode will show your new pose.
Troubleshooting
My pose doesn't import!
I have no idea how to tell you this, choomba, other than stressing thrice that it's important and putting a big red box, but the NLA strip and the animation must have the same name. Go back to "" and double-check. The animation might have trailing numbers, e.g. be called photomode__female__idle.001, that will already do it.
Very funny, but it wasn't that
If you're really 100% sure, then you might have a broken NLA strip. That happens sometimes — simply recreate it:
If your armature isn't selected anymore, click on it to select it
Switch into Pose Mode
Press A to select all bones
Nope, still borked
We're reaching the end of the rope here. Go back and . If that wasn't it,
create a new copy of the .blend file you downloaded (but keep yours open)
In your old Blend file, repeat 1-4 of the
In your new Blend file, repeat 5+6 of the
R&R: Your own Wolvenkit project
Summary
Created by @manavortex
Published September 30 2023
This page is a part of the Recolours and Refit guide and will walk you through the process of creating your own Wolvenkit project. Here, we will:
create our project
solve load order via project name
get the files from the mod that we want to change
Time to complete:
~30 minutes for the tutorial
once you know how it works: < 5 minutes to create a project and add the correct files from a mod
The principles you learn here are universal. Once you have understood how this works, you can recolour and refit any Cyberpunk item.
If you are editing modded items, you should seek permission first. For your personal use, you can (legally) do what you want, but making mods takes time and effort.
Please respect mod creators' wishes in that regard.
You can check find the standard permissions on a mod's Nexus page, Description tab, under the
Prerequisites
The links in the check list go to more detailed guides. For the exact things you have to do if you can't check the boxes, see the previous section of the guide ->,
Why do I want a Wolvenkit project?
To edit an appearance, you need to make a mod, and for that, you need a Wolvenkit project.
As soon as you have changed the first file, you can and check if it is working.
There are two ways you can go about the process: do either a full repack of my mod, or create a compatibility archive. This section will explain the differences, the will walk you through the process of setting things up for either of those options.
Full Repack
Compatibility Archive
Once you've made your decision, you can proceed to the next section and . If you aren't certain yet, you can keep reading to find the pros and cons listed more clearly.
A full repack
Your mod completely overwrites the original mod, creating your own local copy.
I do this with mods for my own personal use — I don't care if the original mod is updated, my character will only ever wear that one custom variant.
Pros:
Anything I do to the mod in the future won't affect you
Cons:
Anything I do to the mod in the future won't affect you
If you update or reinstall the original mod, you will overwrite your changes
If you're anything like me, you'll lose track of which files you have or haven't modified
A patch
You'll create a compatibility mod that will exist together with the original.
I do this with mods where I only want to change little things, e.g. removing a submesh. When the original mod updates, I can update my compatibility mod in <5 minutes.
Pros:
You can still update and reinstall the original without overwriting your changes
Your mod has only exactly those files that you've actually changed
Cons:
You have to keep the original installed
Only works together with the original
Updates on the original mod might necessitate an update on your part
This is where you pick any of those options.
Creating your Wolvenkit project
The .archive that Wolvenkit packs for you will have the same name as your project. Stick to the recommendations in Step 4, or read the expandable box to learn more.
From Wolvenkit's menu bar, select File -> New Project
Fill the fields in the dialogue:
Creation Location: This is where your loose files are going to live. From here, Wkit can pack it as a mod and install it to your game directory.
Select any folder outside of your game directory.
Why do we name it like that?
In Cyberpunk, any file can only be modded once. When something has altered a texture or mesh, everyone else can get lost.
At some point during start-up, Cyberpunk 2077 will open up the mod directory, grab a list of all mods, and load them. Naturally, it will start at the top of that list, so your mod needs to be further up than the original.
We achieve that via file name - hence #4 on the above list.
Add files from the mod to your project
This part will show you how to add files to your project (you can't change them if you don't).
Prerequisites
You have installed the mod from .
Why are we doing this?
Skip to if you don't care.
To alter an existing item, you need to create a mod that will overwrite the original resource. This mod must modify that file first - which is where the load order comes in.
Do not move or rename any of those files, they need to be exactly where Wolvenkit puts them.
The section
describes the process of
tells you which files to use it on for
For the general documentation on adding files to your project, see .
How to export files
In Wolvenkit, open the Asset Browser (pinned at the right-hand side by default), and toggle the switch to "Mod Browser".
Find _ArchiveXL_Netrunner_Variants, then click on it. It will be near the bottom of the list, together with your other mods starting with _
You can now browse the archive, or use (next to the big red toggle button) to find files inside the archive by searching for archive:ArchiveXL_Netrunner.
Selected files: full repack
If you want to overwrite the complete mod, run this query in Wolvenkit's Mod Browser:
Add all files to the project — everything.
Now, switch the Project Explorer to Resources. It will be empty; you have to create the following folder structure:
Find and copy the following files from your game directory into the subfolders of resources (there'll be a screenshot in a minute)
_ArchiveXL_Netrunner_variants.yaml
From: Cyberpunk 2077\r6\tweaks\manavortex
To: resources\manavortex
ArchiveXL_Netrunner_variants_atelier.reds
From: Cyberpunk 2077\r6\scripts\manavortex
To: resources\r6\scripts\manavortex
_ArchiveXL_Netrunner_variants.archive.xl
From: either
vanilla install: Cyberpunk 2077\archive\pc\mod
REDmod: Cyberpunk 2077\mods\RANDOMNUMBER_ArchiveXL_Netrunner_variants\archives
To: resources
Selected files: Emissive
TL;DR: via search browser query
Add all those files to your project, then skip the rest of this page and go to
Selected files: Recolour
All material colour definitions are stored in .mlsetup files, which we'll be editing in .
TL;DR: via search browser query
File structure explained
All material definitions in this mod are in the folder manavortex\torso\netrunning_suit\textures
The first level subfolders group the .mlsetup files by material (e.g. nylon, snake, other)
If the names aren't clear enough or if you can't guess which file you have to take, you can open netrunner_recolours_translation.json in Wolvenkit:
Expand the root node and then the entries node. By selecting a node, you can see the translation text. The field for secondaryKey contains the colour variant, which corresponds to the mlsetup file name:
Selected files: Refit
For a refit, you only need two files (one if you don't care about the emissive properties):
female body gender
mesh
path in files
male body gender
mesh
path in files
Simply add both files to your project, then hit up the section to get them fixed.
OK, what now?
Depending on which files you added, you now proceed to the next guide:
/
NPV: Preparing the head in Blender
Step 1: How to generate your V's custom head mesh
Summary
Created by @manavortex
Published May 13 2023
This page is a part of the NPV guide. It will show you how to create your V's head in Blender.
Prerequisites
In this section, we will be moving/deleting files. You can complete these steps in Wolvenkit or in the Windows File Explorer.
It's important that you leave the file structure as it is. Moving or renaming files will confuse Wolvenkit and break the example project.
The final section of tells you how to safely move files.
Step 1: Getting head
Open the head folder in your project's archive section.
Optional: Be confused and/or panic about why there are over 9000 files.
It's too many of them!
True! That's because I included all options for any given V. But don't worry: after you have deleted the ones that you won't be using, you should be left with a maximum of 13 files for female V and 14 files for male V.
I have included all meshes and morphtargets from the game files. We'll now thin out the options, deleting those parts that your NPV won't be using.
Deleting unused files: the convenient option
The best and most convenient tool for the job is . It will give you a list of files that you need to keep.
The list will give you a number of Source Mesh entries like h0_000_pwa_c__basehead.mesh.
You need to keep these files inside the head
What the actual fuck are all these files?
If you don't care and just want to know what to delete, go .
Meshes vs Morphtargets
The .mesh files are the 3d files making up your NPV's head. I've taken them from the game files and prepared them for you (by making them use the player animations and -expressions).
The .morphtarget files are the character creator options (a direct game export). You can safely overwrite them with the most recent version by searching Wolvenkit for the file name – you need to put it into the correct folder, though, or it won't be picked up by the scripts.
We only need the .morphtargets to generate the actual meshes by duplicating the character creator process.
Okay, and all those numbers?
The different variants in the character creator correspond to the different meshes. For example, if you select cyberware 3 in the character creator, the mesh that will get loaded is cyberware_03. Not so difficult, is it?
Here's what the prefixes mean:
Finding the right piercing
If your V isn't using any piercings, you can skip this step and go directly to .
In the files, you will see four files for jewelry:
… none of which is your V's exact piercings. Instead, there are full sets of jewellery, most of which will be hidden.
You have to look at the meshes and find the file that includes your set of piercings. We'll go about hiding the excess in one of the later steps.
Deleting files
Number in file name <=> Number in character creator
Do not delete any files if you're (Ignore this hint if you don't)
Many of the files are variants and your V will be using one or none of them. That means you have a bunch of files to delete. If you have chosen above, you should already have a list of files that you need to keep. Otherwise, the table below should give you some oversight.
When deleting files that you aren't using, you need to remove both the .mesh file in the head folder and the .morphtarget file in the head/morphtargets folder.
The following table will show you examples on what to keep (as in, you delete everything else):
Body gender/variant
Files not to delete from variants
Expected result
After deletions, both head and head/morphtargets should hold only the files that your V is actually using.
For a list, see the .
Once you're done, you should have this many files:
Step 2: Exporting head
Now, we will export all .morphtarget files from Wolvenkit so that we can edit them in Blender. You will complete most of these steps in Blender, only the import/export happen in Wolvenkit.
Find the Export Tool (Tools -> Export)
To filter, click into the empty row under "name" and write "morphtarget"
Check the box in the header to select everything
Switch to your project's raw folder or Wolvenkit's raw perspective. You will find the entire file structure mirrored there.
In head folder, find the file head_import.blend.
This file is a utility file which will automatically import and export the files for you. For that reason, it needs to be in a certain relative path.
If you have already changed your structure (by re-naming your folders), you need to make sure that head_import.blend is in the folder head right next to the folder morphtargets.
Open it in Blender. It will take you to the scripting perspective, where you'll see something like this:
Press the play button.
The script will now import a bunch of armatures from the morphtargets folder. You will see them showing up in the topright corner (see the next screenshot under 7. for how it should look)
Switch to the next script in the file, but don't run it yet:
If you've been previously afraid of scripting: This is a good place to stop! :))
Find line 26 and following in the script, and alter the values to those of your V (which you get from the character preset, see for further explanation).
You don't need to select the eyebrows here, as those are "painted on" later via mesh appearance. The mesh only needs to have the right shape, which is what we're doing here.
After you've changed the values to those of your V, click the "play" button again. This will apply the morphs to your V's face:
Some shapekeys don't correspond 1:1 with their numbers in the character creator. If a part of your shape is shaped subtly wrong or looks weird in the game, undo your changes (Ctrl+Z), add or subtract 1 from the corresponding shape key, and run the script again.
Step 3: Importing head
Unless you are editing original V, start by deleting the morphtargets from the template file — we don't need them anymore.
Remove the entire folder, both from raw and archive. From now on, it's meshes only!
Exporting from Blender
Now that your head looks the way you want, it's time to run the final script, which will export your changed head to .glb for you:
This will overwrite already existing files, leaving you with a set of import-ready mesh files.
Now it's time to get them back into Wolvenkit.
Find the Import Tool (Tools -> Import Tool)
Click "Import All"
You're done!
You can now start the game and look at your V's face to make sure that your head and eyes are showing up correctly . If it does, read on how to . Otherwise, keep reading.
Can I have that with textures?
Yes, you absolutely can! Once you have imported them back into Wolvenkit, you can use the With Materials option and the Wolvenkit Blender Plugin to get a fully textured and shaded set.
Step 4: Troubleshooting
Optimally, this process just runs with no hitches. However, during beta testing and troubleshooting, people ran into a few issues, so I'm listing them here.
Blender import errors
If you get an error within Blender, e.g. something like AttributeError: 'NoneType' object has no attribute 'name', then something is wrong with your install or you are using the wrong version. Reminder: This has been tested with 3.5.1, but anything >= 3.4 should work.
The piercings are in the wrong position!
The problem went away after the person having it upgraded Blender to 3.5.
V was imported, but the textures are all wrong!
This happens when the UV maps are flipped. 8.9 doesn't implement that feature yet, so you might have to use a of Wolvenkit — the Nightly from is currently stable.
Alternatively, you can use the last script in the file, which will attempt to flip the UV maps for you. It might have an offset, though.
V was imported, but they're unsettlingly, subtly wrong
If you had the example project lying around for a very long time, please try and redownload it (), as the first version had been using an NPC animationgraph for facial expressions.
If that's not it, then you ran into the shapekey offset issue: ssome shapekeys don't correspond 1:1 with their numbers in the character creator. If a part of your shape is shaped subtly wrong or looks weird in the game, add or subtract 1 from the corresponding shape key, and run the script again.
How to create custom props to use with AMM or sector editing
Summary
Created by @manavortex
Published April 2023, updated July 2023
This guide will teach you how to create a customizable by chaining an .ent, an .app, and a .mesh file with multiple appearances.
For a guide on how to make meshes out of 2d textures, see .
Its focus is on the file structure and the relations between the files. If you want more hands-on tips what you can do with materials, check or .
It uses the following versions:
Cyberpunk 2077 game version 1.6.1 (DLSS)
>= 8.8.1
(>= version 2.1, anything earlier won't have customizable appearances)
Level of difficulty: You know how to read.
Setting up the project
This section will tell you how to get the files, then give you an of what they do and finally show you a on how they hang together.
Create a project in Wolvenkit and give it a name. This will later be the name of your archive file.
Download the AMM prop template from or from manavortex's , or download the complete for Wolvenkit. It will have prepared files, which is faster than doing everything from scratch by yourself.
Prepare your Wolvenkit project and make sure that you have the following files:
The first part of the structure is up to you, although for the sake of the tutorial you might want to stick to it. There's a section later on .
The second part (under "resources") is where AMM will look for custom props. You can't change it other than creating subfolders under "Custom Props".
Explanation: what did you just download?
This section gives an explanation of the included files, explaining the difference in file structure between props with vs without variants.
If you don't want to know this, you can skip ahead to to get crackin', or check the to see how the files connect.
LUA file
This file registers your prop with AMM. File content looks like this:
Without a lua file, AMM (as of version 2.1) won't be able to spawn your props.
Here's what the lines do:
When you edit the .lua, it's usually enough to reload all mods in CET.
Entity file
Defined in your LUA file, this file holds the game entity that AMM spawns when you click the button. There are two ways of using entity files:
Mesh entity (the legacy version)
One entity file per variant. The props will not have appearances — AMM's prop browser has one entry per entity file (e.g. cube_black, cube_white, cube_glowing).
Fun fact: The cluttered prop browser annoyed manavortex so much that she joined the AMM developer team, helped Max implement the alternative workflow described below the picture, and wrote this guide!
It was bad!
You add props by putting meshes directly into the components array.
Root entity
One entity file per prop, one entry in AMM's prop browser (e.g. cube). After spawning it, you can toggle its appearances (white, black, glowing) the same way you do it with NPCs.
If you have , then this will be familiar to you. If you haven't, please ignore the link and keep reading — this is the simpler version!
Instead of adding items directly via the components array, we link appearances to an .app file. The only component we keep in the root entity is the targeting component for the CET cursor: this way, it will be added to each appearance in the .app file.
Appearance file
This file holds a list of appearances. Inside each appearance, you can define any number of things to be loaded (components) and specify or override their behaviour.
We will only use entPhysicalMeshComponents, and they must be named amm_prop_slot1 .. amm_prop_slot4 if you want to enable scaling.
If you have more than four mesh files assigned to your app's components, the prop will no longer be scaleable (as of AMM 2.1). You can get around this limitation by making meshes with more submeshes instead of having individual files.
template_textured.mesh
A pre-configured mesh for a textured material. Uses the following files in the subfolder textures:
template_01_d.xbm: A diffuse (albedo) map, colouring the mesh
template_01_n.xbm: A normal (bump) map, adding depth to the object.
If you stick to this naming convention and have your filenames end in _d or _n, Wolvenkit will recognize and identify the correct settings for image import.
You can learn more about textured materials . This is not necessary for the purpose of this guide.
template_multilayered.mesh
A pre-configured mesh for a multilayered material. Uses the following files in the subfolder textures:
6_layers.mlsetup: A with colour properties
6_layers.mlmask: A , determining which parts of the mesh are affected by which layer of the mlsetup. In this case, it just contains six blank layers.
You can learn more about multilayered materials . This is not necessary for the purpose of this guide.
If you have downloaded the example Wolvenkit project, you can now install it and launch the game, seeing everything in action.
Diagram
Okay, now that we've gone through the theory, let's have a quick overview how everything hangs together:
Without variants
With variants
Creating another prop
This step is optional. If you just want to see how this works, you can pack your project with Wolvenkit and search AMM for "tutorial item". However, assuming that you actually want to make cool things, you will be doing this a lot.
If you want to create another prop, here's the fastest non-script way to go about it (tried and tested by manavortex):
In Windows Explorer, duplicate the template folder
Rename the new folder (template - Copy) to the name of your prop (e.g. baseball)
Now you can launch the game and check your prop. If everything went well, you should see something like this now:
If not, it is time to hit up the .
The final touches
Before you can share your custom props, you have to change the folder structure and file paths. Otherwise, two people overwrite tutorial.lua, and one of the mods stops working.
You can find a step-by-step guide on the process .
Troubleshooting
This section will only cover troubleshooting steps for this guide.
For anything related to mesh imports, see .
For general 3d model troubleshooting (including import errors), see .
My prop doesn't even list in AMM!
The problem is in your .lua file. Use to check the syntax and make sure that there are no errors - usually, it is missing/extra commas and/or missing/extra braces.
If the syntax is okay and your prop still doesn't show up, double-check your category and make sure that it is one of the existing ones.
My prop won't spawn!
... and I can't target it!
AMM can't find your .ent file. Make sure that your .lua points to the correct path in your archive (right-click -> copy relative path and paste it to your lua file.
Make sure that you don't delete any quotation marks or commas while you do that. If you're unsure, you can double-check .
... it all looks good, but there is no prop!
Toy around with the scaling. Sometimes, your prop doesn't show because it's the size of Johnny's ego and hovers somewhere above your city block – or the opposite, it's microscopically tiny. Don't be afraid to change it by the factor 10 or even 100 and see if that does anything.
If that's not it and if you have a customizable prop (with a root entity), try adding an appearance default to the mesh. The game will fall back to that one if there are issues with your custom appearances.
My prop spawns, but something about it is weird!
In general, your answer is probably in the guide on , section 2 () – check that guide's .
Different equipment slots
How to determine the item type
Summary
Created by @manavortex
Published June 10 2023
This page is a part of the Adding new items guide and contains the steps necessary to create different equipment types.
For an overview of prefixes for the different component types, see here.
Step 1: The .yaml
You define the item slot in your .yaml file by specifying the root entry type via $base:
You can use the following types:
Base record
You can absolutely set up a shirt and then put $base: Items.GenericHeadClothing - V is the only person I know of who can wear their undies on their head without impairing their functionality.
However, before you start abusing the system that way, you might want to look into .
Step 1.5: EquipmentEx
psiberx's mod EquipmentEx ( | ) adds a whole new wardrobe system, providing extra slots that CDPR forgot to include with the basegame. This feature requires the mod to be installed — without it, only the $base types from step 1 will be considered.
All you need to do is adding the last two lines to your .yaml:
Find a full list of outfit slots in the .
Step 2: the entity file
Some item properties are defined in the file mesh_entity.ent via components. If you use the wrong kind of entity, you might end up with your shirt being a puddle around your feet, or . To get around that, you need to make sure to pick a file that correspond's to your item's body part.
You can find all entity files under base\characters\garment\player_equipment:
If you want to be super thorough, you can stick to the right gender
If you want to know more about components, check the . This is completely unnecessary for the purpose of this guide!
Yes: you need to configure MLSetupBuilder. Follow the steps on the linked list until you have a full depot, then proceed with Netrunner Suit Preview
If you can't set up a depot in MLSB (because computer go brr), you might want to hit up the Redmodding Discord to find help with your problem, or file an issue on github (Wolvenkit | MLSB). You can still use the Netrunner Suit Preview.
No: You have to options now. Please pick one.
Partial preview: I've prepared a bunch of files for you. Netrunner Suit Preview will show you where to put them.
No preview at all: This will make it harder because you're recolouring blind, but if you're cool with that, you can proceed with R&R: Your own Wolvenkit project.
folder from inside the archive there. You can find the path in MLSB's settings:
copy
them to that folder. If you're asked to overwrite existing files, click
Yes
.
I can't tell you exactly how to do that, because each program works slightly differently. I'll include instructions for 7zip, just in case:
Make sure that either nothing or everything is selected
Click the Extract button in the taskbar (it looks like a blue minus)
Find the Copy To field and do either of these things:
Paste the path to your Cyberpunk 2077 directory into the field
Click the … button next to the field, navigate to your
Click OK
If you get a Confirm File Replace popup, click Yes to All.
Optional, but recommended: Launch the game and make sure that the mod works:
Equip a suit in the Atelier Store's preview
OR
Spawn one via Cyber Engine Tweaks and equip it (e.g. Game.AddToInventory("Items.mana_netrunner_suit_nylon_black_gold"))
A fully-blown 3d editing software (free and open source). You only need this if you want to do refits.
Instead of overwriting the entire .anims file, Wolvenkit will splice the NLA tracks that you will create below into the container. For that reason, you can have as many .blend and .glb files as you want and import them in sequence, or have all your poses in a single .blend.
Tool usage
You can limit a tool's effect to an axis by pressing x, y or z. Press the key a second time to use the local axis rather than the global one, and a third time to remove the limitation.
Viewport zoom matters. Get closer for finer movements!
pressing R to enter rotation mode, then moving the mouse to rotate the bone (read up on axis limitation in the expandable box above)
or
selecting the Rotate tool from the toolbar on the left, then clicking and dragging along the coloured axes
When you're done with this bone, position the next one.
Press I to open the keyframe menu
Press W to insert the whole character
Press the right arrow to select the next keyframe
Press I and then W again
After you have done that, click on the Push Down Action button
Now that you're sure that you have the correct names, switch the viewport back to Object Mode (the same way you switched to pose mode). Your armature should still be selected.
TODO: This step will be made optional when the Blender plugin update hits. Update guide when it does.
From the File -> Export menu, select Export Selection to GLB for Cyberpunk
When you're done, hit "Export for Cyberpunk".
to Anims:
Press Ctrl+C to copy their positions
Create a new NLA strip by repeating Step 2 — but instead of posing the armature, you can simply press Ctrl+V to paste the bone positions from your previous animation.
This is what adding your .anims to your project may look like
Your viewport directly after opening the file.
"Pose Mode" dropdown looks like this
Armature -> Animation Data panel looks like this
Animation timeline
Before
After
Permissions and Credit
header right next to the requirements.
Needs load order?
No, replaces original mod
yes, needs to load before original mod
Your mod has to load before the original, so you need to fix load order. (This guide will tell you how)
Project Name: The name of your project, and subsequently, the name of your .archive file.
If you want to overwrite: Name it the same as the original mod's .archive (_ArchiveXL_Netrunner_Variants)
If you want to patch: It needs to come before the original in alphabetical/binary order. Pick one of the following:
_ArchiveXL__Netrunner_Variants
__ArchiveXL_Netrunner_Variants
_00_ArchiveXL_Netrunner_Variants
My personal preference is the first, as the .archive files will show up
Once you have found the correct items (for recolour or refit), this is how you add them to the project:
The texture files inside the folders are named like material_baseColor_accentColor. Base colour and accent colour should correspond with the in-game suit name.
If there is a subfolder inside the material folder, the mlsetups inside are using the secondary mlmask. That's not going to mean anything to you, but we'll get back to it on R&R: Colour Editing.
Optional, but recommended if you want to create multiple props: Notepad++
template_01_n.xbm: A normal (bump) map, adding depth to the object.
Rename all files inside of the folder: replace template with the name of your prop (e.g. baseball). Make sure that it is the same as the containing folder, or you'll have to clean up things by hand later.
Right-click on your folder and export the entire thing to json.
Switch to the raw tab in Wolvenkit and open your json files in Notepad++
Via Search and Replace in Files (Ctrl+Shift+F), replace template with the name of your new prop and folder (e.g. baseball). Replace it in all files, using Match case:
Make sure to check "Match case", or you will be unable to re-import the .ent file!
Optional: If you have changed the folder structure (e.g. moved your folder from the subfolder stuff to the subfolder misc), run another Search and Replace in Files (Ctrl+Shift+F) to adjust your file paths.
In the project browser's raw section, right-click on the folder and select Convert from json. This will have updated the relationships between the files to your renamed files.
Delete the files / appearances that you don't need. Save and close the mesh file.
Import your meshes and textures over the ones from the template. For a guide on how to do that, check here.
Add another entry to the props array in your LUA file:
name
what you search for in AMM
category
what AMM sorty by (you can only reuse exisitng categories)
distanceFromGround
how far away from the ground should your prop be? (This moves the origin in Blender's 3d viewport)
appearances
If you're using a root entity, these are the appearance names to switch through and the entries in AMM's "appearance" dropdown / spawn tab
More detailed explanations for the guide "Adding new items"
Summary
Created by @manavortex
Updated June 10 2023
This page is a part of the Adding new items guide and explains how the different files interact with each other.
If you have come here from the main page because you want to change the existing files, search for Making changes in each section. To add new appearances, the following files are relevant:
Unless stated otherwise, any linked resources are optional and might not even be related to this exact guide.
Structural files: telling the game about your mod
We need four files to tell the game about our new items:
the .xl file, which tells ArchiveXL which files to register
the .json file with the translations
the factory.csv, telling the game about your custom files
The .xl file
This file will be in the same directory as your mod's .archive file. It lets ArchiveXL register the (my_shirt_factory.csv) and the (translation_strings.json).
You usually touch this only once, unless you want to add more factories or translation files.
.xl: Making changes
You only need to change this file if you have changed the factory's file path (moved the file) or want to add a second factory file (there is no need to, though).
The .json file (custom texts, i18n)
This is the localization file for language-specific entries (green boxes on 's screenshot).
If no entry for a language is defined, then the English one will be used.
An entry will look like this:
If you don't need a male-specific translation, you can leave it blank — by default, femaleVariant will be used.
.json: Making changes
You need to change this file every time you want to add a new text entry to your mod. The easiest way to do this is by duplicating an existing entry.
The .csv file (the factory)
The factory connects your .yaml to the corresponding rootEntity.ent via entity_name.
When reading your .yaml file (e.g.tutorial_my_custom_tshirt.yaml, ), the game will find entries like this:
The csv file is where ArchiveXL will find an entry with the yaml's entityName in the first field. It will then check the corresponding for an appearance with the name in appearanceName.
Making changes
You only need to change this file when
you move a root entity (update the path!)
you add a new entityName — for example, a second t-shirt that you want to have its own root entity.
The control file: yourModName.yaml
When editing this file, please keep in mind that indent is important!
The first line of each block must not have spaces, the blocks below must have the same amount of spaces. More spaces means more nesting.
Making mistakes here might break your entire mod, so if in doubt, run your edited file through an .
This file controls the adding of items to the game. An entry looks like this:
The entry above will let you add the item via Game.AddToInventory('Items.my_custom_shirt_redwhite')
Four mappings take place here:
entityName: Points to the (see documentation there as for what it works)
appearanceName: In the specified in the factory, it will look for an appearance by this name.
The appearance name will only be considered up to the first . If you want to know what those pesky & things are doing, read up the corresponding documentation.
You don't need to know this unless you want to add variants for different genders or camera perspectives: we're avoiding them by puttingappearanceSuffixes: [].
displayName/localizedDescription : In the translation_strings.json, find an array where the value for [3] (the last entry) is identical to this key. Then, check which gender V has, and display either femaleVariant or maleVariant.
icon:
What is it, precious? The $base parameter
$base defines which slot the item will use. For the full documentation, see "".
The inherited properties can cause problems (see "" for more detail).
You don't need to know this unless you want to add variants for different genders or camera perspectives: we're avoiding them by puttingappearanceSuffixes: [].
.yaml: Making changes
You need to touch this file every time you want to add a new item (or when you want to change an existing one). It is easiest to duplicate an existing entry.
If you want more than just the base properties, check the documentation for .
The game files
Now that we're done with the base structure, we can take a look at the game files. Like for any of the vanilla game items, we have four of them. This guide will only hold information that's directly relevant to adding item, but in the individual sections below, you will find links to more documentation about the files.
With ArchiveXL >= 1.5, there is a new way of making these connections, saving most of the work of making many variants. You can still complete this guide and then see the documentation for dynamic loading .
If you want to do more than 5 variants (for both body genders and camera modes), that approach is strongly recommended. Since there isn't a detailed guide yet, you can find us on in the #archive-xl channel.
appearance.app
mesh_entity.ent
Overview
This is how the files connect to each other. If your head explodes now, don't worry: it's not as complicated as it looks, and the item addition guide will walk you through step by step.
root_entity.ent
Full documentation of the root_entity is on its own page.
Understanding this is not necessary for the purpose of this guide.
The entry point from your yaml, this file is a glorified lookup dictionary: for any appearanceName, it will specify an .app file and the name of an appearance in the .app file.
An entry looks like this:
If you don't know what this means, skip it and wait for the full step-by-step guide!
For using , you only need one appearance here, which must match the field appearanceName in the .yaml up to the variant separator !
Make sure to add the DynamicAppearance tag here.
Suffixes
The root entity's name field is where you would put suffixes for different appearance variants.
You don't need to know unless you want to make variants for different genders or camera types. In fact, you will want to skip this until you have a confirmed and working mod!
To disable them, each entry in your contains the following line:
appearanceSuffixes: []
Root Entity: Making Changes
When you change the path of this file, you need to adjust the path inside the .
Adding a new appearance:
Expand the list appearances and duplicate your already working entry.
Change the following fields:
appearanceName => everything before the & must match appearanceName in your *.yaml
name => must match the name you're going to put in your app.app
Example:
old (copy):
new:
You do not need to change the appearanceResource.
mesh_entity.ent
For experienced modders
This file replaces the component array inside the .app!
Check for how to find the right mesh entity for each equipment slot.
This file holds a collection fo components that determine how our equipment item behaves and moves. Each kind of equipment has different types of components, which is why you need to pick the for each equipment slot.
Would you like to know more?
Full documentation of
More intel on
Understanding this is not necessary for the purpose of this guide!
By bundling them in this file, we save ourselves a lot of copy-pasting inside the .app file. The only component we actually need to change is the one with "Mesh" in its name, typically entGarmentSkinnedMeshComponent:
The component's name will be used in appearance.app's materialOverride array (see )
When changing component names, you want to leave the (t1_) in place — the game needs them to calculate collisions!
If the text in this box tells you nothing, just ignore it for now
If you're using , you can use property interpolation in paths. For example, *p{gender}a will resolve to pwa or pma, based on V's body gender.
Read more about this on .
Mesh Entity: Making Changes
When you move this file, you need to change the path inside every appearance inside the . file.
Otherwise, you only need to touch this file if you move the .mesh file.
appearance.app
Contains a list of appearances as mapped by . Each of the appearances will load mesh_entity.ent via partsValues and specify
For experienced modders
The .app file's component array should be empty: this is not an NPC appearance! :)
An entry will look as follows:
partsValues will define what file(s) to load (as a list of components), while partsOverrides tells the which appearance to use.
For ArchivXL >= , appearance overrides can understand the following variables for meshAppearance:
If you don't know what this means, skip it and wait for the full step-by-step guide!
For using , you only need one appearance here. In this case, components will be ignored — make sure to put them all into your mesh_entity!
Appearance: Making changes
When you move this file, remember to change the path inside the root_entity.ent
You need to touch this file every time you add a new appearance:
Open the .app file and expand the list appearances.
Duplicate an item and select the new one.
Change its name to the one you just defined in the .yaml (black_blue_appearance_name)
You can leave partsValues alone - this just points at the file that loads the mesh, and you've already set it up above when setting up the file.
Mesh
The mesh file maps materials to appearances. To find out how exactly it does that, find the on the mesh wiki page.
Would you like to know more?
#appearan
The documentation for .mesh files lives on their own page!
For our purposes it's enough to say that you can define your individual appearances here.
Mesh: Making changes
Find the array appearances and open it.
Duplicate any meshMeshAppearance.
For further information and guides, check or see .
Items.my_custom_shirt_redwhite:
entityName: my_custom_shirt_factory_name << this is for the factory.csv
appearanceName: appearance_root_entity_white_red << this is for the root_entity.ent
componentName: t1_tutorial_custom_shirt_4711 << no need to change this
mesh_appearance: mesh_black_blue << corresponds to meshMeshAppearance.name in my_mesh.mesh
name: mesh_black_blue <<< as defined in step 1 and used by meshMeshAppearance in appearances[]
index: <index of item in array>
Importing textured items (and creating an AMM prop set in the process)
Summary
Created by @manavortex
Published February 11 2023
This guide will walk you through importing 3d objects into Cyberpunk 2077, which can then be spawned via Appearance Menu Mod.
It uses the following versions:
Cyberpunk 2077 game version 1.6.1 (DLSS)
>= 8.8.1
(version 2.0.2, but pretty much any version will do)
Level of difficulty: You know how to read.
If you only want to know how to apply Cyberpunk materials to parts of your mesh, check "" below.
For a guide about changing materials, check
If you want to understand how material loading works, check the .
You can find explanation and documentation about materials .
Where to find models
You can find many free 3d models across the web.
For game design or rendering, usually textured:
For 3d printing, usually not textured:
You can also search Google for "thing_I_want free 3d model" or "thing_I_want free <format> file" (<format> = STL, OBJ, FBX), or check or the pages on .
Setting up the project
This section is already covered in the guide for , using the source folder variant, or directly download and extract it into your Wolvenkit project.
Optional: Complete the section from the custom props guide, or alter one of the two existing template items.
This guide will assume that you are editing template_no_variants.mesh, as our focus is on mesh import and material assignment. You can delete the folder amm_props\template, since we won't need it.
The first step to importing a mesh is exporting a mesh, since the import needs to overwrite already-existing files.
In Wolvenkit, open the Export Tool (Tools -> Export), and export everything in your folder: the mesh(es) you want to use and the textures.
This will create the following files under the project's raw section:
Step 3: Importing
Optional: Download - I have prepared it for import. It contains both the original glb from sketchfab and the version I prepared for import:
After you have exported the files from Wolvenkit, use the Windows Explorer to overwrite them with the files that you want to bring into the game. They need to have the same names!
Use baseball_02_d.png, as the other one doesn't have transparency.
The import/export process has . There's also a if you're stuck.
Now that all files are in place, open the Import Tool in Wolvenkit (Tools -> Import), and re-import the files. The Wolvenkit preview should show your new imported mesh.
The next step is to to the object.
Wait, where did Step 2 go?
Good! You've been paying attention!
Step 2 is to prepare the downloaded 3d asset to work with Cyberpunk. Depending on your target file, this can be any level of difficult, but the steps below should be enough for most meshes.
Step 2: Processing the downloaded mesh
All of these steps will be taking place in Blender.
The files you download will have all sorts of structures. In the end, you want to end up with a flat hierarchy of object(s):
LOD_1 indicates the level of detail, whereas the submeshes need to be numbered explicitly (or Wolvenkit will number them for you, which messes up the material assignments. You'll want to avoid this).
The easiest way to get there is by running (source: manavortex's github) in Blender after import:
- Switch to the "Scripting" perspective
- Create a new file
- Paste the contents of the script into the file
- Hit the "play" button
A mesh that I imported with 9 simultaneously visible submeshes made the game crash with a likelihood of ~ 80% when I spawned or de-spawned it (scaling was fine). You might want to create two separate files if you have too many objects.
Since it clearly works for e.g. the body mesh, make of this what you will.
Submesh by material
Sketchfab meshes often use dozens of submeshes, but we want to split by cyberpunk's logic:
Every submesh can have its own material assigned in the mesh, and can be hidden or displayed via chunkmask. This is how you assign Cyberpunk materials to parts of your imported asset.
I've always found it easiest to join all meshes into a single one:
In Object Mode, select all meshes but one
Select the last mesh
Press Ctrl+J to merge everything into that last mesh
This will let us assign one material per "section" of your mesh.
Especially when exporting meshes from sketchfab, there are often duplicate materials. Feel free to fuse everything that you want to e.g. slap black plastic on.
Splitting off submeshes (mildly advanced)
I usually join everything into one object that'll have the same material in the game, unless I want to hide parts of it to make variants.
But the opposite is also possible: You can split off parts from the original object, putting them into their own submeshes. I have done this in the : the seams will get a texture, and the rest of the mesh will be coloured with a cyberpunk material.
You do that by changing into the edit mode, then selecting everything that you want to split off ("Select Linked" or "Select More" is your friend here), and splitting it (P -> Split Selection).
You can duplicate your selection first (Shift+D, ESC)
Now, switch back to Object mode and select your new mesh before going back to Edit Mode. Make sure to your new mesh, so that it is slightly above the surface of the old one - otherwise, you will have two things in the same place, which will look like shit.
Make sure to , or run again.
Unparent
You can complete unparent + apply transformations via : Switch to the Blender "Scripting" perspective, create a new file, paste the code from mana's github, and click the play button.
Select everything (click the viewport and press A), then unparent the objects by pressing Alt+P. Select "Clear and Keep Transformation".
Applying transformations
Since those are saved relatively and Wolvenkit will ignore them, your objects might end up larger or smaler than you expect them, or be in different places.
Select your objects in the viewport, then press Ctrl+A and choose "All Transforms".
Scale it
Scale your 3d object in Blender until it has the size you expect it to be in-game.
If you do this in the object mode, you need to afterwards. Alternatively, you can scale the vertices in edit mode.
If your mesh still scales weirdly in Wolvenkit / the game, you can create a new mesh in Blender, delete its vertices in edit mode, and then join your original object on top of it.
If you need a reference object, you can use this from my .
Origin
Keep in mind that your prop will rotate around the world origin, and position it accordingly.
Once you are done, import the glb file over your original mesh (you can consult the below).
Your import has been successful when the preview in Wolvenkit changes (you might have to select another file first).
Material assignments
For an overview of materials that you might want to use for something, check .
You can check a material's properties by opening the file inside of Wolvenkit and checking the last entry of the "parameters" array, or search for "files using this" and looking at how they're doing things.
Setting up our materials
You can find explanation and documentation about materials .
Add a new material entry
Select the entry "texture" inside the array materialEntries
Duplicate it
Select the new entry
Assign the submesh
Open the array appearances, select the first appearance (default) and select the array chunkMaterials. Create a new entry, or duplicate the existing one. Make sure the list order shows
Transfer the material
Open baseball_textured.mesh
Find the CMaterialInstance "texture" inside localMaterialBuffer.materials.
Select it, then copy it via right-click (Copy (Selection) from Array/Buffer)
Change the material parameters
Let's update paths and values. Still inside of localMaterialBuffer.materials, change the following properties:
Material
name of KeyValuePair
value
For the leather texture, I've just picked a random mlsetup from the game files (which I found by searching Wolvenkit for leather > .mlsetup). If you want to make your own mlsetups, see .
Save the mesh. You can check the "Mesh Preview" tab if the materials show up. If the mesh turns invisible, you'll want to double-check your paths, though!
Let's set up our entity file
Open the baseball's entity file (your_name\your_prop_pack\baseball\baseball.ent).
Open the components array.
Select the second component (amm_prop_slot1
If you have more than four mesh files assigned to your entity's components, the prop will no longer be scaleable (as of AMM 2.0.2). You can get around this limitation by making meshes with more submeshes instead of individual files.
AMM: Let's set up our lua file
Open the lua file under resources\bin\x64\plugins\cyber_engine_tweaks\mods\AppearanceMenuMod\Collabs\Custom Props\your_prop_pack.lua.
Set modder to your name and unique_identifier to anything, e.g. your_name_your_props. Now, adjust the first entry in the "props" list to point to your entity file:
The "path" parameter is the relative path to your entity file, but every backslash has to be doubled.
"name" is what you'll search for in AMM. "distanceFromGround" is pretty self-explanatory, but I prefer it if my objects are floating.
Save the lua file, install your mod, and launch the game. Time to test!
Material assignments
For an explanation how materials are assigned to a mesh, check - this guide will just tell you what to do.
You can copy entire materials between meshes: select one, right-click, and pick one of the "copy from…" entries.
Open template_no_variants_textured.mesh in WKit. All of the following operations will take place in that file.
Adjust your chunkMaterials
Open appearances/default/chunkMaterials. You need to have one per submesh.
For a more detailed explanation/guide, see the next section. If you don't care, you can skip straight to the next section and fix up the .
Explanation:
chunkMaterials are where you assign materials by submeshes. The identifier here is the name.
Before changes, the first (and only) submesh will use the material mat_textured. Our newly imported mesh (the baseball) has two.
Add a new chunkMaterial to the array by either
right-click the existing chunkMaterial and select duplicate
select the array chunkMaterials and then click the yellow (+) button int he side panel
then change the name of the first entry to mat_ingame:
You can name your materials whatever you like, as long as you stick to the following rules:
You need one chunk material per submesh
chunkMaterials needs to be
Material entries
Find the array materialEntries at the root level of the mesh and open it. It will have two entries:
Select the second entry and change its name to the one from your chunkMaterial (mat_ingame). Numerical order does not matter here.
Explanation:
MaterialEntries are a lookup map between the material names in the chunkMaterials and the actual materials (see for an explanation). You can have local or external materials or a mix of both; check for an explanation.
Now, we adjust the materials — we'll just change a few properties to show you how it works, and then you can go play.
For another guide on how to edit materials in detail, check
Setting up the materials
Find the array localMaterialBuffer/materials and open it. It contains two materials. Wolvenkit will display the names corresponding to the so you can see which is which.
For an explanation of material parameters, see .
The first one, mat_textured, is the one that we will use for the seams. If you imported your textures by overwriting the original export, you shouldn't need to do anything here.
Instead, we will change the second material, mat_ingame.
Re-using an mlsetup
If you rather want to make your own mlsetups, see .
Select mat_ingame
Expand the material and its values array
Delete the parameter MultilayerMask
Make it gold, baby!
Select mat_ingame
Delete all parameters from the values array
Set the baseMaterial to base\environment\decoration\containers\cases\coffin\textures\m_z_gold.mi
The possibilities are basically endless, so go and explore them already! For a nifty list with materials to get you started, check .
For a guide on creating AMM props, see .
Troubleshooting
This section will only cover troubleshooting steps for this guide. For general 3d model troubleshooting (including import errors), see .
My prop doesn't spawn and AMM won't target it!
AMM can't find your .ent file. Check the paths in the lua.
My prop is invisible (but AMM targets it)!
This can be one of the following issues:
the path from .ent to .mesh is wrong
the mesh appearance in the .ent file can't be found (check spelling in both .ent and .mesh)
the mesh appearances's chunk materials can't be found (check spelling in the .mesh, both in the chunkMaterial assignments and the CMaterialInstance in localMaterialBuffer.materials)
If that doesn't help as well, try assigning a default game material (search for anything ending in .mt and put the path in your material's baseMaterial.DepotPath).
Try assigning a default game material by searching for
My prop is all over the place / too big / too small
Check the in Blender and make sure that you have .
I don't have a normal map texture, but my import looks shit without one
Use engine\textures\editor\normal.xbm
Some of my props are much "lighter" than others!
These ones will have a blue normal map as opposed to a yellow one. Invert the blue normal texture before importing it..
Change the mesh -> depotPath to the path of your baseball mesh (your_name\your_prop_pack\baseball\baseball_ml.mesh).
Leave meshAppearance on default, unless your mesh has multiple appearances: This is where you select which entry in the mesh's appearance array will be used.
Delete the other amm_prop_slot components. (These are where you would add more mesh files to your prop - but keeping them makes your prop be full of glowing cubes).
Save the entity file.
in the same order
as your submeshes — if you're uncertain, check the "Mesh Preview" tab
The names should be lower case without spaces and special characters. Numbers are fine!
GlobalNormal: Re-use the same as your textured material (by default: tutorial\amm_props\template\textures\template_01_n.xbm)
MultilayerSetup: Set it to base\characters\garment\gang_nomad\legs\l1_021_pants__cargo_computer\textures\leather_red_basic.mlsetup
Also not a moon
Check your mesh's face orientation in Blender — inside-facing meshes are usually transparent.
Check your mesh's chunkmasks in the .ent file: maybe you have accidentally hidden a submesh?
No more replacers! Add your own gear with TweakXL and ArchiveXL
Summary
Created by @manavortex
Published November 04 2022
This guide will walk you through adding your own items to Cyberpunk 2077, which can then be spawned via console.
It uses the following versions:
Cyberpunk 2077 game version 1.6.2 Hotfix
>= 8.9.0
1.1.4
Assumed skill level:
You should be able to find your way around WolvenKit, but I aim to keep this as noob-friendly as possible.
For experienced modders
I have repeatedly observed that newbies are fine with this guide, while people who know how to mod are not. Watch out for boxes like this one to avoid those pitfalls.
The guide was created after reading and being left with a bunch of question marks. To get a deeper understanding, refer to the initial guide and follow the linked resources or consult ArchiveXL's .
To troubleshoot your ArchiveXL mods, you can make use of the FileValidation in Wolvenkit >= 8.9.1. As of Jul 22nd that isn't yet released, but you can download a (for example , as it's pretty stable).
There is a new way of connecting your files: . There is no detailed guide yet, but if you want to create lots of options, then you will definitely want to check out this approach, as it cuts down your file structure overhead by virtually eliminating the root entity and .app file.
Grab the example files
Create a new Wolvenkit project
Download the prepared files from and extract them to the root of your new project (overwriting the "source" folder)
If you would rather start from scratch: Check the detailed instructions .
Understanding of the file structure is not required as long as you follow the guide to the letter, but if you want it anyway, see the sub-page.
⚠ Do not edit those files outside of WolvenKit, and whatever you do, do not let Microsoft Excel touch the clothing.csv! ⚠
You should now have the following files:
Start the game
Wait, am I not supposed to do anything first??
Actually, no! This is how you later debug your custom items — by packing your project and checking that everything works in-game. So we're starting with a dry run here.
Press "Install and Launch" in WolvenKit. This will do the following things:
Copy all supported file entries from source to their destination under packed, overwriting older files (but not removing files that you renamed!)
Copy all files under packed into your game directory, again overwriting older files
You should now see your the tutorial item. If not, consult the section below, or retrace your steps and make sure that everything works before proceeding to the step below.
Great! You added items! Now what?
You've successfully pushed a button and everything worked, but so far, you haven't done anything. If you're okay with this, then you're done now.
To start changing the existing files, check the page for "Making Changes" headers.
Otherwise, you will want to complete one or more of the following steps:
add than a torso item
Add more
Add for different genders or different camera modes
Diagram
This is how everything connects. Looks pretty scary, but is actually simple: whenever you want to rename or repath something, make sure that you catch both ends of the arrow.
You can find a breakdown-by-entry on the .
With ArchiveXL >= 1.5, there is a new way of making these connections, saving most of the work of making many variants. You can still complete this guide and then see the documentation for dynamic loading .
If you want to do more than 5 variants (for both body genders and camera modes), that approach is strongly recommended. Since there isn't a detailed guide yet, you can find us on in the #archive-xl channel.
Adding an appearance (example: blackblue)
Before you add an appearance, make sure that your item is loading up correctly and looking as expected. If you have to debug, you will have to look through every appearance you made!
For experienced modders: This includes you! :)
If you would rather have a step-by-step guide for a gendered variant, see .
To add an appearance, you will have to touch the following files:
*.yaml: Adding an entry
appearance.app: Adding a mapping between rootentity and mesh's appearance
rootentity.ent: Adding a mapping between yaml's appearance and app's appearance
For a diagram of how everything connects, go . To follow the
Step 1: Register it in your *.yaml
Duplicate the entire appearance block for an already working item.
⚠Mind the indent!
Change the first line to a unique name like Items.my_custom_shirt_blueblack
Set the new appearance name for the rootentity.ent
The total entry should look like this:
Step 2: Add it to the rootentity.ent
Find the step-by-step guide in the on the "" page.
If you want to add a , make sure to add the DynamicAppearance tag here.
Step 3: Add it to my_custom_shirt.app
Find the step-by-step guide in the on the "" page
Step 4: Add it to the .mesh
This tutorial assumes you already know how to . Quick reminder about the mlsetup:
Export it to json
edit the mlsetup.json with the
Import it back
Find the step-by-step guide in the on the "" page
Test it
Now, log into the game and spawn the item variant. The name is the header you defined in the yaml file, in this case
Adding a Male Instance
This part of the tutorial isn't fully up-to-date with the overhauled file structure yet, so keep that in mind when studying the screenshots.
Also, this part is super easy to follow and even if you make a mistake, fixing it won't be a problem. But hey, you've put in a lot of work and made great progress, so why not take a sec and back up your project files? Better safe than sorry, right?
Before we proceed with the tutorial, it's important to address a common issue you might have encountered while creating your mod.
If you've tested the mod on a Male V, you might have noticed some weird glitches like mesh clipping or wonky shapes.
You see, we've been using a mesh designed specifically for Female V, and that's why we've been running into some roadblocks. But don't worry, we're here to help you overcome this challenge!
Preparing the mesh file for the male variant
To fix this issue, we'll need a mesh that's compatible with Male V.
In the interest of keeping things simple, we've found just the mesh for you! It's called t1_024_ma_tshirt__sweater.mesh and it can be found in the base\characters\garment\citizen_casual\torso\t1_024_tshirt__sweater directory.
If you plan on using other meshes for your mod, ensure that it has ma or pma in its name.
Keep in mind that some ma meshes may still have clipping issues when paired with certain types of clothing, while pma meshes are specifically designed for V and don't have this problem.
Now, add the file to your project, move it to the tutorial\torso\my_custom_shirt\ folder and rename it from t1_024_ma_tshirt__sweater.mesh to my_mesh_m.mesh.
Next, follow the steps you used for the original my_mesh.mesh by removing any unnecessary entries and adjusting the indices.
To avoid any issues, it's crucial to pay close attention to this step and double-check that the correct materials are present in the localMaterialBuffer and materialEntries, and that the indices are adjusted correctly.
This will ensure that your mod works as intended without any glitches or errors. If you need a refresher, to return to that section.
Creating a .ent File for Your Custom Mesh
It's time to set up the .ent file for our mesh. Don't worry, it's easy!
Start by making a copy of the mesh_entity.ent file that you previously created for the female version by duplicating it, and rename it to mesh_entity_m.ent.
Inside the mesh_entity_m.ent file, find the first component of the type entGarmentSkinnedMeshComponent. Set the following values:
Edit the yourModName.yaml
Inside the yourModName.yaml file set the appearanceSuffixes array to itemsFactoryAppearanceSuffix.Gender
If you are unclear about why this step was taken, we recommend !
Edit the rootentity.ent
Find the array appearances.
Expand the first entry.
Append &Female to the name attribute. This will change the name from appearance_root_entity_white_red
Edit the appearance.app
Find the array appearances
Duplicate the first entry to create a new one and expand it
Set the name attribute to my_shirt_m
Testing the mod
To test your mod, it's important to ensure that it works correctly for both male and female V. This means you'll need to have two separate save files, one for male V and one for female V, unless you're using a mod that allows you to quickly switch between them.
Test your mod independently for both cases by loading the appropriate save file and checking that the mod is working as intended. To spawn and equip your item, use the command specified in your YAML file.
Consider reviewing the guide to ensure that all steps have been followed correctly and that the values have been set appropriately. Ensure that the mesh is compatible with the male variant of V. If errors persist, review the for further assistance.
The final touches
If everything is working: Congratulations! You have successfully made a mod!
But before you can share it, you need to do one last thing, which is changing the file structure. Otherwise, everyone will overwrite the same tutorial files, and only one of those mods will work.
You can find a full guide on how to do that .
Troubleshooting
The easiest way to spot what's wrong is to use Wolvenkit's new FileValidation feature, which will print warnings and errors to the log file for you, starting at version >= 8.9.1.
First of all, check the logs for errors including the name of your mod:
red4ext/plugins/ArchiveXL/ArchiveXL.log
red4ext/plugins/TweakXL/TweakXL.log
ArchiveXL added clipping!
You have read right past those warning boxes telling you about . Make sure that you add them back.
My item warps weirdly
... deforms incorrectly, or is a puddle on the floor?
Most likely, you have ignored the when picking your mesh_entity.ent: Make sure that you're using an entity file that corresponds with the slot that you are trying to replace (e.g. if your item is a pair of shoes, you need an entity file from base\characters\garment\player_equipment\feet).
If you are here because of a link from a different guide:
You can find out which entity file your item uses by right-clicking on your mesh and selecting "find files using this". Add the .ent file to the list and open it in WolvenKit. Then, of the "components" array with those of an .ent file from the correct folder — don't forget to change the path to your mesh again!
I spawn my item, but it's not added to my inventory!
Before you start digging into your file structure, check if there are any leftover yaml files from earlier versions/deploys in your tweaks directory. Do a full text search in e.g. Notepad++ in any files in the folder with the name of the item you want to spawn.
If no additional yaml files are messing things up, then the error is somewhere in the first part of the chain and relatively easy to fix:
Check the following places:
yourmodname.archive.xl:
Is the indentation correct, as shown in the picture?
Did you make any typos?
My item shows empty text instead of name/description!
Something went wrong with your json file:
If there are no errors in any of the log files, check the following places:
yourmodname.archive.xl:
Does the key localization - onscreens - en-us exist?
The item spawns, but…
Congratulations, you've made it into the right half of the diagram! The error will be somewhere here:
can help you catch the error.
If you set your mesh_entity.ent to point at a vanilla mesh, you can rule out your custom mesh and .mlsetup as a source of errors. Original game meshes will always have a working default appearance and will thus always be displayed!
The game crashes!
That means the chain is working, but something isn't loaded correctly. That's good! Check the following files:
appearance.app: Check the partsValues and partsOverrides entries. They need to point at the mesh_entity.ent, not at the mesh.
mesh_entity.ent: Does the component
If the default mesh is displayed correctly, then we have narrowed down the problem.
If the default mesh is not displayed correctly, then there's an issue between the root_entity and your .app file, or in the .app file's internal logic.
Troubleshooting a mesh
For more detailed error handling, check the sections below, or check .
ℹ In the "Mesh Preview" tab of your mesh, you can "Generate Materials for Appearance". If the correct colours show up, you can at least rule out that the error is in the .*mesh or its material.
Make sure that you have the same number of entries in materialEntries and localMaterialBuffer.materials .
Go through the CMaterialInstances in localMaterialBuffer.materials.
If none of that helps, I suggest
doing a gdb export
throwing away your mesh (don't close the WKit tab yet), falling back to the original one
doing a gdb import
My mesh is black and shiny!
Congratulations, this is about the easiest-to-resolve error that you could've had. Your mesh is loaded correctly, there is only a problem with the rendered material.
Check your mesh file:
Check the connection between appearance, materialEntry and localMaterial.CMaterialInstance. Are the names correct?
Go through the CMaterialInstances in localMaterialBuffer.materials.
My mesh has the wrong appearance!
Either an appearance is incorrectly selected, or it is incorrectly resolved. Check the following places for copy-paste/duplication mistakes:
yourModName.yaml - is the appearanceName correct, or did you forget to change it?
rootentity.ent - does the name corresponding to the field above point to the appearanceName with the right name in the right appearance file?
appearance.app - does the appearance's partOverride set the correct appearance in the componentsOverride?
Now, check the mesh file (close and re-open it to make everything refresh):
appearance - does it use the correctly named material?
materialEntries - is the index correct, or is it pointing at the index of the actually displayed material?
localMaterialBuffer - does the CMaterialInstance use the correct .mlsetup file?
Finally, check the .mlsetup: does it actually use different colours, or is it just a duplicate?
My mesh is invisible!
Here we go. This is the big one, and it's Not Fun. The error can be anywhere between the yaml and the mesh. You can rule out one of the files with the following question:
Does the glitching stop after <10 seconds?
If not: the appearance can't be resolved - ignore the .mesh
If yes: the appearance is resolved, but can't be displayed - ignore the .yaml
The fastest way to find your error is Wolvenkit's FileValidation (in version >= 8.9.1). Save the root_entity.ent, and the recursive valudation will check the whole chain for errors and print them to the log files for you.
As of July 2023, you can download the right version from the page (for example , as it's pretty stable).
ℹIf the appearance is resolved, but not displayed (short glitch), the first thing you should do is to change the path in the mesh_entity.ent to one of the game's default meshes. This will rule out errors on your part. (Yes, even if your mesh worked in another mod. No, I'm not speaking from experience, why do you ask?)
If the hint above doesn't solve it, proceed to troubleshoot in the same way as "My mesh has the wrong appearance!" above.
My garment tucks into/under other garments incorrectly
That's due to - check the link to learn more.
Visual tags aren't working!
If you are hiding components via visual tags, these tags have to go into the appearance file rather than the root entity.
I can't find anything, kill me now
Time to restore your files one by one to the last working backup and restart from there.
Don't delete them, keep them in a different folder - you will be able to copy a lot of stuff over.
By right-clicking on a tab title, you can move it to a new document group for easier copying.
For lookups in your translation file (translation_strings.json): Change the values of displayName and localizedDescription to the corresponding secondary keys in the json file.
This is optional.
ℹIf you make any mistakes here, the worst that happens is an empty string.
Now, add a new entrie to your .json file:
If you decide to create your own mesh, be sure to fix any potential issues before using it in your mod. Check out our3D modeling guidefor helpful tips and resources.
Remember, a little extra effort in the beginning can save you a lot of headaches down the line!
to
appearance_root_entity_white_red&Female
.
Duplicate the first (and only) entry to create a new one.
Expand the newly create entry
Set name : appearance_root_entity_white_red&Male.
Set appearanceName : my_shirt_m.
(as defined in the root_entity)
Find the array partsValues
Set the resource path to your new male mesh entity file:
resource : tutorial\myshirt\mesh_entity_m.ent
Find the array partsOverrides
Find the array componentOverrides
Set componentName : my_shirt_m
Set partResources : tutorial\torso\my_custom_shirt\mesh_entity_m.ent
my_tshirt_factory.csv:
Is there an entry where the first value matches the entityName from the yaml (my_tshirt in the picture above)?
Without leading or trailing spaces?
Does the second value of that entry have the correct root entity path?
(tutorial\myshirt\rootentity.ent in the picture above)
If you moved the root_entity.ent, you have to adjust this entry.
rootentity.ent:
Do you have an appearance matching your item by name?
Without leading or trailing spaces?
Are you using any ? Are you using the correct ones?
Try setting an empty suffix array in the .yaml, just to see if that works:
appearanceSuffixes: [ ]
Try creating a fall-back entry without any suffixes in the root_entity.
Is the indentation correct, as shown in the picture?
Does it point at the correct file (tutorial\ops\translation_strings.json), or did you rename or move it?
Did you make any typos?
yourModName.yaml:
Is the spelling for the key you defined after displayName and localizedDescription identical to the one in the json file?
translation_strings.json:
Is the spelling of the key defined in yaml's displayName and localizedDescription identical?
Did you set the femaleVariant (default)?
Are you using quotation marks? If so, switch to singlequotes!
If the field for primary_key is not empty, then its value must be unique (probably on a per-file basis). Just number them.
entry point to a valid mesh? Try it with a default mesh as detailed above.
Make sure that the files you're loading exist.
Make sure that you don't load a mlmask under a key for an mlsetup or vice versa.
replacing the arrays appearances, localMaterialBuffer.materials and materialEntries with those from your previous mesh.
Make sure that the files you're loading exist.
Make sure that you don't load a mlmask under a key for an mlsetup or vice versa.
localizationPersistenceOnScreenEntry - []
femaleVariant: my item - now in black and blue
maleVariant:
secondaryKey: my_shirt_localization_name_black_blue
mesh: DepotPath: tutorial\torso\my_custom_shirt\my_mesh_m.mesh << path to your mesh
Flags: Default << leave this alone
name: my_shirt_m << this corresponds to the appearanceOverride in appearance.app